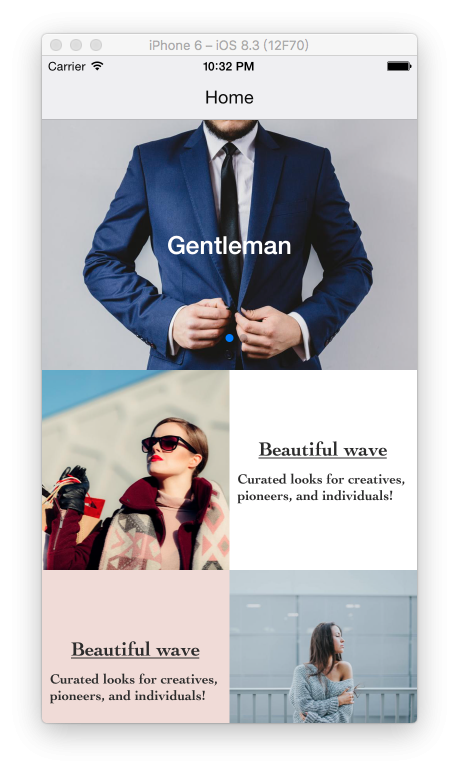
今天我們要來刻一個簡單的卡片 UI,可以簡單的搭配 ScrollView 或是 ListView 就能完成漂亮的首頁了,主要還是用到了 FlexBox 來排版可以參考 React Natvie FlexBox 的排版,這是今天預計完成的效果。
因為程式碼有點長我直接放 GitHub, Card.js
我們可以看到,這個卡片 Component 是固定高度的,這樣子能統一每個區塊的大小
container: {
  height: 200,
},
然後能使用的 props 主要有 title、subTitle、image、imagePosition、backgroundColor
這邊有個有趣的地方,有個 imagePosition 可以決定圖片的位置,那這是怎麼辦到的呢?
const Card = (props) => {
  let flexDirection = props.imagePosition === 'left' ? 'row' : 'row-reverse';
  return(
    <View style={[styles.container, { flexDirection }]}>
      <Image source={props.image} style={styles.img} />
      <View style={[styles.desc, { backgroundColor: props.backgroundColor }]}>
        <Text style={styles.title}>{props.title}</Text>
        <Text style={styles.subTitle}>{props.subTitle}</Text>
      </View>
    </View>
  );
}
看主要 render 的部分,我們在上方有用 flexDirection, flexbox 章節有介紹到 flexDirection 可以設定內容物的排列方式,除了 column 跟 row 外,還有一個參數 row-reverse 可以讓內容物反過來呈現,這樣就能達到更改圖片左右的效果摟。
最後我們把我們寫好的 import Card.js 到 Home.js 然後使用
<Card
  title={'Beautiful wave'}
  image={{ uri: 'https://d2lm6fxwu08ot6.cloudfront.net/img-thumbs/960w/B23METEB9K.jpg' }}
  subTitle={'Curated looks for creatives, pioneers, and individuals!'}
  imagePosition={'right'}
/>
就設定好一張卡片摟,外面再包一層 listView 漂亮的首頁就完成摟,而且圖片可以調整位置,不會整個版面死板板的。
有問題歡迎來 React Native Taiwan 問喔
創科資訊
