Deploy a vCenter HA Cluster
接續前一章節:VMware vSphere 6.5 Enabling vCenter Server HA(VCHA) Stage 1
前置作業已經完成:Configure the Private Network(設定vCenter HA專用網路設定)
接下來就開始正式架設vCenter Server High Availability高可用性保護架構。
(因硬體主機資源有限,此實作範例使用一台ESXi主機來驗證模擬vCenter HA架構)
實作說明
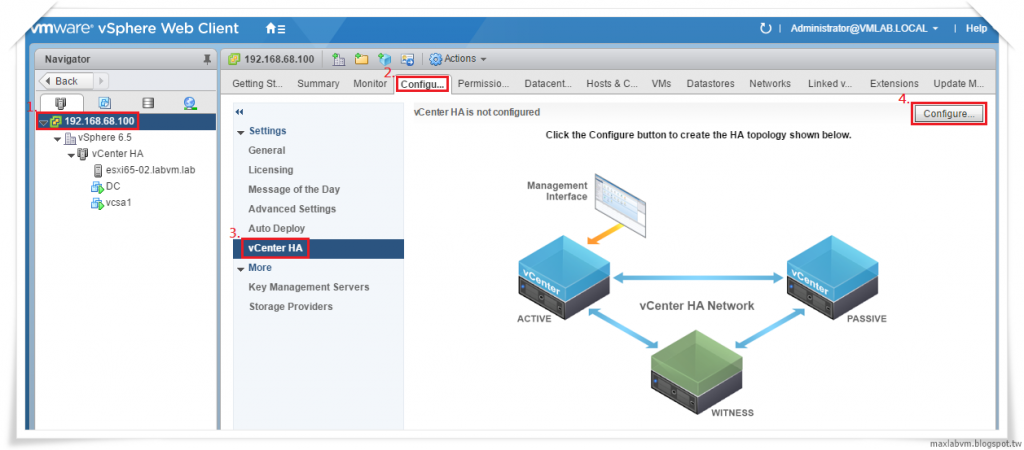
Edit the vCenter HA Cluster Configuration. 編輯設定vCenter HA叢集
請點選:ESXi Host➤Configure設定➤vCenter Server HA➤Configure設定
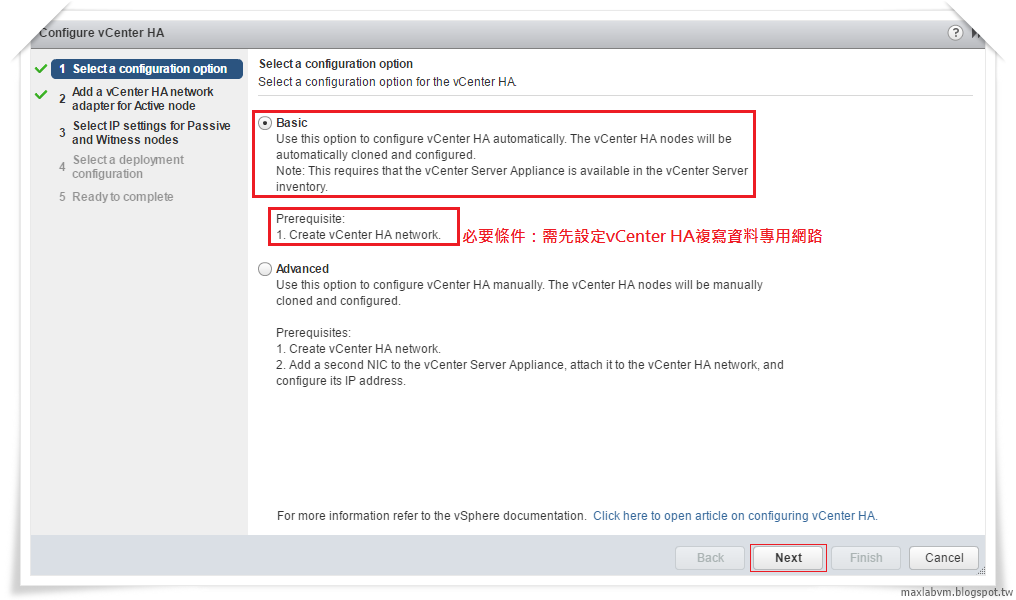
1.Select Configuration option➤Basic
Use thisoption to configure vCenter HA automatically.
The vCenter HA modes will be automatically cloned and configured.
請選擇Basic基本設定模式,系統會自動複製和設定vCenter HA高可用性保護解決架構。
選擇完成請點選Next,繼續下一步。
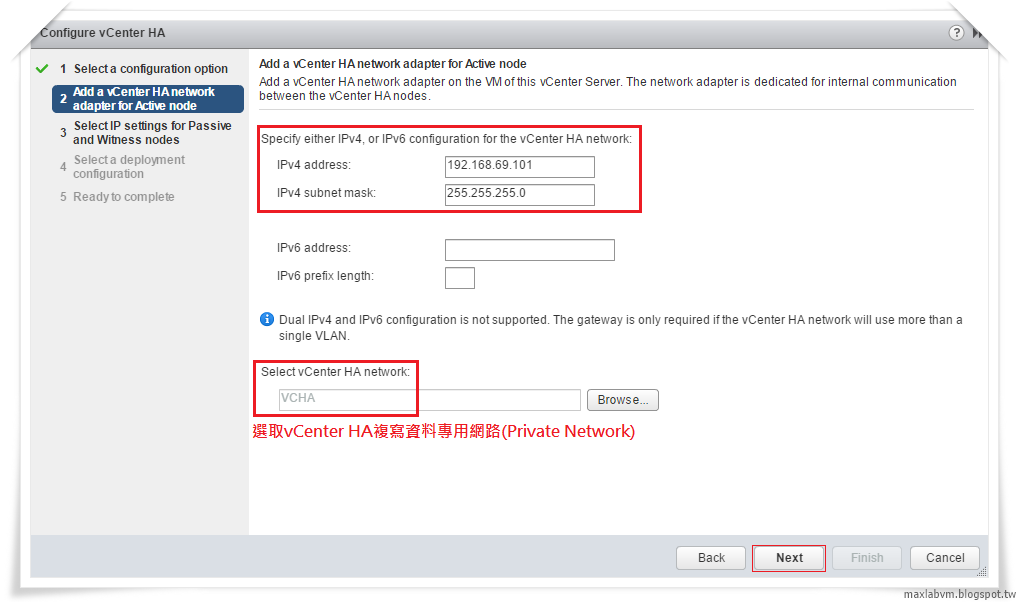
2.Add vCenter HA network adapter for Active node
準備為vCenter Server虛擬機器新增虛vCenter HA網路介面卡,
專用於各節點之間內部通訊。
請輸入Active node主動節點網路位址:IP Address
及選取vCenter HA複寫資料專用網路:VCHA
選擇完成請點選Next,繼續下一步。
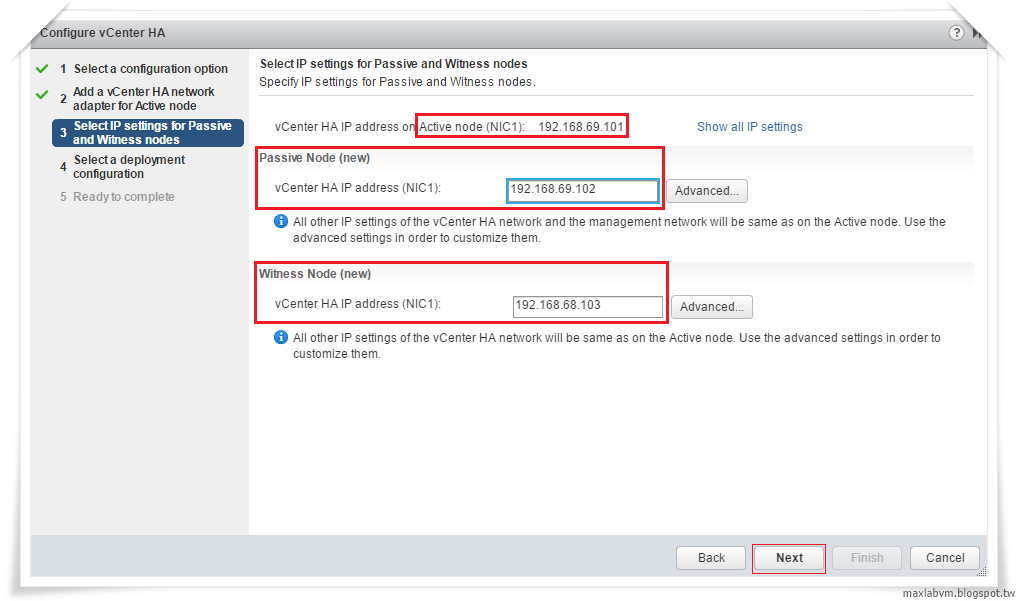
3.Select IP settings for Passive and Witness nodes
請選擇:Passive Node被動節點、Witness Node見證節點網路IP Address設定
(vCenter HA運作IP位址必須與VM管理網路分開在不同的子網路上)
範例參考:
(1)VMware vSphere Web Client IP Address:192.168.0.1
(2)Active Node vCenter HA IP Address(NIC1):192.168.1.1
(3)Passive Node vCenter HA IP Address(NIC1):192.168.1.2
(4)Witness Node vCenter HA IP Address(NIC1):192.168.1.3
輸入完成請點選Next,繼續下一步。
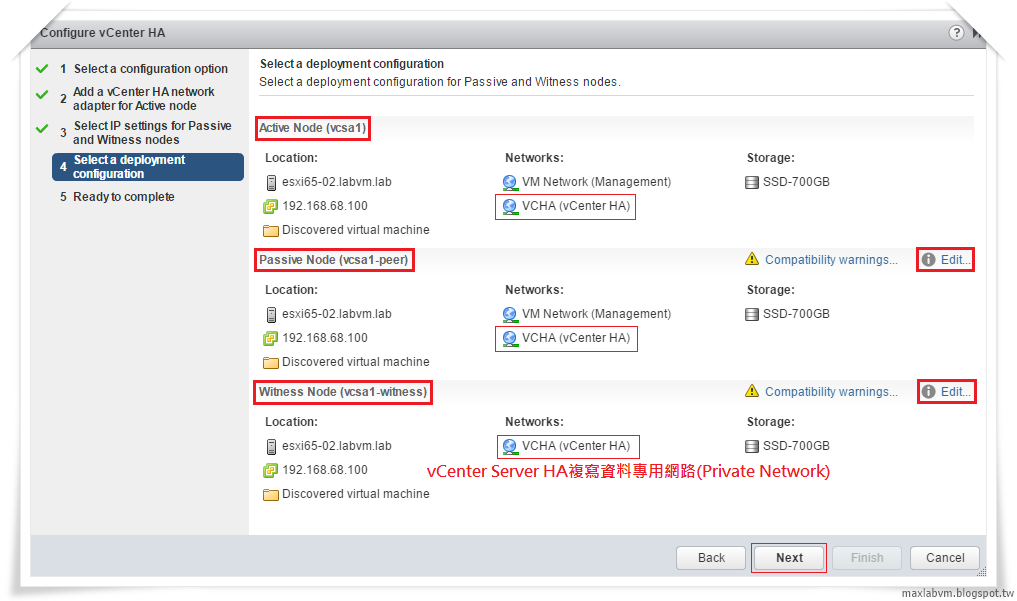
4.Select a deployment configuration for Passive and Witness nodes
請選擇部署:
Active Node主動節點、
Passive Node被動節點、
Witness Node見證節點、
ESXi Host主機系統、網路、儲存位置等資源。
正式上線系統請分開在三台不同ESXi Host主機資源運作,
真正達到vCenter Server HA系統容錯叢集保護功能。
選擇完成請點選Next,繼續下一步。
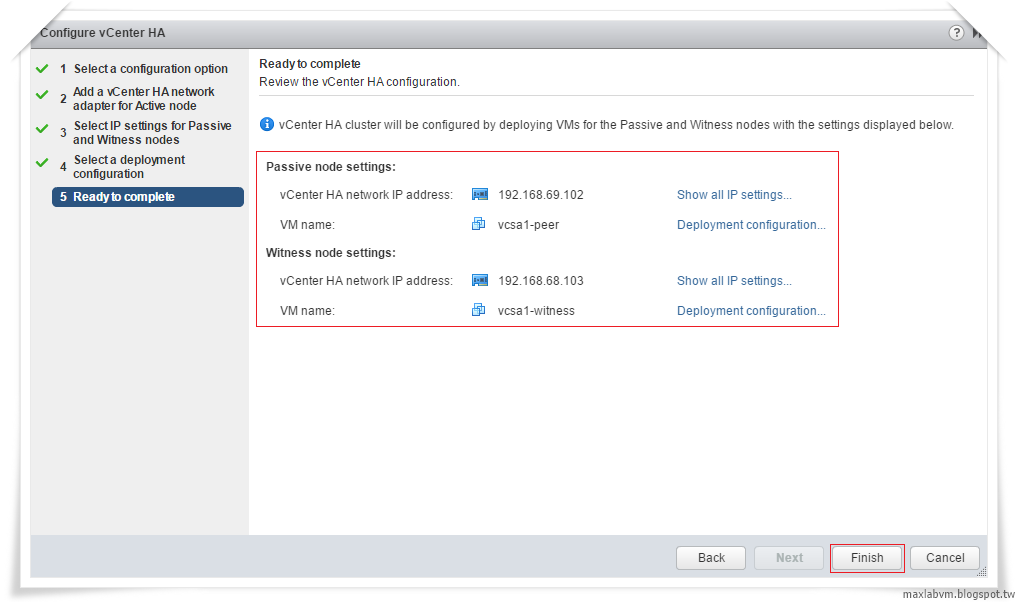
5.Configure vCenter HA Ready to complete.即將完成設定
請確認vCenter Server HA新增Passive Node、Witness Node
節點主機網路設定無誤後,點選Finish完成設定。
6.Deploy a vCenter HA Cluster, please wait...
開始部署vCenter HA 容錯叢集架構,請稍後...
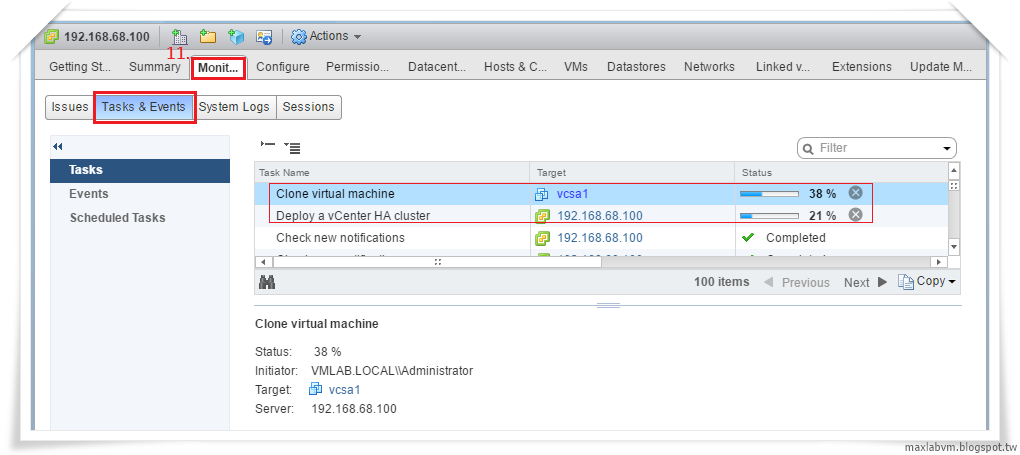
7.Deploy a vCenter HA Cluster, please wait...
畫面左邊可以看到系統即將部署完成Passive Node被動節點、Witness Node見證節點。
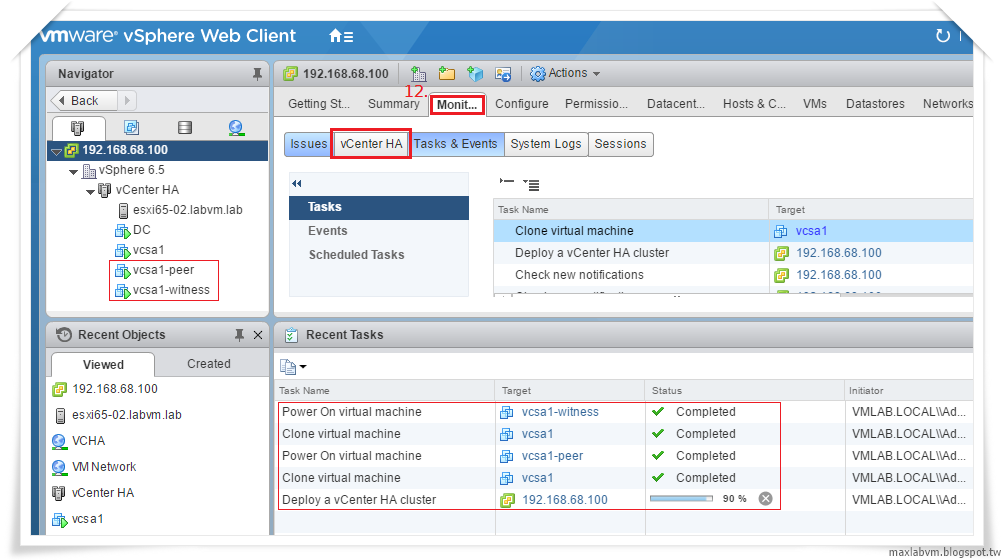
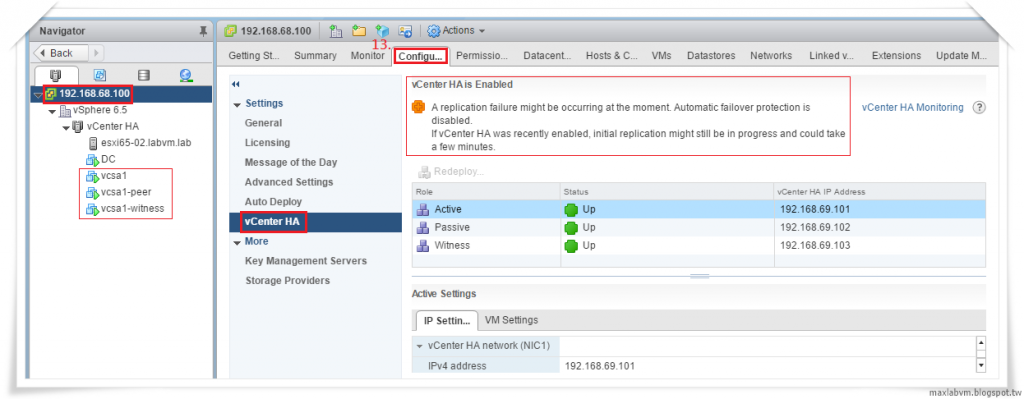
8.vCenter HA is Enabled. If vCenter HA was recently enabled,
initial replication might still be in progress
and could take a few minutes.
因系統剛啟用 vCenter HA,初始複寫可能仍在進行中,
請稍後需要幾分鐘時間。
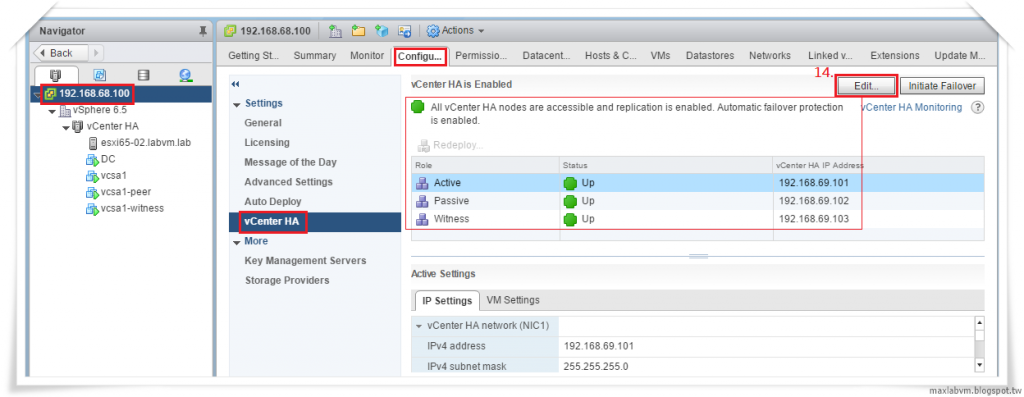
9.All vCenter HA nodes are accessible and replication is enabled.
Automatic fail over protection is enabled.
設定完成,所有vCenter HA 節點均可供存取,
且已啟用複寫、自動容錯移轉保護機制。
內容圖文長,下一章節接續說明:如何驗證啟動vCenter HA自動容錯移轉保護機制。
本文完整章節發佈於:Lab-VM Testing Blog
 max6886

 iThome鐵人賽