今天要建立基本的功能來取代之前純粹demo用途的內容,前面提過我們要建立縮水版的GitHubBrowser,功能為:

由於Retrofit和RecyclerView都是之前講過的東西,所以大部分會看程式帶過而不做個別的說明,今天目的只是跑一次要做的步驟,順便看看MVVM架構下新增功能的過程。
加入Retrofit dependencies:
implementation "com.squareup.retrofit2:retrofit:2.3.0"
implementation "com.squareup.retrofit2:converter-gson:2.3.0"
我們要用的是GitHub API搜尋repository功能,其回傳的json內容長這樣:
{
  "total_count": 40,
  "incomplete_results": false,
  "items": [
    {
      "id": 3081286,
      "name": "Tetris",
      "full_name": "dtrupenn/Tetris",
      "owner": {
        "login": "dtrupenn",
        "id": 872147,
        "avatar_url": "https://secure.gravatar.com/avatar/e7956084e75f239de85d3a31bc172ace?d=https://a248.e.akamai.net/assets.github.com%2Fimages%2Fgravatars%2Fgravatar-user-420.png",
        "gravatar_id": "",
        "url": "https://api.github.com/users/dtrupenn",
        "received_events_url": "https://api.github.com/users/dtrupenn/received_events",
        "type": "User"
      },
      "private": false,
      "html_url": "https://github.com/dtrupenn/Tetris",
      "description": "A C implementation of Tetris using Pennsim through LC4",
      "fork": false,
      "url": "https://api.github.com/repos/dtrupenn/Tetris",
      "created_at": "2012-01-01T00:31:50Z",
      "updated_at": "2013-01-05T17:58:47Z",
      "pushed_at": "2012-01-01T00:37:02Z",
      "homepage": "",
      "size": 524,
      "stargazers_count": 1,
      "watchers_count": 1,
      "language": "Assembly",
      "forks_count": 0,
      "open_issues_count": 0,
      "master_branch": "master",
      "default_branch": "master",
      "score": 10.309712
    }
  ]
}
依照上面的Json建立POJO,首先是整個Response的內容
public class RepoSearchResponse {
    @SerializedName("total_count")
    private int total;
    @SerializedName("items")
    private List<Repo> items;

    public int getTotal() {
        return total;
    }

    public void setTotal(int total) {
        this.total = total;
    }

    public List<Repo> getItems() {
        return items;
    }

    public void setItems(List<Repo> items) {
        this.items = items;
    }
}
接著是其中的items
public class Repo {

    public final int id;

    @SerializedName("name")
    @NonNull
    public final String name;

    @SerializedName("full_name")
    public final String fullName;

    @SerializedName("description")
    public final String description;

    @SerializedName("stargazers_count")
    public final int stars;

    @SerializedName("owner")
    @NonNull
    public final Owner owner;

    ...Constructor
}
最後是Repo中的帳號資料Owner
public class Owner {

    @SerializedName("login")
    @NonNull
    public final String login;

    @SerializedName("avatar_url")
    public final String avatarUrl;

    @SerializedName("url")
    public final String url;

    ...Constructor and override equals
}
interface只要一個GET
public interface GithubService {
    @GET("search/repositories")
    Call<RepoSearchResponse> searchRepos(@Query("q") String query);
}
Retrofit client:
public class RetrofitManager {

    private static RetrofitManager mInstance = new RetrofitManager();

    private GithubService githubService;

    private RetrofitManager() {

        Retrofit retrofit = new Retrofit.Builder()
                .baseUrl("https://api.github.com/")
                .addConverterFactory(GsonConverterFactory.create())
                .build();

        githubService = retrofit.create(GithubService.class);
    }

    public GithubService getAPI() {
        return mInstance.githubService;
    }
}
在AndroidManifest加入網路權限:
<uses-permission android:name="android.permission.INTERNET" />
網路功能的建置完成了,接著處理一下Model和ViewModel的運作。
DataModel中用retrofit呼叫API,並跟之前一樣用interface回傳結果:
public class DataModel {

    private GithubService githubService = RetrofitManager.getAPI();

    public void searchRepo(String query, final onDataReadyCallback callback) {
        githubService.searchRepos(query)
                .enqueue(new Callback<RepoSearchResponse>() {
                    @Override
                    public void onResponse(@NonNull Call<RepoSearchResponse> call, @NonNull Response<RepoSearchResponse> response) {
                        callback.onDataReady(response.body().getItems());
                    }

                    @Override
                    public void onFailure(@NonNull Call<RepoSearchResponse> call, @NonNull Throwable t) {
                        // TODO: error handle
                    }
                });
    }

    public interface onDataReadyCallback {
        void onDataReady(List<Repo> data);
    }
}
其中API連線失敗的onFailure之後會用wrapper打包response來處理,目前就先略過。
MainViewModel我們改名成RepoViewModel,LiveData也跟著改名一下:
public class RepoViewModel extends ViewModel {

    public final ObservableBoolean isLoading = new ObservableBoolean(false);

    private final MutableLiveData<List<Repo>> repos = new MutableLiveData<>();

    ...

    LiveData<List<Repo>> getRepos() {
        return repos;
    }

    void searchRepo(String query) {

        isLoading.set(true);

        dataModel.searchRepo(query, new DataModel.onDataReadyCallback() {
            @Override
            public void onDataReady(List<Repo> data) {
                repos.setValue(data);
                isLoading.set(false);
            }
        });
    }
}
到這邊就處理完Model和ViewModel了,在MVVM架構下各角色職責分明,當功能要修改時可以每一層分別處理,個人覺得比MVC在Activity內的各處改好很多。
需要一個TextInputLayout讓使用者輸入關鍵字,以及RecyclerView搭配CardView顯示搜尋結果,先加入dependencies:
implementation "com.android.support:design:27.0.2"
implementation "com.android.support:recyclerview-v7:27.0.2"
implementation "com.android.support:cardview-v7:27.0.2"
用Fragment來顯示UI,首先是layout檔,項目大致如上所述
repo_fragment.xml
<?xml version="1.0" encoding="utf-8"?>
<layout xmlns:android="http://schemas.android.com/apk/res/android"
    xmlns:app="http://schemas.android.com/apk/res-auto"
    xmlns:tools="http://schemas.android.com/tools">

    <data>

        <import type="android.view.View" />

        <variable
            name="viewModel"
            type="ivankuo.com.itbon2018.ui.RepoViewModel" />

    </data>

    <android.support.constraint.ConstraintLayout
        android:layout_width="match_parent"
        android:layout_height="match_parent"
        android:focusableInTouchMode="true">

        <android.support.design.widget.TextInputLayout
            android:id="@+id/textInputLayout"
            android:layout_width="0dp"
            android:layout_height="wrap_content"
            app:layout_constraintBottom_toTopOf="@+id/recyclerView"
            app:layout_constraintEnd_toStartOf="@+id/btnSearch"
            app:layout_constraintStart_toStartOf="parent">

            <android.support.design.widget.TextInputEditText
                android:id="@+id/edtQuery"
                android:layout_width="match_parent"
                android:layout_height="wrap_content"
                android:hint="search repositories" />

        </android.support.design.widget.TextInputLayout>

        <Button
            android:id="@+id/btnSearch"
            android:layout_width="wrap_content"
            android:layout_height="wrap_content"
            android:text="GO"
            app:layout_constraintEnd_toEndOf="parent"
            app:layout_constraintTop_toTopOf="parent" />

        <android.support.v7.widget.RecyclerView
            android:id="@+id/recyclerView"
            android:layout_width="match_parent"
            android:layout_height="match_parent"
            app:layout_constraintBottom_toBottomOf="parent"
            app:layout_constraintEnd_toEndOf="parent"
            app:layout_constraintLeft_toLeftOf="parent"
            app:layout_constraintTop_toBottomOf="@+id/textInputLayout"
            tools:listitem="@layout/repo_item" />

        <ProgressBar
            android:id="@+id/progressBar"
            android:layout_width="wrap_content"
            android:layout_height="wrap_content"
            android:visibility="@{viewModel.isLoading ? View.VISIBLE : View.GONE}"
            app:layout_constraintBottom_toBottomOf="parent"
            app:layout_constraintLeft_toLeftOf="parent"
            app:layout_constraintRight_toRightOf="parent"
            app:layout_constraintTop_toTopOf="parent" />

    </android.support.constraint.ConstraintLayout>
</layout>
(才發現我的package name當初打錯了耶!應該要com.ivanxxx)
Fragment本身,一些設置元件的部分就不貼了節省版面
public class RepoFragment extends Fragment {

    public static final String TAG = "Repo";

    private RepoFragmentBinding binding;

    private GithubViewModelFactory factory = new GithubViewModelFactory();
    private RepoViewModel viewModel;

    private RepoAdapter repoAdapter = new RepoAdapter(new ArrayList<Repo>());

    ...

    @Nullable
    @Override
    public View onCreateView(@NonNull LayoutInflater inflater, @Nullable ViewGroup container, @Nullable Bundle savedInstanceState) {
        binding = RepoFragmentBinding.inflate(inflater, container, false);

        // Setup EditText OnKeyListener
        ...

        binding.btnSearch.setOnClickListener(new View.OnClickListener() {
            @Override
            public void onClick(View view) {
                doSearch();
            }
        });

        binding.recyclerView.setLayoutManager(new LinearLayoutManager(getContext(),
                LinearLayoutManager.VERTICAL, false));
        binding.recyclerView.setAdapter(repoAdapter);

        return binding.getRoot();
    }

    @Override
    public void onActivityCreated(@Nullable Bundle savedInstanceState) {
        super.onActivityCreated(savedInstanceState);
        viewModel = ViewModelProviders.of(this, factory).get(RepoViewModel.class);
        binding.setViewModel(viewModel);
        viewModel.getRepos().observe(this, new Observer<List<Repo>>() {
            @Override
            public void onChanged(@Nullable List<Repo> repos) {
                repoAdapter.swapItems(repos);
            }
        });
    }

    private void doSearch() {
        String query = binding.edtQuery.getText().toString();
        if (TextUtils.isEmpty(query)) {
            repoAdapter.clearItems();
            return;
        }
        viewModel.searchRepo(query);
        dismissKeyboard();
    }

    ...
}
在Fragment中使用Data Binding的話可以在onCreateView使用inflate,並return binding.getRoot()
顯示列表的RepoAdapter,明天會用Data Binding修過,先能動就好:
public class RepoAdapter extends RecyclerView.Adapter<RepoAdapter.RepoViewHolder> {

    private List<Repo> items;

    RepoAdapter(List<Repo> items) {
        this.items = items;
    }

    class RepoViewHolder extends RecyclerView.ViewHolder{

        private RepoItemBinding binding;

        RepoViewHolder(RepoItemBinding binding) {
            super(binding.getRoot());
            this.binding = binding;
        }
    }

    @Override
    public RepoViewHolder onCreateViewHolder(ViewGroup parent, int viewType) {
        LayoutInflater layoutInflater = LayoutInflater.from(parent.getContext());
        RepoItemBinding binding = RepoItemBinding.inflate(layoutInflater, parent, false);
        return new RepoViewHolder(binding);
    }

    @Override
    public void onBindViewHolder(RepoViewHolder holder, int position) {
        Repo repo = items.get(position);
        Glide.with(holder.itemView.getContext())
                .load(repo.owner.avatarUrl)
                .into(holder.binding.ownerAvatar);
        holder.binding.name.setText(repo.fullName);
        holder.binding.desc.setText(repo.description);
        holder.binding.stars.setText(""+repo.stars);
    }

    @Override
    public int getItemCount() {
        return items.size();
    }

    void clearItems() {
        int size = this.items.size();
        this.items.clear();
        notifyItemRangeRemoved(0, size);
    }

    void swapItems(List<Repo> newItems) {
        DiffUtil.DiffResult result = DiffUtil.calculateDiff(new RepoDiffCallback(this.items, newItems));
        this.items.clear();
        this.items.addAll(newItems);
        result.dispatchUpdatesTo(this);
    }

    ...
}
列表的item layout,同樣明天會用Data Binding修過:
<?xml version="1.0" encoding="utf-8"?>
<layout xmlns:android="http://schemas.android.com/apk/res/android"
    xmlns:app="http://schemas.android.com/apk/res-auto"
    xmlns:tools="http://schemas.android.com/tools">

    <android.support.v7.widget.CardView
        android:layout_width="match_parent"
        android:layout_height="wrap_content"
        app:cardUseCompatPadding="true">

        <android.support.constraint.ConstraintLayout
            android:layout_width="match_parent"
            android:layout_height="wrap_content">

            <ImageView
                android:id="@+id/ownerAvatar"
                android:layout_width="48dp"
                android:layout_height="48dp"
                android:layout_marginStart="8dp"
                android:scaleType="fitCenter"
                app:layout_constraintStart_toStartOf="parent"
                app:layout_constraintTop_toTopOf="parent" />

            <TextView
                android:id="@+id/name"
                android:layout_width="0dp"
                android:layout_height="wrap_content"
                android:layout_marginStart="@dimen/default_margin"
                android:layout_marginTop="16dp"
                app:layout_constraintEnd_toStartOf="@+id/stars"
                app:layout_constraintStart_toEndOf="@+id/ownerAvatar"
                app:layout_constraintTop_toTopOf="parent"
                tools:text="repository name" />

            <TextView
                android:id="@+id/desc"
                android:layout_width="0dp"
                android:layout_height="wrap_content"
                android:layout_marginStart="@dimen/default_margin"
                android:layout_marginTop="8dp"
                app:layout_constraintStart_toStartOf="parent"
                app:layout_constraintTop_toBottomOf="@+id/ownerAvatar"
                tools:layout_editor_absoluteX="@dimen/default_margin"
                tools:text="this is some description more description more description" />

            <TextView
                android:id="@+id/stars"
                android:layout_width="wrap_content"
                android:layout_height="wrap_content"
                android:layout_marginEnd="@dimen/default_margin"
                android:layout_marginTop="@dimen/default_margin"
                android:drawableEnd="@android:drawable/btn_star"
                android:gravity="center"
                app:layout_constraintEnd_toEndOf="parent"
                app:layout_constraintTop_toTopOf="parent"
                tools:text="5" />

        </android.support.constraint.ConstraintLayout>
    </android.support.v7.widget.CardView>
</layout>
最後是MainActivity,改成只有顯示Fragment的功能
main_activity.xml
<?xml version="1.0" encoding="utf-8"?>
<FrameLayout xmlns:android="http://schemas.android.com/apk/res/android"
    xmlns:tools="http://schemas.android.com/tools"
    android:layout_width="match_parent"
    android:layout_height="match_parent"
    tools:ignore="MergeRootFrame">

    <FrameLayout
        android:id="@+id/container"
        android:layout_width="match_parent"
        android:layout_height="match_parent" />
</FrameLayout>
public class MainActivity extends AppCompatActivity {

    @Override
    protected void onCreate(Bundle savedInstanceState) {
        super.onCreate(savedInstanceState);
        setContentView(R.layout.main_activity);
        String tag = RepoFragment.TAG;
        if (getSupportFragmentManager().findFragmentByTag(tag) == null) {
            RepoFragment fragment = RepoFragment.newInstance();
            getSupportFragmentManager().beginTransaction()
                    .add(R.id.container, fragment, tag)
                    .commit();
        }
    }
}
OK完成,最後的package會長這樣: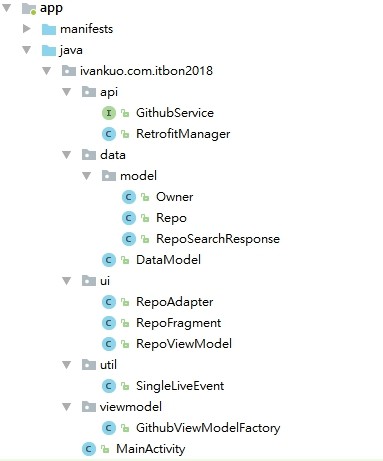
今天的內容沒有什麼新東西,只是把功能建置過程跑一遍,不過花費的時間比預期還多所以蠻趕的,可能有疏漏的地方我們之後再陸續修改。
GitHub source code:
https://github.com/IvanBean/ITBon2018/tree/day05-api


 iThome鐵人賽