本文同步發佈於: Claire's BLOG
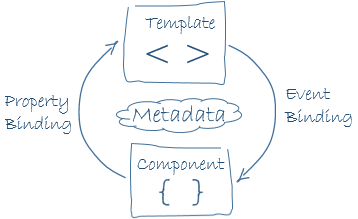
在上一篇的Angular架構中有提到,透過模版語法,template可以與component做許多的溝通。
那這一篇就會介紹Angular內建的模版語法參考。
對於template.html來說,所有的html標籤都可以使用,除了<script>以外,這是為了維護模版的安全性,去除template被攻擊的風險,因此在template中所有的<script>會被忽略,並跳出警告。
接下來我們來介紹所有Angular的模板語法
{{...}}以下為一個範例
<h3>
  {{title}}
  <img src="{{heroImageUrl}}" style="height:30px">
</h3>
大括號之間值通常是組件屬性的名稱。Angular使用相應組件屬性的字符串值替換該名稱。
在上面的例子中,Angular會取元件裡title和heroImageUrl的屬性,並會取代{{title}}及{{heroImageUrl}},因此在頁面上會顯示一個大的應用程序標題,然後一個英雄影像的位置。
在{{...}}之間,我們也可以使用模板表達式去轉換要顯示的值。
例如在刮弧中做運算:
The sum of 1 + 1 is {{1 + 1}}
或者也可以呼叫component的function getVal():
The sum of 1 + 1 is not {{1 + 1 + getVal()}}
大多的運算符都可以用在表達式裡面,除了一些會影響到component的值的運算符,如=、+=、-=之類。
有時候{{...}}裡面要綁定的數值也可以是在template定義的(使用#符號),請見下面的範例
<div *ngFor="let hero of heroes">{{hero.name}}</div>
<input #heroInput> {{heroInput.value}}
「註」:如果在元件裡已經有變數名稱叫做hero,而template裡又有一個hero,在template會優先使用template內定義的變數。
在表達式中不能引用任何除了undefined外的全域變數,如window或document,也不能用consolo.log,只能使用元件內的屬性或方法,或者template裡上下文內的成員
在使用{{...}}時,有下面四個原則要注意:
{{...}}裡面寫很複雜的運算但是不建議,最多在裡面使用!符號,不然還是建議將運算放到元件內去計算,以利閱讀及開發(event)="statement"(event)="statement"是Template statements。事件綁定是利用這樣的方式去做的,下面是一個範例:
<button (click)="deleteHero()">Delete hero</button>
與{{...}}不同的是,在這樣的語法中,是可以去改變元件的值的,並且被改變的值會透過單向綁定{{...}}顯示在畫面上。因此,(event)="statement"的statement是能夠有支援=運算符的,但是+=、-=和++、--是不被允許的。
語句上下文也可以引用模板自己的上下文的屬性。在以下範例中,將模版$event對象,模板輸入變量(let hero)和模板引用變量(#heroForm)傳遞給組件的事件處理方法。
下面是一個範例
<button (click)="onSave($event)">Save</button>
<button *ngFor="let hero of heroes" (click)="deleteHero(hero)">{{hero.name}}</button>
<form #heroForm (ngSubmit)="onSubmit(heroForm)"> ... </form>
[target]="statement"以下是一個範例:
<!-- Bind button disabled state to `isUnchanged` property -->
<button [disabled]="isUnchanged">Save</button>
這樣的語法,能夠讓isUnchanged為true時,顯示這樣的畫面
<button disabled>Save</button>
單向綁定:從component到view(如插值,屬性綁定,Class或Style設定)
{{expression}}
[target]="expression"
bind-target="expression"
單向綁定:從view到component(如:Event)
(target)="statement"
on-target="statement"
雙向綁定:Two-way雙向
[(target)]="expression"
bindon-target="expression"
HTML attribute和DOM property(物件屬性)的區別對於理解Angular綁定是很重要的。一旦使用插值({{...}}),就不是使用HTML attribute,而是在設置DOM property。
一些HTML attribute可以1:1的對應到一個DOM property,例如:id。
一些HTML attribute沒有相應的DOM property,例如:colspan(無法使用插值)。
一些DOM property沒有相應的HTML attribute,例如:textContent。
許多DOM property似乎對應到HTML attribute...但不是以你想像的方式!
HTML attribute的value指定初始值; DOM property的value屬性是當前值。
例如,當瀏覽器執行下面HTML,它創建一個對應的DOM節點,其value屬性初始化為“Bob”。
<input type="text" value="Bob">
當用戶在輸入框中輸入“Sally”時,DOM property的value變成“Sally”。
但是,HTML attribute的value保持不變,如下所示:
input.getAttribute('value');
//取的的值還是返回“Bob”
disabled屬性是另一個特殊的例子。按鈕的disabled 屬性是false默認的,所以按鈕被啟用。當你添加disabled 屬性時,它的存在會初始化按鈕的disabled 屬性,true所以按鈕被禁用。添加和刪除disabled屬性禁用並啟用按鈕。屬性的值是不相關的,這就是為什麼你不能用下面的語法來將按鈕設為enable。
<button disabled="false">Still Disabled</button>
因此,HTML attribute和DOM property是不一樣的,即使它們具有相同的名稱。
屬性綁定範例:
<img [src]="heroImageUrl">
<app-hero-detail [hero]="currentHero"></app-hero-detail>
<div [ngClass]="{'special': isSpecial}"></div>
事件綁定範例:
<button (click)="onSave()">Save</button>
<app-hero-detail (deleteRequest)="deleteHero()"></app-hero-detail>
<div (myClick)="clicked=$event" clickable>click me</div>
雙向綁定範例:
<input [(ngModel)]="name">
類別綁定範例:
<div [class.special]="isSpecial">Special</div>
樣式綁定範例:
<button [style.color]="isSpecial ? 'red' : 'green'">
屬性綁定與插值常常能達到相同的功效,如下面的範例:
<p><img src="{{heroImageUrl}}"> is the <i>interpolated</i> image.</p>
<p><img [src]="heroImageUrl"> is the <i>property bound</i> image.</p>

<p><span>"{{title}}" is the <i>interpolated</i> title.</span></p>
<p>"<span [innerHTML]="title"></span>" is the <i>property bound</i> title.</p>
一般而言,為了易讀性,會使用插值({{...}})。但當沒有要綁定的元素屬性時,必須使用屬性綁定。例如:
<tr><td colspan="{{1 + 1}}">Three-Four</td></tr>
會得到這個錯誤 Template parse errors: Can't bind to 'colspan' since it isn't a known native property
這是因為插值只能設定properties而不能設定attributes。
這時可以改成
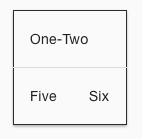
<table border=1>
  <!--  expression calculates colspan=2 -->
  <tr><td [attr.colspan]="1 + 1">One-Two</td></tr>

  <!-- ERROR: There is no `colspan` property to set!
    <tr><td colspan="{{1 + 1}}">Three-Four</td></tr>
  -->

  <tr><td>Five</td><td>Six</td></tr>
</table>
則可以正常顯示如下圖
常見的結構指令如下:
<app-hero-detail *ngIf="isActive"></app-hero-detail>
<div [ngSwitch]="currentHero.emotion">
  <app-happy-hero    *ngSwitchCase="'happy'"    [hero]="currentHero"></app-happy-hero>
  <app-sad-hero      *ngSwitchCase="'sad'"      [hero]="currentHero"></app-sad-hero>
  <app-confused-hero *ngSwitchCase="'confused'" [hero]="currentHero"></app-confused-hero>
  <app-unknown-hero  *ngSwitchDefault           [hero]="currentHero"></app-unknown-hero>
</div>

<app-hero-detail *ngFor="let hero of heroes" [hero]="hero"></app-hero-detail>
在Angular也可以使用#開頭來將使用者在網頁上input輸入的值轉為一個變數,如下:
<input #phone placeholder="phone number">

<!-- lots of other elements -->

<!-- phone refers to the input element; pass its `value` to an event handler -->
<button (click)="callPhone(phone.value)">Call</button>
這個功能在做表單驗證時非常的方便
<form (ngSubmit)="onSubmit(heroForm)" #heroForm="ngForm">
  <div class="form-group">
    <label for="name">Name
      <input class="form-control" name="name" required [(ngModel)]="hero.name">
    </label>
  </div>
  <button type="submit" [disabled]="!heroForm.form.valid">Submit</button>
</form>
<div [hidden]="!heroForm.form.valid">
  {{submitMessage}}
</div>
要讓元件內的屬性能夠給其他元件使用,或者讀取其他元件的屬性,可以在component.ts內宣告
@Input()  hero: Hero;
@Output() deleteRequest = new EventEmitter<Hero>();</pre>
或者這樣也可以
@Component({
  inputs: ['hero'],
  outputs: ['deleteRequest'],
})
輸入屬性通常接收數據值。
輸出屬性會發送事件,如EventEmitter。
下面的圖顯示元件屬性的輸入和輸出的範例。
?. )為了防止出現null reference exception,我們可以使用?.,當值為空值時,會直接傳回空白,可以避免產生不必要的exception 以下為範例
The current hero's name is {{currentHero?.name}}
完整綁定範例資料請見此:線上範例
