今天我們要依照Architecutre Guide Addendum整合遠端API和本地資料庫Room這兩個資料來源。當按下搜尋時先顯示本地資料,接著發出API連線,最後於連線完成時將結果存進資料庫並更新畫面。這樣可以達到兩個效果:

Room和LiveData同為Architecture Component的成員,Room可以將資料直接以LiveData型態回傳,當有異動時LiveData會同步更新,這在待會的實作上會省力很多,而且回傳LiveData時會自動在background thread執行,不用自己實作非同步的處理。
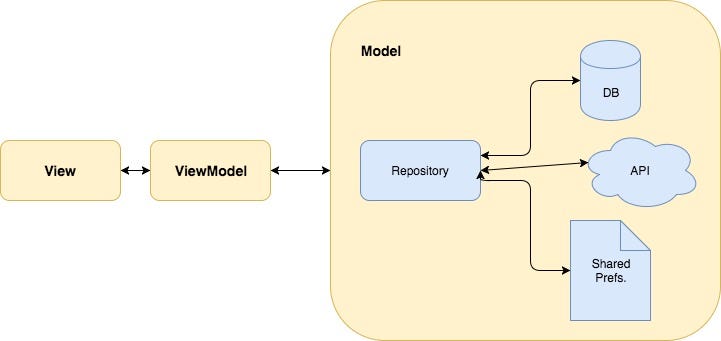
當有多個資料來源時這是很常見的pattern,概念如同MVVM中的Model,即建立一個Repository掌管所有的資料出入口,ViewModel一律透過Repository來存取資料。
配合pattern名稱,我們把DataModel重新命名成RepoRepository,就是..存取Repo的Repository,依照存取的資料類型不同,通常會建立不同的Repository以區分,例如UserRepository、PetRepository。
建立class來包裝API和資料庫的資料,其中特別的地方是有loading狀態,當API在loading時我們要先顯示本地的資料,因此loading時是有資料的,即為資料庫中的內容。
public class Resource<T> {

    @NonNull
    public final Status status;

    @Nullable
    public final T data;

    @Nullable
    public final String message;

    public Resource(@NonNull Status status, @Nullable T data, @Nullable String message) {
        this.status = status;
        this.data = data;
        this.message = message;
    }

    public static <T> Resource<T> success(@Nullable T data) {
        return new Resource<>(SUCCESS, data, null);
    }

    public static <T> Resource<T> error(@Nullable T data, String msg) {
        return new Resource<>(ERROR, data, msg);
    }

    public static <T> Resource<T> loading(@Nullable T data) {
        return new Resource<>(LOADING, data, null);
    }

    @Override
    public boolean equals(Object o) {
        if (this == o) return true;
        if (o == null || getClass() != o.getClass()) return false;
        Resource<?> resource = (Resource<?>) o;
        return Objects.equals(status, resource.status) &&
                Objects.equals(message, resource.message) &&
                Objects.equals(data, resource.data);
    }

    @Override
    public int hashCode() {
        int result = status.hashCode();
        result = 31 * result + (message != null ? message.hashCode() : 0);
        result = 31 * result + (data != null ? data.hashCode() : 0);
        return result;
    }

    @Override
    public String toString() {
        return "Resource{" +
                "status=" + status +
                ", message='" + message + '\'' +
                ", data=" + data +
                '}';
    }
}
public enum Status {
    SUCCESS,
    ERROR,
    LOADING
}
這邊就是核心部分,將API和資料庫兩個來源的資料包成LiveData,Google寫的版本有用到分頁功能,我們沒有所以將其簡化,主要包含這些method:
/**
 * A generic class that can provide a resource backed by both the sqlite database and the network.
 * <p>
 * You can read more about it in the <a href="https://developer.android.com/arch">Architecture
 * Guide</a>.
 * @param <ResultType> : Type for the Resource data
 * @param <RequestType> : Type for the API response
 */
public abstract class NetworkBoundResource<ResultType, RequestType> {

    // Called to get the cached data from the database
    @NonNull
    @MainThread
    protected abstract LiveData<ResultType> loadFromDb();

    // Called with the data in the database to decide whether it should be
    // fetched from the network.
    @MainThread
    protected abstract boolean shouldFetch(@Nullable ResultType data);

    // Called to create the API call.
    @NonNull
    @MainThread
    protected abstract LiveData<ApiResponse<RequestType>> createCall();

    // Called to save the result of the API response into the database
    @WorkerThread
    protected abstract void saveCallResult(@NonNull RequestType item);

    // Called when the fetch fails. The child class may want to reset components
    // like rate limiter.
    protected void onFetchFailed() {
    }

    // returns a LiveData that represents the resource
    public LiveData<Resource<ResultType>> asLiveData() {
        return result;
    }
}
前面四個method就是我們主要的運作流程
一開始1執行時我們就更新UI,最後4完成時因為異動了資料表,將觸發LiveData讓UI再次更新。
可以注意的是loadFromDb()和createCall()這兩個取得資料的method回傳型態都是LiveData,所以我們還會藉由MediatorLiveData合併它們。MediatorLiveData的特色是能同時觀察多個LiveData,並在任一個更新時觸發MediatorLiveData本身更新。依照官方文件舉例:
LiveData loadFromDb = ...;
LiveData createCall = ...;

MediatorLiveData liveDataMerger = new MediatorLiveData<>();
liveDataMerger.addSource(loadFromDb, value -> liveDataMerger.setValue(value));
liveDataMerger.addSource(createCall, value -> liveDataMerger.setValue(value));
透過addSource接收其他LiveData,當loadFromDb或createCall更新的時候,liveDataMerger也會更新。
實作合併LiveData部分:
public abstract class NetworkBoundResource<ResultType, RequestType> {

    private final MediatorLiveData<Resource<ResultType>> result = new MediatorLiveData<>();

    @MainThread
    NetworkBoundResource() {
        result.setValue(Resource.<ResultType>loading(null));
        final LiveData<ResultType> dbSource = loadFromDb();
        result.addSource(dbSource, new Observer<ResultType>() {
            @Override
            public void onChanged(@Nullable ResultType data) {
                result.removeSource(dbSource);
                if (shouldFetch(data)) {
                    fetchFromNetwork(dbSource);
                } else {
                    result.addSource(dbSource, new Observer<ResultType>() {
                        @Override
                        public void onChanged(@Nullable ResultType newData) {
                            result.setValue(Resource.success(newData));
                        }
                    });
                }
            }
        });
    }

    private void fetchFromNetwork(final LiveData<ResultType> dbSource) {
        final LiveData<ApiResponse<RequestType>> apiResponse = createCall();
        // we re-attach dbSource as a new source, it will dispatch its latest value quickly
        result.addSource(dbSource, new Observer<ResultType>() {
            @Override
            public void onChanged(@Nullable ResultType newData) {
                result.setValue(Resource.loading(newData));
            }
        });
        result.addSource(apiResponse, new Observer<ApiResponse<RequestType>>() {
            @Override
            public void onChanged(@Nullable final ApiResponse<RequestType> response) {
                result.removeSource(apiResponse);
                result.removeSource(dbSource);
                //noinspection ConstantConditions
                if (response.isSuccessful()) {
                    saveResultAndReInit(response);
                } else {
                    onFetchFailed();
                    result.addSource(dbSource, new Observer<ResultType>() {
                        @Override
                        public void onChanged(@Nullable ResultType newData) {
                            result.setValue(Resource.error(newData, response.errorMessage));
                        }
                    });
                }
            }
        });
    }

    @MainThread
    private void saveResultAndReInit(final ApiResponse<RequestType> response) {
        new AsyncTask<Void, Void, Void>() {

            @Override
            protected Void doInBackground(Void... voids) {
                saveCallResult(response.body);
                return null;
            }

            @Override
            protected void onPostExecute(Void aVoid) {
                // we specially request a new live data,
                // otherwise we will get immediately last cached value,
                // which may not be updated with latest results received from network.
                result.addSource(loadFromDb(), new Observer<ResultType>() {
                    @Override
                    public void onChanged(@Nullable ResultType newData) {
                        result.setValue(Resource.success(newData));
                    }
                });
            }
        }.execute();
    }

    ...
}
因為貼程式不容易看,可以看下圖或是GitHub連結。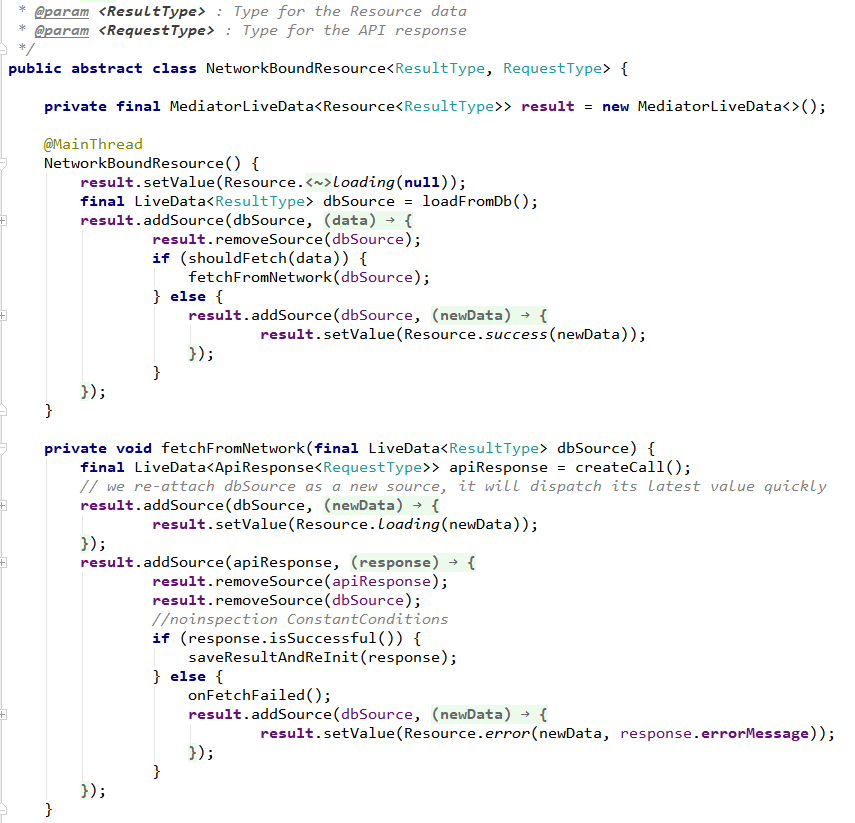
個人覺得理解的關鍵是抓住addSource的位置,看它的source是誰,而當此source改變時onChanged會做什麼事。大致流程就如上面4點,一開始先呼叫loadFromDb()並用addSource加入result以觀察其結果,依照shouldFetch(data)判斷是否要透過fetchFromNetwork進行API連線。
fetchFromNetwork的運作也類似,先呼叫createCall()並addSource判斷連線是否成功,成功的話存到資料庫,失敗的話可以實作onFetchFailed()來做其他處理,並以error狀態回傳原dbSource的資料。
在RepoRepository中使用:
@Singleton
public class RepoRepository {

    private RepoDao repoDao;

    private GithubService githubService;

    @Inject
    public RepoRepository(RepoDao repoDao, GithubService githubService) {
        this.repoDao = repoDao;
        this.githubService = githubService;
    }

    public LiveData<Resource<List<Repo>>> search(final String query) {
        return new NetworkBoundResource<List<Repo>, RepoSearchResponse>() {
            @NonNull
            @Override
            protected LiveData<List<Repo>> loadFromDb() {
                return repoDao.getRepos(query);
            }

            @Override
            protected boolean shouldFetch(@Nullable List<Repo> data) {
                return data == null;
            }

            @NonNull
            @Override
            protected LiveData<ApiResponse<RepoSearchResponse>> createCall() {
                return githubService.searchRepos(query);
            }

            @Override
            protected void saveCallResult(@NonNull RepoSearchResponse item) {
                repoDao.insertRepos(item.getItems());
            }
        }.asLiveData();
    }
}
建立NetworkBoundResource並實作那四個method就可以了。上面是刻意簡化後的code,比較好讀。
運作流程圖: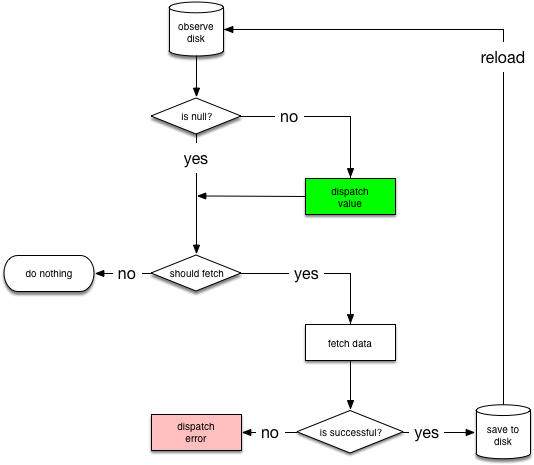
Guide to App Architecture
ViewModel只要改參數型態
public class RepoViewModel extends ViewModel {

    ...

    private final LiveData<Resource<List<Repo>>> repos;

    @Inject
    public RepoViewModel(RepoRepository repoRepository) {
        ...
        repos = Transformations.switchMap(query, new Function<String, LiveData<Resource<List<Repo>>>>() {
            @Override
            public LiveData<Resource<List<Repo>>> apply(String userInput) {
                if (TextUtils.isEmpty(userInput)) {
                    return AbsentLiveData.create();
                } else {
                    return mRepoRepository.search(userInput);
                }
            }
        });
    }

    LiveData<Resource<List<Repo>>> getRepos() {
        return repos;
    }

    ...
}
在View中接收資料
viewModel.getRepos().observe(this, new Observer<Resource<List<Repo>>>() {
    @Override
    public void onChanged(@Nullable Resource<List<Repo>> resource) {
        repoAdapter.swapItems(resource.data);
    }
});
到這邊其實就完成整個Architecture Components的架構了,才14天,我緊張了。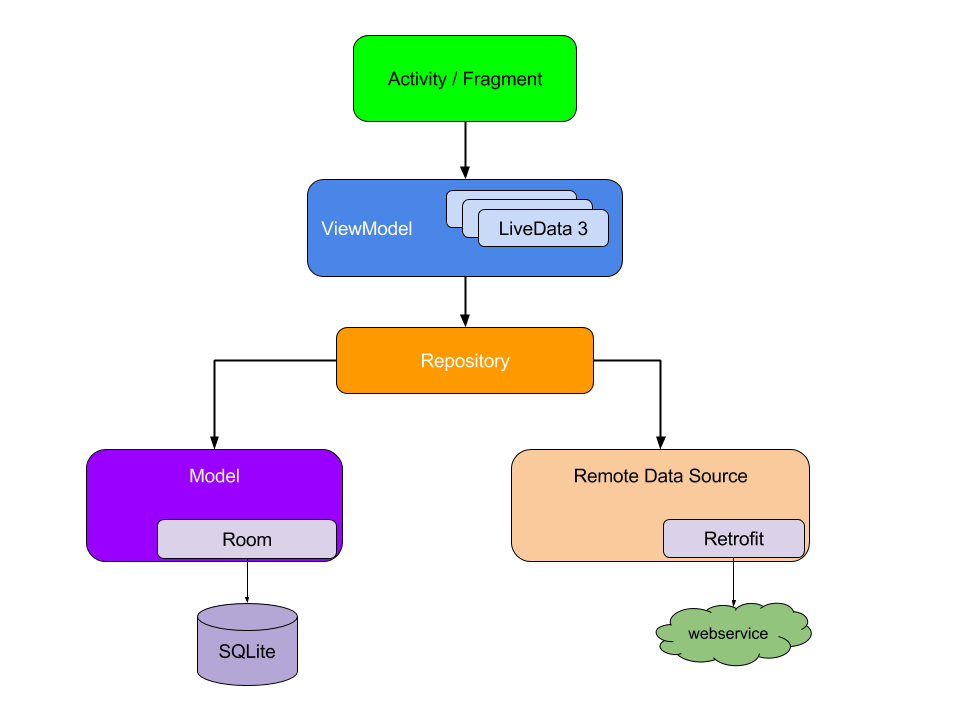
Guide to App Architecture
之後我們會再花一點時間研究Room的其他部分,包含資料關聯、migration和test。
GitHub source code:
https://github.com/IvanBean/ITBon2018/tree/day14-exposing-network-status
Reference:
Guide to App Architecture
Modern Android development with Kotlin


 iThome鐵人賽