接下來會談兩個用 deep learning 上有趣的小範例,一個是這個章節要談的 image classifier ,而下個章節將帶來 retrieve images,兩者皆包含 deep features
老樣子同樣先載入要做圖像分析的資料集,課程中引用的資料集叫做SIFR10,接下來將會選擇它的一個子集(包含四種物品),來去嘗試分辨
同樣的也需要分成 train set 和 test set
import graphlab

# Load a common image analysis dataset
image_train = graphlab.SFrame('image_train_data/')
image_test = graphlab.SFrame('image_test_data/')
接著我們可以來看看原始資料的樣子,因為我們只關心圖像,所以這邊只顯示圖像
你可以發現有鳥、貓、狗、車子,這個資料集總共包含了這四個類別
# Exploring the image data
image_train['image'].show()

接著我們打算在這個資料中訓練出一個基礎模型,我們要做第一件事情不是使用圖片
而是使用圖片的像素(pixels),基於像素的基礎訓練分類器,然後觀察效果
**像素是我們的特徵,但不是 deep feature **
這裡將選用最基礎的 logistic regression,每一張圖片都有它的label,所以我們訓練的目標就是它
# Train a classifier on the raw image pixels
raw_pixel_model = graphlab.logistic_classifier.create(image_train,target='label',
                                                      features=['image_array'])
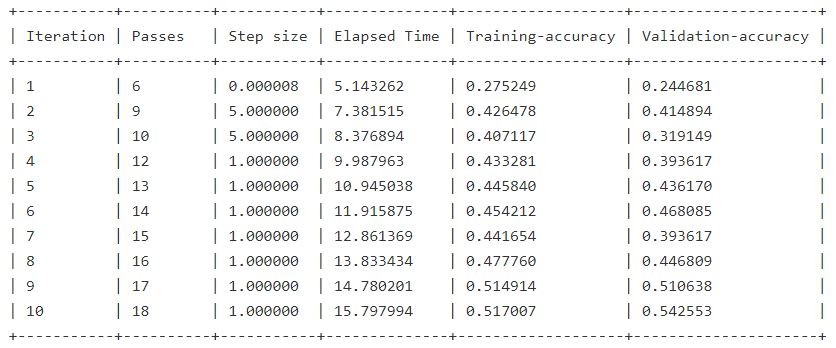
接著我們就可以來看看,我們基於原始照片的像素所訓練的分類器,它的精確度如何
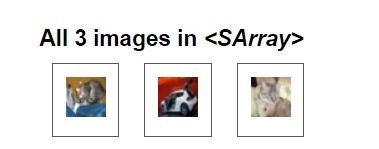
我打算先用一個簡單的例子來檢驗,將 test set 中選取三張圖片來看看分類器的結果如何
我們可以發現,這三張圖片的順序分別是,貓、車、貓
# Make a prediction with the simple model based on raw pixels
image_test[0:3]['image'].show()
當然可以不只用肉眼來確認,也可以查看一下它的label
image_test[0:3]['label']
看來我的眼睛視力應該還是不錯的...
dtype: str
Rows: 3
['cat', 'automobile', 'cat']
確定之後,就可以來查看模型預測的結果
raw_pixel_model.predict(image_test[0:3])
我訓練的分類器,它的預測居然跟它主人在真實世界中的智商一致
將貓當成鳥,將車當成貓
dtype: str
Rows: 3
['bird', 'cat', 'bird']
這一定是幻覺,我們就來看整個測試集模型的結果與正確率如何
# Evaluating raw pixel model on test data
raw_pixel_model.evaluate(image_test)
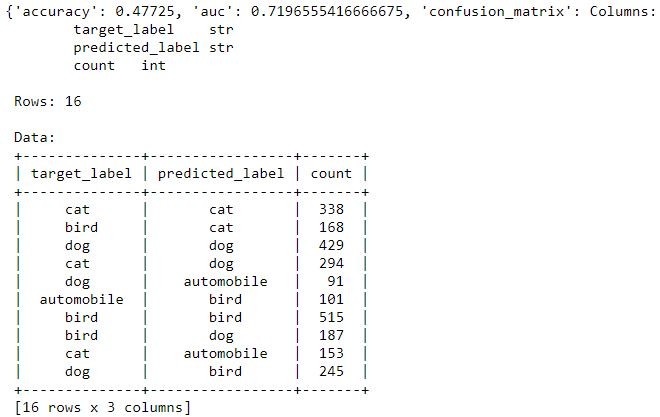
結果極其慘烈
一共四類的話隨機猜測率是25%,但模型精準率只有47%,離可以被拿來使用在真實世界還太遙遠
現在所面臨的問題是我們能否使用 deep features 來改進我們的模型
前面曾經提到即便在樣本數不多的情況下 deep features 依然能發揮效用
所先我們可以先來查看一下樣本數(共2005張)
len(image_train)
# 2005
接著我們可以利用 deep learning 的模組,我們使用的是已經編譯好的模型只要使用 graphlab 來載入即可
這個模組就是我們前面提到的在ImageNet比賽中獲勝的模組,你可以用這個模組來做訓練
並且透過 extract_features 這個 method 來提取 deep_features
這個就是前面章節提過的 transfer learning ,把另一個領域學習到的特徵用到另一個資料集當中
deep_learning_model = graphlab.load_model('imagenet_model')
image_train['deep_features'] = deep_learning_model.extract_features(image_train)
最後來看看我們訓練的成果
image_train.head()
| id | image | label | deep_features | image_array |
|---|---|---|---|---|
| 24 | Height: 32 Width: 32 | bird | [0.242871761322,1.09545373917, 0.0, ... | [73.0, 77.0, 58.0, 71.0,68.0, 50.0, 77.0, 69.0, ... |
| 33 | Height: 32 Width: 32 | cat | [0.525087952614, 0.0,0.0, 0.0, 0.0, 0.0, ... | [7.0, 5.0, 8.0, 7.0, 5.0,8.0, 5.0, 4.0, 6.0, 7.0, ... |
| 36 | Height: 32 Width: 32 | cat | [0.566015958786, 0.0,0.0, 0.0, 0.0, 0.0, ... | [169.0, 122.0, 65.0,131.0, 108.0, 75.0, ... |
| 70 | Height: 32 Width: 32 | dog | [1.12979578972, 0.0, 0.0,0.778194487095, 0.0, ... | [154.0, 179.0, 152.0,159.0, 183.0, 157.0, ... |
| 90 | Height: 32 Width: 32 | bird | [1.71786928177, 0.0, 0.0,0.0, 0.0, 0.0, ... | [216.0, 195.0, 180.0,201.0, 178.0, 160.0, ... |
| 97 | Height: 32 Width: 32 | automobile | [1.57818555832, 0.0, 0.0,0.0, 0.0, 0.0, ... | [33.0, 44.0, 27.0, 29.0,44.0, 31.0, 32.0, 45.0, ... |
| 107 | Height: 32 Width: 32 | dog | [0.0, 0.0,0.220677852631, 0.0, ... | [97.0, 51.0, 31.0, 104.0,58.0, 38.0, 107.0, 61.0, ... |
| 121 | Height: 32 Width: 32 | bird | [0.0, 0.23753464222, 0.0,0.0, 0.0, 0.0, ... | [93.0, 96.0, 88.0, 102.0,106.0, 97.0, 117.0, ... |
| 136 | Height: 32 Width: 32 | automobile | [0.0, 0.0, 0.0, 0.0, 0.0,0.0, 7.5737862587, 0.0, ... | [35.0, 59.0, 53.0, 36.0,56.0, 56.0, 42.0, 62.0, ... |
| 138 | Height: 32 Width: 32 | bird | [0.658935725689, 0.0,0.0, 0.0, 0.0, 0.0, ... | [205.0, 193.0, 195.0,200.0, 187.0, 193.0, ... |
現在我們多了一個欄位(deep features)
我們就可以用 deep features 來訓練我們的模型了
# Given the deep features, let's train a classifier
deep_features_model = graphlab.logistic_classifier.create(image_train,
                                                         features=['deep_features'],
                                                         target='label')
接著我們同樣把先前的步驟演練一次,同樣先抽取前面三個樣本來看看它訓練後的成果
# Apply the deep features model to first few images of test set
image_test[0:3]['image'].show()
deep_features_model.predict(image_test[0:3])
dtype: str
Rows: 3
['cat', 'automobile', 'cat']
高達百分之百的準確率
# Compute test_data accuracy of deep_features_model
deep_features_model.evaluate(image_test)

最後我們得到了77%的準確率,雖然它離真實世界還是有點距離,但是已經大大的提升了其準確率
所以說 deep feature 提供了一個僅僅只有很小的資料量,但是卻能在分類任務中,得到相對不錯的正確率