iT邦幫忙

2018 iT 邦幫忙鐵人賽
DAY 25
0
Data Technology

Microsoft R Solution系列 第 25

Day25 – R Last Mile to Web Part1 Shiny

終於來到鐵人賽的最後一個單元, R 的最後一哩路, 如前面所提的,讓R在Web落地, 是許多R開發人員面臨最後一個階段, 如何在網頁裡直接呼叫R做好的模型與顯示R的繪圖? 在接下來的文章裡, 就會介紹底下幾個方式, 可以讓網頁與R互動

  • RStudio Shiny
  • ASP.NET 與 R.NET
  • ASP.NET 與 MSSQL R Service
  • Azure Machine Studio
  • Microsoft Machine Server

實做的部份, 我們透過上述所提的方式來改寫在Day19做的Windows Form小程式, 使之變成Web版本
https://ithelp.ithome.com.tw/upload/images/20180112/20103333zV5z0NxI7i.png

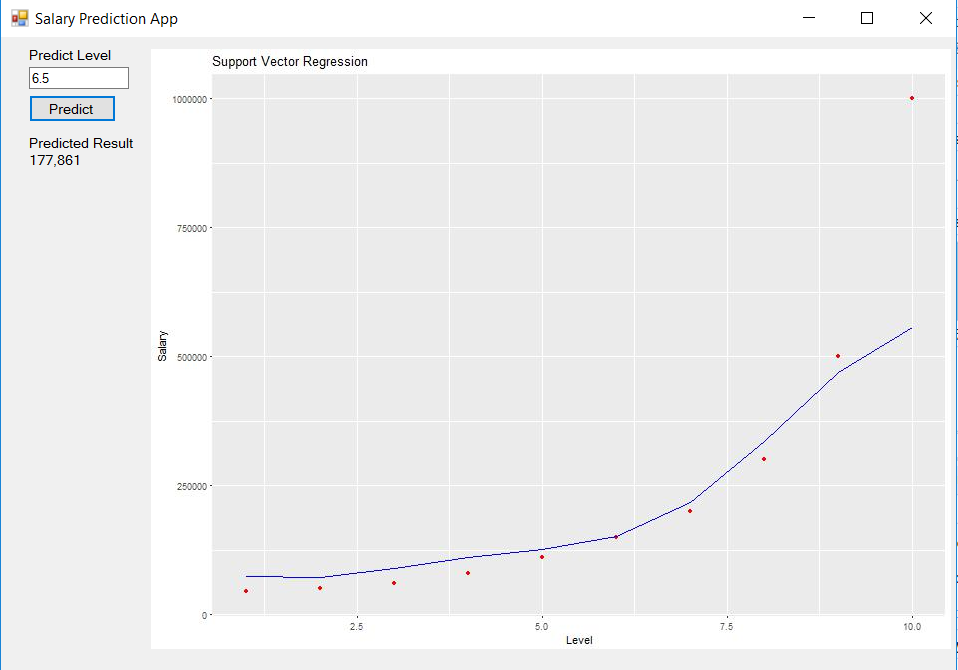
接下來我們來看甚麼是Shiny? Shiny同為RStudio針對R所開發的Web套件, 先來看一下,最後成品會是甚麼樣子?
https://shiny.rstudio.com/gallery/
https://ithelp.ithome.com.tw/upload/images/20180112/20103333x8MUmLVeZk.png

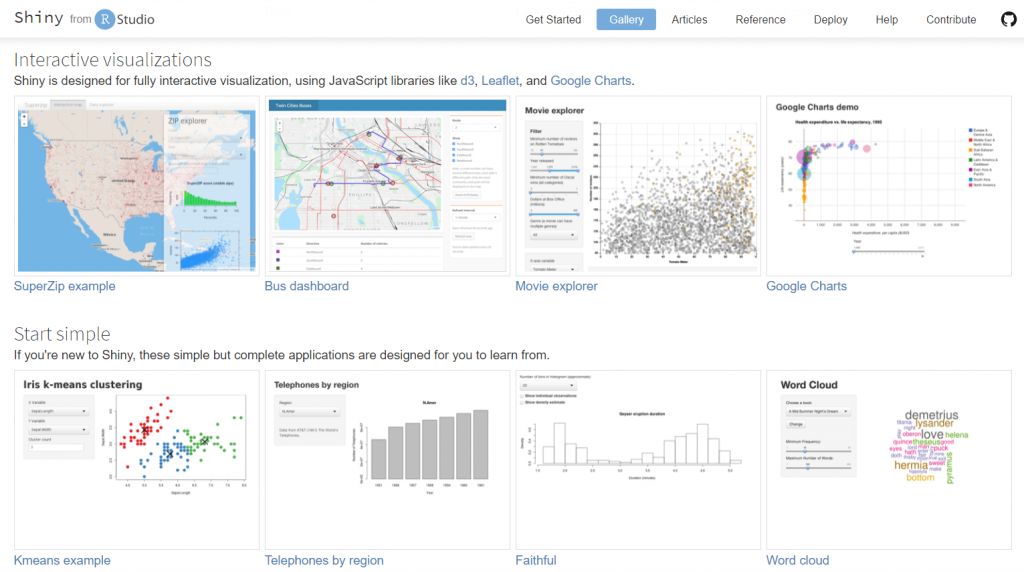
是不是目不暇給? 這些漂亮報表還提供預測功能都是由Shiny製作出來的範例, RStudio還很貼心提供每個範例的原始碼, 讓人學習與觀摩, 筆者也是透過這些範例學習Shiny開發技巧

接著就是透過RStudio來看一下Shiny內建的範例, 那為什麼不用RTVS? 原因是
最後成品要發佈, 而RTVS不支援發佈到https://www.shinyapps.io/

在RStudio輸入底下指令安裝Shiny套件跟載入, 並且用runExample() 看一下範例清單
https://ithelp.ithome.com.tw/upload/images/20180112/201033336iitfoIxyS.png

執行結果如下, 總共有11個範例
https://ithelp.ithome.com.tw/upload/images/20180112/20103333oOX9XstDxt.png

我們挑第一個範例01_hello出來看一下
https://ithelp.ithome.com.tw/upload/images/20180112/20103333nswS3wOUMI.png

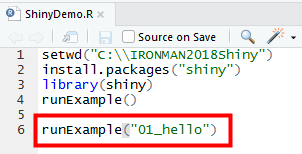
執行結果如下, RStudio會開啟自帶的Web server與Browser
https://ithelp.ithome.com.tw/upload/images/20180112/20103333ekC9k5fLH3.png

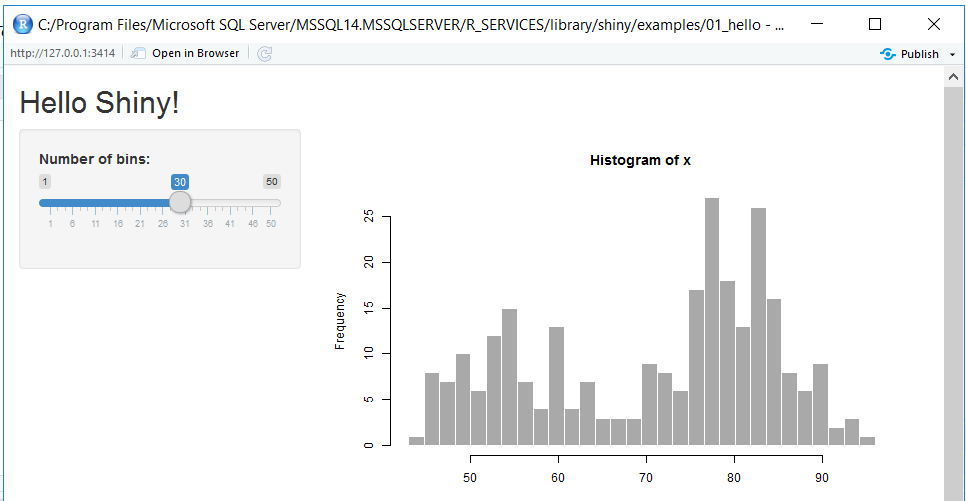
滑動Sidebar, 旁邊的柱狀圖會跟著變化, 下方有程式碼可參考, 而程式碼分成兩個部分, 一個為server.R, 一個為ui.R, 先來看一下ui.R如下
https://ithelp.ithome.com.tw/upload/images/20180112/20103333rcvxeqd1OQ.png

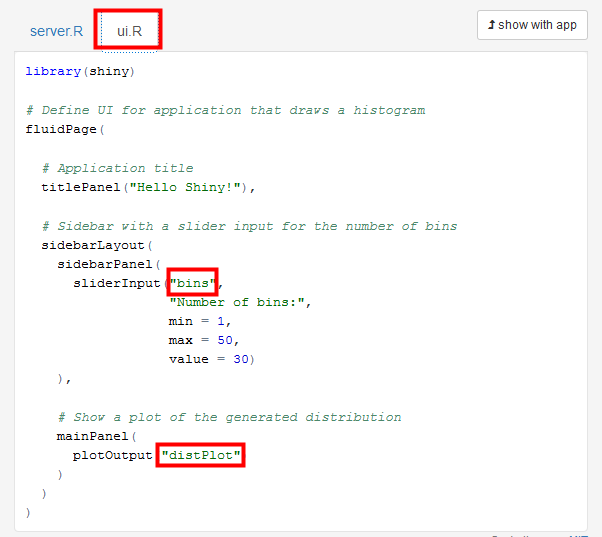
ui.R主要的功能是來配置網頁上的呈現的UI, 從上述的檔案, 可以知道它宣告了一個TitlePanel, 一個SidebarLayout, 與一個mainPanel等三個主元件, 然後在對SidebarLayout與mainPanel做細部的設定, 另外要特別注意的是紅框框起來的bins與disPlot則是與server.R溝通的變數名稱

再來看一下server.R
https://ithelp.ithome.com.tw/upload/images/20180112/201033331NWJGFtOsX.png

server.R主要負責邏輯與事件的部分, 可以看到它有input與output兩個參數, 所以上述的程式碼說明了output$distPlot是傳給ui.R的distPlot, 來顯示繪圖, 而input$bins就是從ui.R傳進來的變數, 然後整個繪圖的邏輯寫在renderPlot({…})裡, 除了server.R與ui.R之外, Shiny還提供global.R來宣告全域變數與物件, 其說明可以參考底下網址
https://shiny.rstudio.com/articles/scoping.html

看完範例01_hello之後, 對於Shiny開發有些概念, 接下來就開始寫程式了, 不過在正式寫Shiny之前, 先打開Day08的程式, 因為筆者有習慣將dataset與model存成R的資料格式如rda與rds, 方便日後重複使用, 在RStudio輸入底下程式碼
https://ithelp.ithome.com.tw/upload/images/20180112/20103333jmw7fxppsq.png

執行之後, 檢查是否產生對應的檔案?
https://ithelp.ithome.com.tw/upload/images/20180112/20103333xaPRiL3NQ0.png

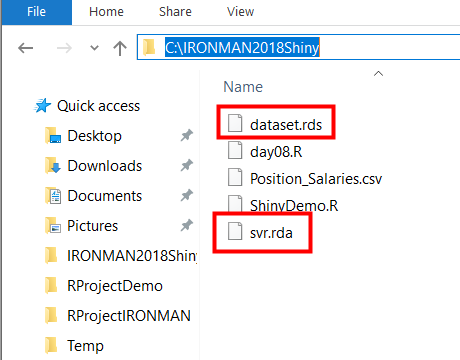
然後新增一個global.R, 並讀取上個步驟儲存的dataset與model, 然後在Global Envrionment檢查dataset與model是否正確載入?
https://ithelp.ithome.com.tw/upload/images/20180112/20103333C9YHdu5pGV.png

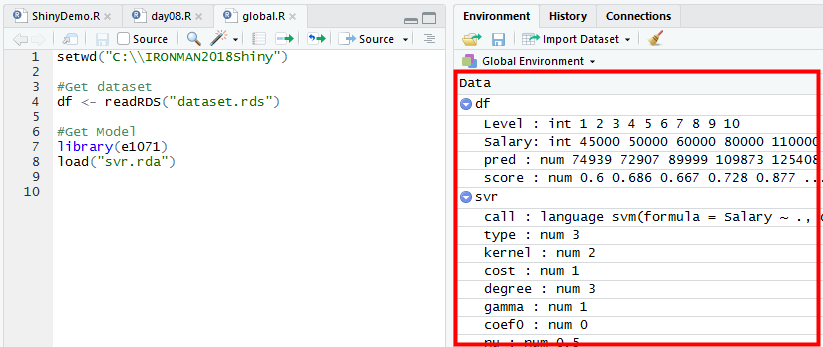
接下來新增ui.R, 加入數字框, 按鈕等控制項如下
https://ithelp.ithome.com.tw/upload/images/20180112/201033339LmNsmwTO6.png

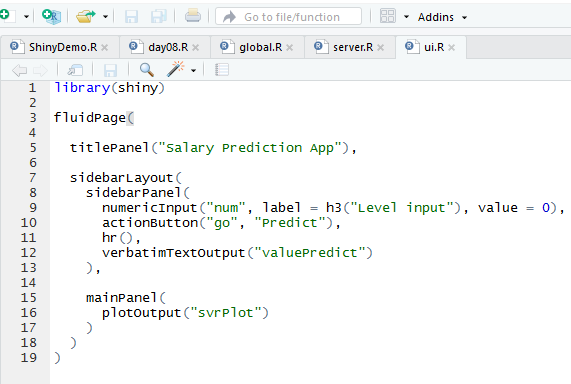
最後加入server.R, 撰寫繪圖邏輯與預測邏輯, 然後按下Run App
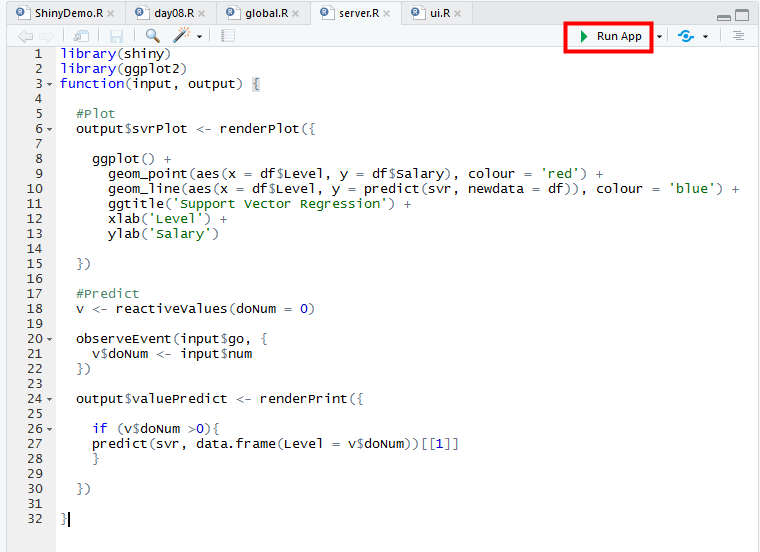
https://ithelp.ithome.com.tw/upload/images/20180112/20103333FdKWlUwKiG.png

執行結果如下
https://ithelp.ithome.com.tw/upload/images/20180112/201033331OdBcxvcJf.png

確認沒問題後可以按下右上角的Publish按鈕, 發佈到https://www.shinyapps.io/
, 不過此時跳出一個錯誤, 說是沒有安裝rsconnect 0.8.5套件, 但有0.7可用
https://ithelp.ithome.com.tw/upload/images/20180112/20103333yswzIX0x4s.png

然後再安裝rsconnect套件如下, 順便檢查一下版本
https://ithelp.ithome.com.tw/upload/images/20180112/20103333WRHLLjZDgZ.png

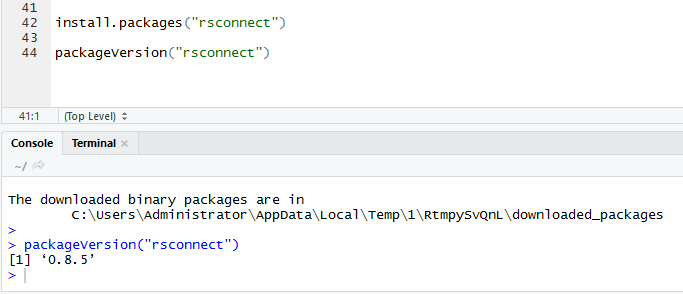
重新Publish後, 會要求建一個Publishing Account
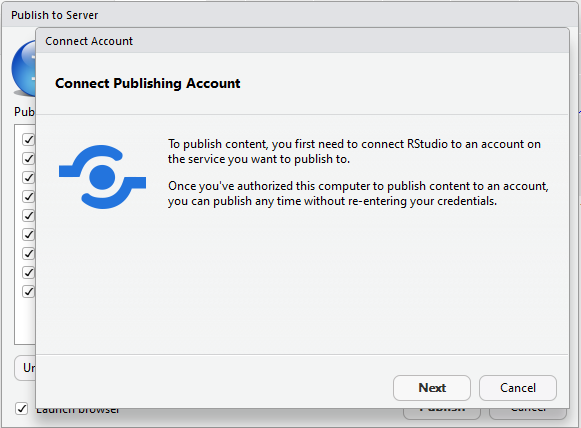
https://ithelp.ithome.com.tw/upload/images/20180112/20103333jh11BvuvhY.png

點選ShinyApps.io
https://ithelp.ithome.com.tw/upload/images/20180112/20103333ZAvvEFbPr0.png

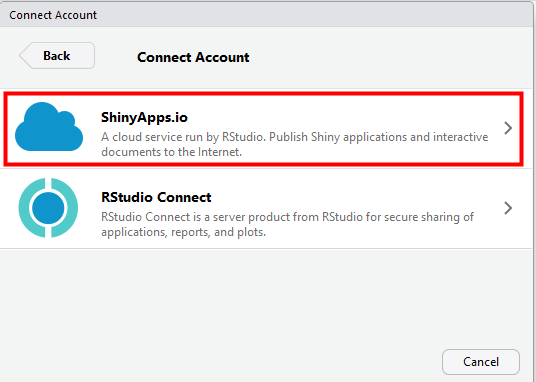
按下 your account on ShinyApps, 會開啟瀏覽器再按下右上方的login
https://ithelp.ithome.com.tw/upload/images/20180112/20103333XIJjpMjEhG.png

在登入畫面, 可選擇用Google帳號登入或是點選Sign up新建一個新的帳號,
筆者這邊採用的是用Google帳號登入
https://ithelp.ithome.com.tw/upload/images/20180112/20103333PZJipb2iXE.png

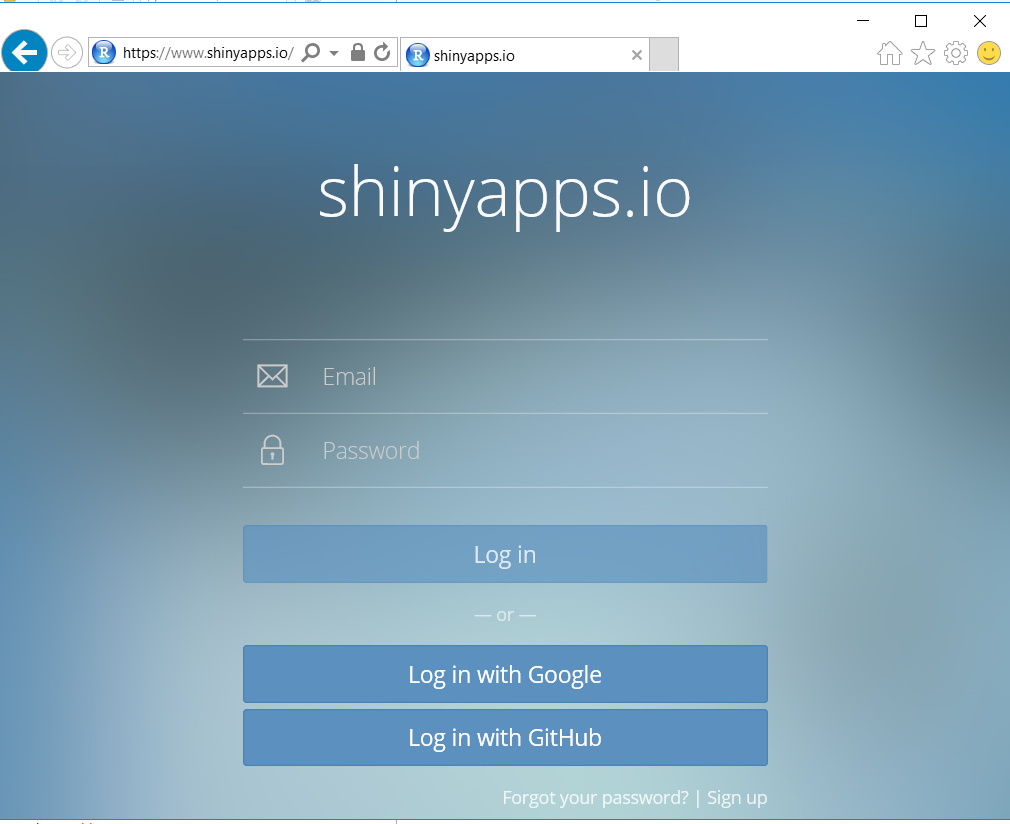
登入之後, 在右邊的選單, 可以找到Tokens, 按下之後, 左邊會顯示Tokens的設定畫面, 然後按下Show
https://ithelp.ithome.com.tw/upload/images/20180112/20103333QRMJPeev8C.png

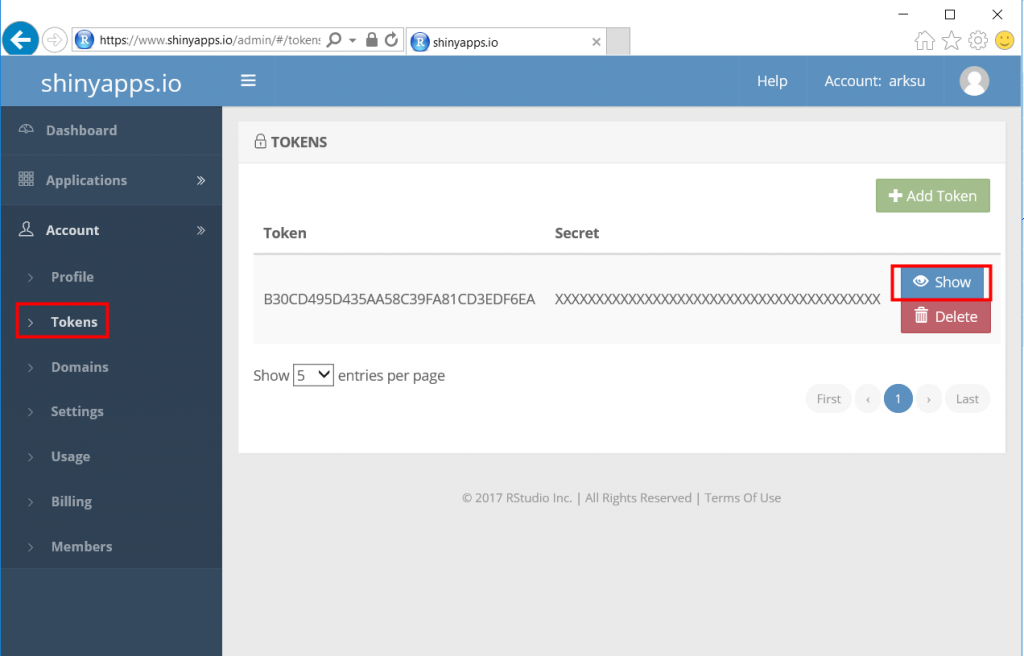
接著就可以看到name, token與secret等三個參數,按下Copy to clipboard複製到剪貼簿
https://ithelp.ithome.com.tw/upload/images/20180112/20103333f8tTw4zxg1.png

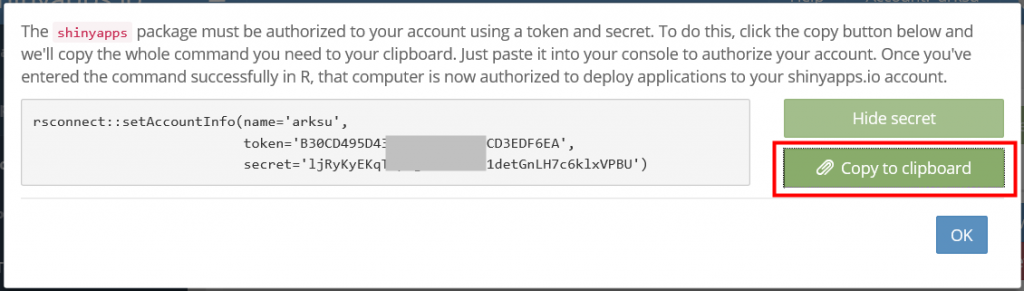
回到Connect ShinyApps.io Account, 複製貼上, 然後按下Connect Account
https://ithelp.ithome.com.tw/upload/images/20180112/20103333FVUR3ofpeV.png

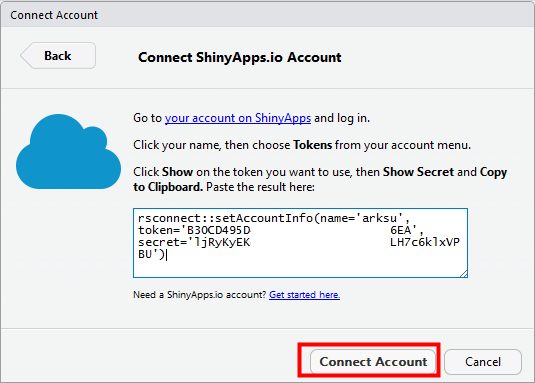
勾選需要上傳的檔案如下, 按下Publish
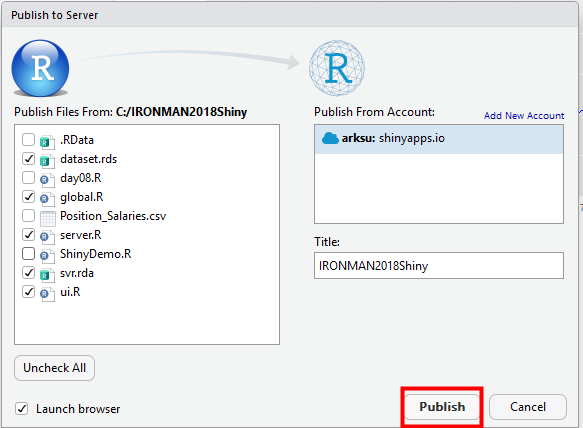
https://ithelp.ithome.com.tw/upload/images/20180112/201033330YUEonmjgI.png

部屬完畢後, 會在瀏覽器看到成果如下
https://ithelp.ithome.com.tw/upload/images/20180112/20103333VlTt36rnrw.png

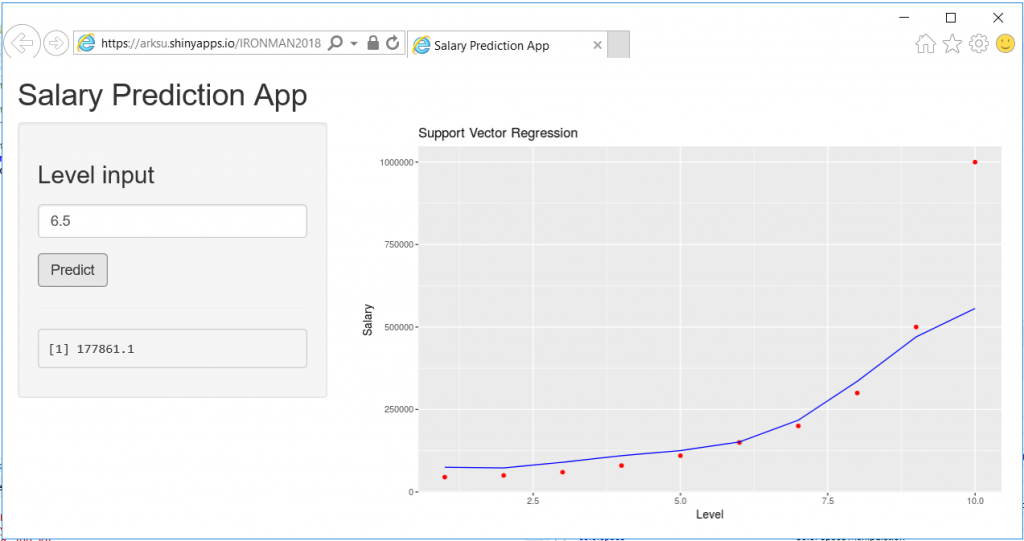
終於打完收工, 完成了第一個R與Web互動的範例

後記: Shiny真的是拿來做Prototype的好物/images/emoticon/emoticon34.gif, 但是要多做一點系統整合如AD權限控管之類的, 就得買付費版本了


上一篇
Day24 - Power BI 與 R 互動
下一篇
Day26 – R Last Mile to Web Part2 ASP.NET與R.NET
系列文
Microsoft R Solution30
圖片
  直播研討會
圖片
{{ item.channelVendor }} {{ item.webinarstarted }} |
{{ formatDate(item.duration) }}
直播中

1 則留言

0
ms0306733
iT邦見習生 ‧ 2018-03-29 17:57:04

您好,謝謝大大的分享,有一個問題想向您請教>_<
關於RStudio Shiny的說明,將global.R新增的部分,我在R studio新增R shiny web app的時候,只有server.R 和 ui.R,找不到新增global.R的選項,因此想向您詢問是從哪裡點選新增global.R的呢?

arksu iT邦新手 2 級 ‧ 2018-03-29 20:49:27 檢舉

就自己新增一個R Script, 檔名是global.R而已啊

我要留言

立即登入留言