iT邦幫忙

2019 iT 邦幫忙鐵人賽

DAY 3
1
自我挑戰組

Linux學習系列 第 3

安裝Linux和學習路徑指令

  • 分享至 

  • xImage
  •  

網址:
https://www.guru99.com/install-linux.html

有3種方法可以安裝Linux

1USB
2光碟
3虛擬機器
選擇先安裝虛擬機器,在虛擬機器安裝Linux
1 安裝虛擬機器
https://www.virtualbox.org/wiki/Download_Old_Builds_5_1
2 下載Ubuntu
https://www.ubuntu.com/download/desktop
3 開始在虛擬機器建立Ubuntu

1名稱自取
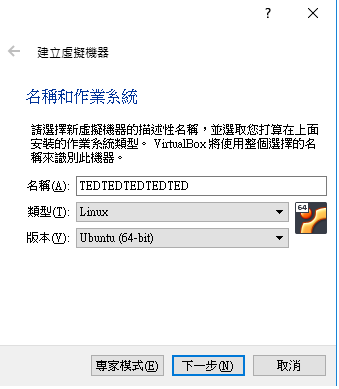
https://ithelp.ithome.com.tw/upload/images/20181016/201119947ptjiHnnJ1.png
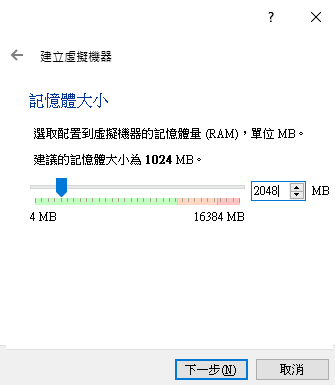
2建立RAM
https://ithelp.ithome.com.tw/upload/images/20181016/20111994WXyeb21jT2.png
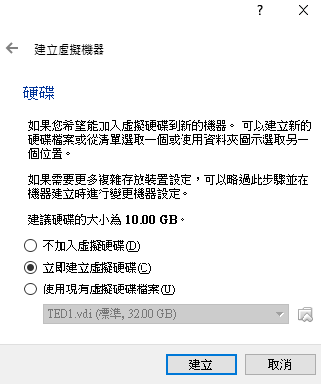
3建立虛擬硬碟
https://ithelp.ithome.com.tw/upload/images/20181016/20111994caxhLSt0QM.png
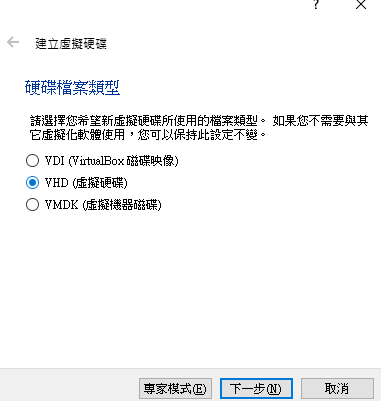
4選擇虛擬硬碟檔案類型
這3個不懂,網址選VHD
https://ithelp.ithome.com.tw/upload/images/20181016/20111994abNnq2s38b.png
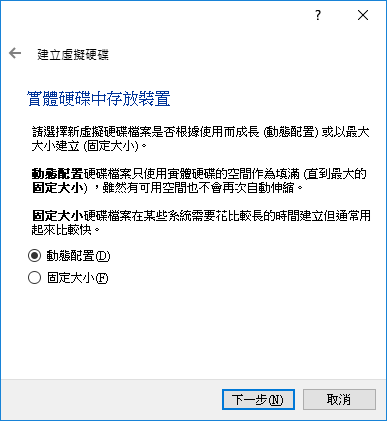
5選擇動態配置或固定大小
https://ithelp.ithome.com.tw/upload/images/20181016/20111994BkVy7DGilI.png
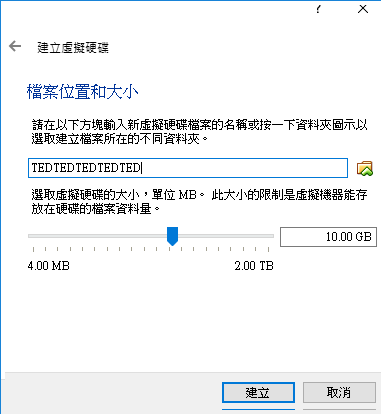
6硬碟名稱和硬碟大小
https://ithelp.ithome.com.tw/upload/images/20181016/20111994XEZsFTbWSi.png
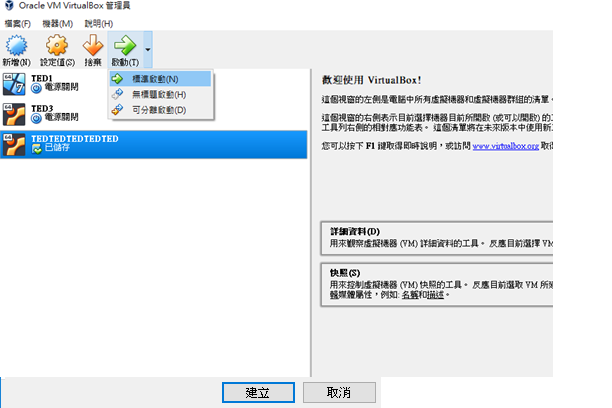
7選擇你要開的虛擬電腦,啟動
https://ithelp.ithome.com.tw/upload/images/20181016/20111994qwUBKITZEZ.png
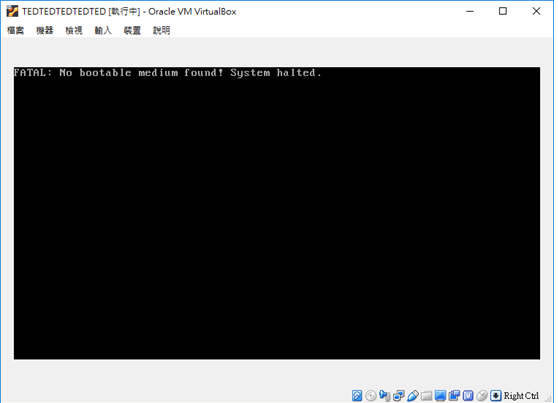
8 發現錯誤,不能開機,因為還沒把Ubuntu加到虛擬電腦
https://ithelp.ithome.com.tw/upload/images/20181016/20111994hwJ08Z3obd.png
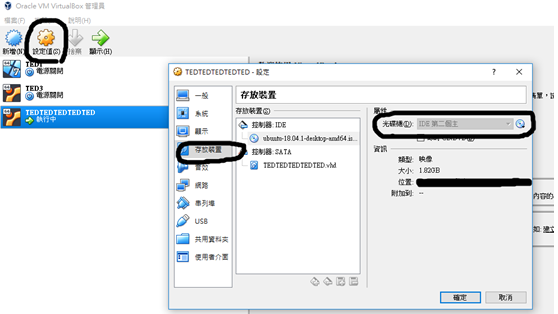
9設定值-->存放裝置-->光碟機(選擇Ubuntu檔案(檔名: ubuntu-18.04.1-desktop-amd64.iso)的位置)
檔名因版本不同而不同
https://ithelp.ithome.com.tw/upload/images/20181016/20111994tXhYIlrZ5g.png
10接著開啟虛擬電腦,會有一連串的安裝問題,跟著網址的步驟就可以了
11等待安裝
12完成

安裝完Linux,接著學習Terminal和GUI是什麼:

學習網址:
https://www.guru99.com/terminal-file-manager.html
https://ithelp.ithome.com.tw/upload/images/20200813/20111994YR8PJrXdzo.png

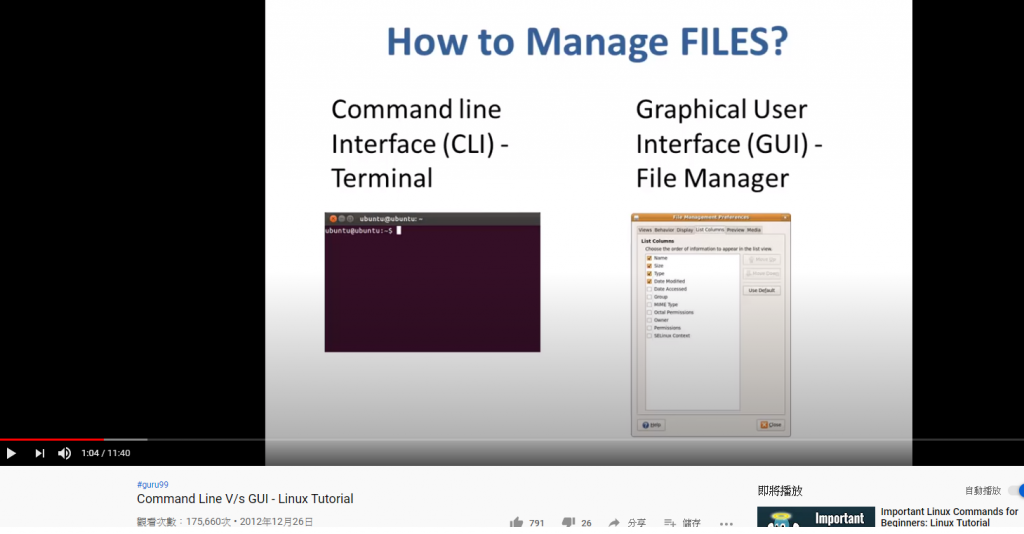
To manage your files, you can either use
1 Terminal (Command Line Interface - CLI)
2 File manager (Graphical User Interface -GUI)
一個是文字的(Terminal),一個是圖形的(File manager)

網址有講到為什麼要用Terminal?

1因為指令有比較多的選擇和靈活,Piping and stdin/stdout可以在Terminal使用
而不能在GUI使用

2 GUI可能需要開啟五個圖形介面,但Terminal只要一個指令

3 移動或重新命名1000個資料夾,GUI非常耗時,但Terminal只需要一個指令

4 Terminal使用的RAM比較小(因為畫面會占記憶體,Terminal卻只有文字)

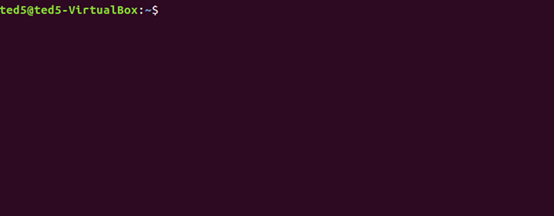
開啟終端機: CTRL + Alt + T
https://ithelp.ithome.com.tw/upload/images/20181016/20111994YaffZ3ECA3.png

  1. ted5是使用者名字
  2. ted5-VirtualBox是電腦名字
  3. '~'代表家目錄,如果現在的位置不在家目錄,那就不會有~
  4. 普通使用者'$',root使用者'#'

學習指令:

pwd(print working directory)

顯示現在位置,沒改變的話都是家目錄
https://ithelp.ithome.com.tw/upload/images/20181016/201119940zXMKzU2gi.png

cd(Changing Directories)

改變位置,位置先改成tmp,接著位置再改成bin,最後顯示現在位置:/bin
https://ithelp.ithome.com.tw/upload/images/20181016/201119947fBx0RxQUn.png

cd或cd ~(Navigating to home directory)

返回家目錄
https://ithelp.ithome.com.tw/upload/images/20181016/20111994ztoAtYFyni.png

cd /(Moving to root directory)

前往跟目錄
https://ithelp.ithome.com.tw/upload/images/20181016/20111994dSf5hPipow.png

cd / directory / directory / directory(Navigating through multiple directories)

如果資料夾前還有資料夾,要用這個方法比較快
而不是像這樣的方法寫指令:
https://ithelp.ithome.com.tw/upload/images/20181016/20111994izpitevtv5.png

cd ..(Moving up one directory level)

回到前一個資料夾
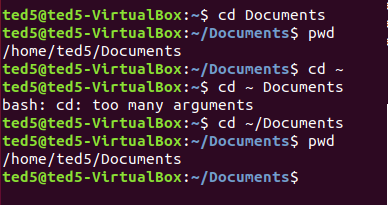
一開始把Documents打成documents,因而找不到資料夾,所以要注意大小寫。
用cd / directory / directory / directory一行指令到指定資料夾
cd ..回到前一個資料夾,所以顯示/home/ted5
如果要回到前前個資料夾就是 cd ../../
https://ithelp.ithome.com.tw/upload/images/20181016/20111994H5DGFmjHRR.png

Absolute Path(絕對路徑)

就是要把路徑全部打出來

Relative Path(相對路徑)

只要打部分路徑

~代表家目錄,所以可以 cd ~/Documents

https://ithelp.ithome.com.tw/upload/images/20181016/201119948s8uLRzflh.png

雙系統

带您在PC上安装 Windows 10 + UBuntu 18.04 双系统
ubuntu-安裝win10-ubunto18-04-雙系統
Ubuntu與Windows的雙系統安裝教學
如何在Windows 10系統安裝Linux雙系統
How to Dual Boot Ubuntu 22.04 LTS and Windows 11 [ 2022 ]

1.下載iso檔
https://www.ubuntu-tw.org/download/download.php?distro=desktop&version=20.04&arch=amd64

2.下載rufus
https://rufus.ie/zh_TW/
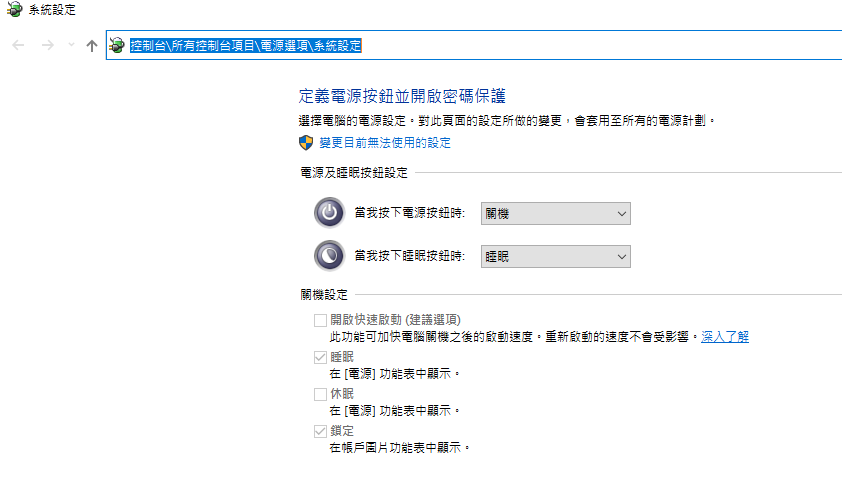
  1. 控制台\所有控制台項目\電源選項\選擇按下電源時的行為
    開啟快速啟動 關閉
    https://ithelp.ithome.com.tw/upload/images/20220125/20111994YjEk4XJ6Op.png

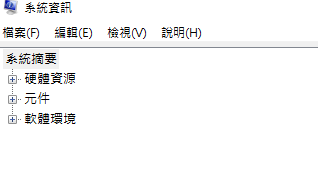
4.查看bios是哪種???
https://ithelp.ithome.com.tw/upload/images/20220125/20111994jtS4BWQnEd.pnghttps://ithelp.ithome.com.tw/upload/images/20220125/201119940qSoFv03tg.png

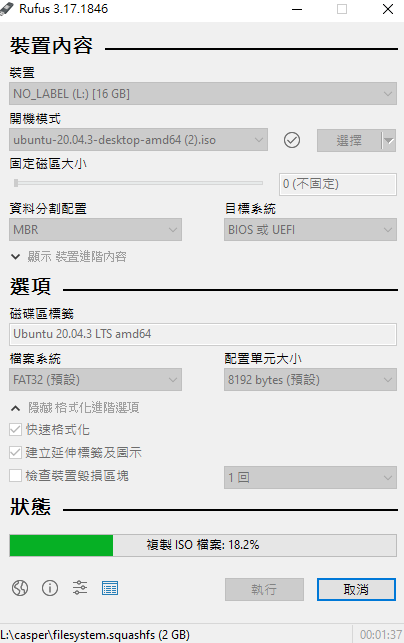
5.設定好rufus, iso檔, USB
https://ithelp.ithome.com.tw/upload/images/20220128/2011199466aiUoixSy.png

6.
F2進到bios,關掉boot設定裡的 fast boot

7. 把USB放到電腦重開機 ,按Esc、Delete、F1、F2、F10、F11 或 F12
(進到bios後,usb開機放到最前面)

8.設定!
install type 要選擇 something else !
硬碟路徑應該只要設定/即可
把所有容量都給/
/home跟/swap可給可不給。
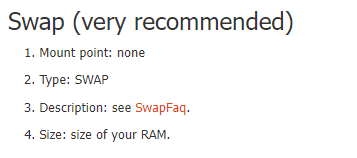
swap只要記憶體夠就不需要?
如果要有swap空間的話,要大於等於 實體記憶體?
所以選擇32GB (32768 MB)

設定boot loader的位址

選到/的位址 會沒辦法啟動ubuntu 。
所以在重裝一次

進入Windows操作系統。按Win + R。然後,鍵入diskmgmt.msc以打開“ 硬碟管理”。
刪除ubuntu那塊磁碟區,再重灌一次!

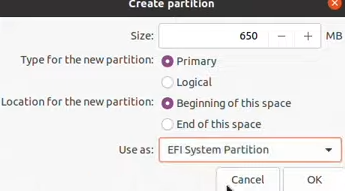
如果不想用在windows那顆硬碟的boot loader ,就要自己再切一塊硬碟路徑設定:
影片6:42 :
這邊設定1GB好了
Ubuntu與Windows的雙系統安裝教學
https://ithelp.ithome.com.tw/upload/images/20220128/20111994WAS9ALtxY1.png

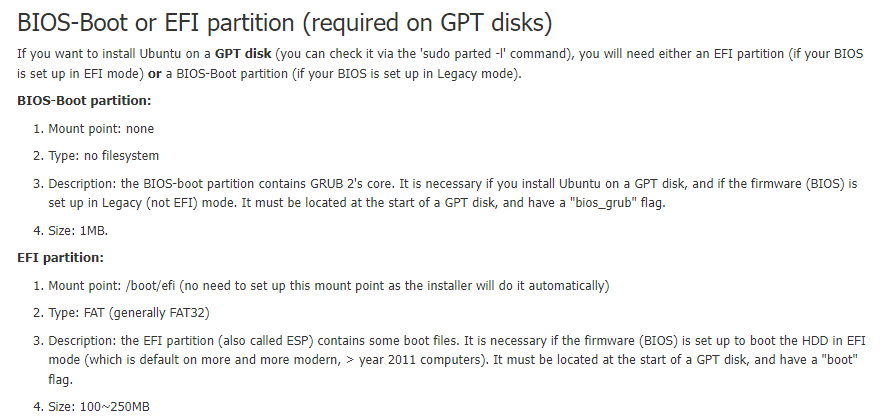
這邊有寫到100-250MB:
https://help.ubuntu.com/community/DiskSpace
https://ithelp.ithome.com.tw/upload/images/20220128/201119948xQzMnlu8C.png

然後/home或是/swap目錄是不一定需要的。
https://ithelp.ithome.com.tw/upload/images/20220128/20111994s2DpXPd9vM.png

https://ithelp.ithome.com.tw/upload/images/20220128/20111994OKayT5qSWd.png

設定螢幕解析度1920 * 1080

一開始開啟ubuntu畫面會很大,要改掉
找了幾個網站 安裝一些東西,重開機後成功的
如何安裝Nvidia 顯示卡的Linux驅動

試過:

sudo add-apt-repository ppa:graphics-drivers
sudo apt-get update
#sudo apt-cache search nvidia-* # 查詢nvidia驅動可用版本 
sudo apt-get install nvidia-driver-495

試過:
Ubuntu 18.04無法調整解析度解決辦法

【問題】UEFI? BIOS? Legacy? 淺談主機板UEFI觀念與迷思
https://forum.gamer.com.tw/C.php?bsn=60030&snA=506558


上一篇
Linux 發行版
下一篇
Linux基本指令
系列文
Linux學習30
圖片
  直播研討會
圖片
{{ item.channelVendor }} {{ item.webinarstarted }} |
{{ formatDate(item.duration) }}
直播中

尚未有邦友留言

立即登入留言