這篇要講的內容,類似css中background-repeat這個效果,一般在做橫向卷軸遊戲應該都會用到這個,除非覺得載入超長的圖片無所謂的話,就不需要使用到這個

這次的素材


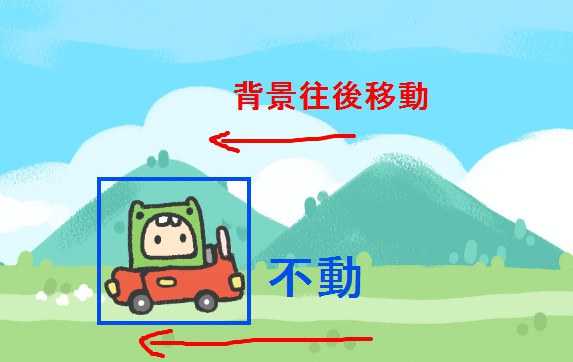
這次的範例是開噗噗移動的假象(?)
呱呱本身不移動,背景往左邊移動
建立app
(ps我後面有一些用寫死的位置設定,所以如果你設定的畫布尺寸跟我不一樣,之後的位置設定自行調整)
let app = new PIXI.Application({width: 1024, height: 768,backgroundColor: 0x78e2ff});
document.body.appendChild(app.view);
先載入圖片
let cloud = PIXI.Texture.fromImage('img/cloud.png')
let mount = PIXI.Texture.fromImage('img/mount.png')
let ground = PIXI.Texture.fromImage('img/ground.png')
再將圖片放入PIXI.extras.TilingSprite中
let mountTiling = new PIXI.extras.TilingSprite(
  mount, // 放入的Texture
  app.screen.width, // 圖片的寬
  app.screen.height/3*2 // 圖片的高
);
let cloudTiling = new PIXI.extras.TilingSprite(
  cloud,
  app.screen.width,
  app.screen.height
);
let groundTiling = new PIXI.extras.TilingSprite(
  ground,
  app.screen.width,
  app.screen.height/4
);
再來是定義擺放的位置(請原諒我大部分用寫死的數字)
cloudTiling.y = 220;
mountTiling.y = 330;
groundTiling.anchor.set(0,1); // 將groundTiling的軸心放在左下
groundTiling.y = app.screen.height; // 因為軸心在左下,把位置設定在畫布最下面就不會跑出去
app.stage.addChild(cloudTiling,mountTiling,groundTiling); // 把物件放進畫布中
再來一樣是spriteSheet json載入,跟前兩篇方式一摸摸一樣樣,這邊就不贅述了
最後就是把移動的方式放入ticker中,就會動啦~~
可以自己設定喜歡的速度感~
app.ticker.add(delta => {
    mountTiling.tilePosition.x -= 2;
    cloudTiling.tilePosition.x -= 0.5;
    groundTiling.tilePosition.x -= 2;
});
後記:
這次的範例超級可愛的XD,我在PS試跑影格整個愛上!!!!!!!!!!(自己講
只好再來貼一下粉專 廢物人森
我現在呈現邊用之前做好的素材邊想下一篇的主題是什麼,接續上一篇原本是想要做鍵盤偵測左右移動,然後左右移動寫好之後,覺得應該要讓背景移動一下才對,所以TilingSprite這篇是臨時插隊的XD
