
今日做完後會長這樣

繼續昨天的進度
該補上搜尋的框框了
先來看一下其他兩家的東西
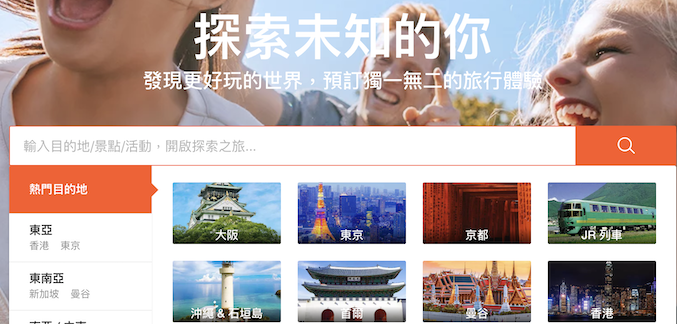
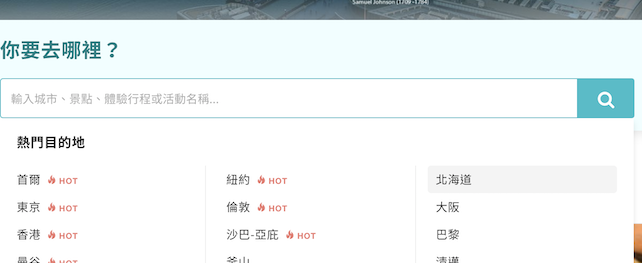
恩... 不簡單啊 XD?
暫且不看下面的視覺選單
先來打個字搜尋看看吧
嗯嗯 一樣有自動填入(Autocomplete)的功能
這個比較簡單,而且Quasar也有這個元件能用
我們就先從這個著手開始弄好了
這邊我們使用q-input來做
其實還有另一個q-search,不過功能沒有input多
所以這邊就用input來做吧
首先一樣到設定檔quasar.conf.js裡面去引入
framework: {
  components: ['QInput']
}
接著直接加到我們昨天程式的區塊中
<q-input
  inverted-light
  color="white"
  placeholder="輸入城市/景點 或是想去的地方"
  :after="[{
    icon:'fas fa-search-location'
  }]"
  v-model="search"
>

</q-input>
這邊來設定幾個屬性
inverted
顯示背景,同樣的inverted-light就是顯示亮色背景用的,
原本預設的背景是透明的,因為我們框框在圖片上,透明的會導致看不到
因此這邊給他一個背景色的屬性
color
前篇有提過,因為主顏色是藍色,這邊我們一樣也改成白色,看起來比較正常點
placeholder
用來顯示框框中還沒輸入東西時的提示文字,如果框框有值就不會顯示這串字,我們就照個其他兩間一樣放個“輸入城市/景點 或是想去的地方”
after
他還有一個同伴叫做before,用途都是拿來顯示框框前後的icon用的。
更進階一點的就是能根據輸入的內容,動態去調整icon的外觀等等,不過這邊給個搜尋的icon就好囉~
最後記得給input綁定個v-model,這邊姑且叫做search
  data()
  {
    return {
      search: ''
    }
  },
那目前頁面會長這樣
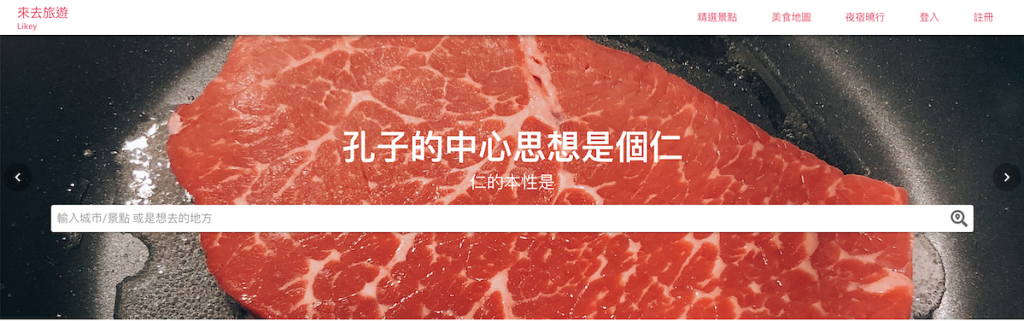
好像有點太長了,因為這個元件預設長度都是最長
這邊最簡單的解決方法就是運用 FlexCSS
就是 row 跟 col 家族啦,有玩過其他框架的同學應該都不陌生
這邊一樣要顧慮到手機版跟電腦版的顯示哦
<div class="row">
  <div class="col-md-2 col-xs-1"></div>
  <div class="col-md-8 col-xs-10">

 	//這裡塞剛剛的input

  </div>
  <div class="col-md-2 col-xs-1"></div>
</div>
調整好後會變這樣,是不是好很多呢?
再來就是本日的重頭戲啦
這個功能說複雜可以很複雜 (使用動態資料)
說簡單能很簡單(單純使用靜態資料)
那我們就先不考慮動態資料
先使用靜態資料來做吧~~
這裡一樣記得去引入元件
framework: {
  components: ['QAutocomplete']
}
再來就直接塞進QInput中間吧
<q-input
  inverted-light
  color="white"
  placeholder="輸入城市/景點 或是想去的地方"
  :after="[{
    icon:'fas fa-search-location'
  }]"
  v-model="search"
>
    <q-autocomplete
      :static-data="{field: 'label', list: countries}"
    />
</q-input>
static-data
使用靜態資料(就是...寫死在程式的資料),這邊要給一個Object,要給兩個值分別為:
field(欄位名稱)
意指要拿來搜尋資料的欄位
list(資料列表)
搜尋的資料來源
直接在剛剛的data()裡面多加我們的靜態資料
countries: [
{ label:'台北市' , icon:'fas fa-map-marker-alt' },
{ label:'新北市' , icon:'fas fa-map-marker-alt' },
{ label:'台中市' , icon:'fas fa-map-marker-alt' },
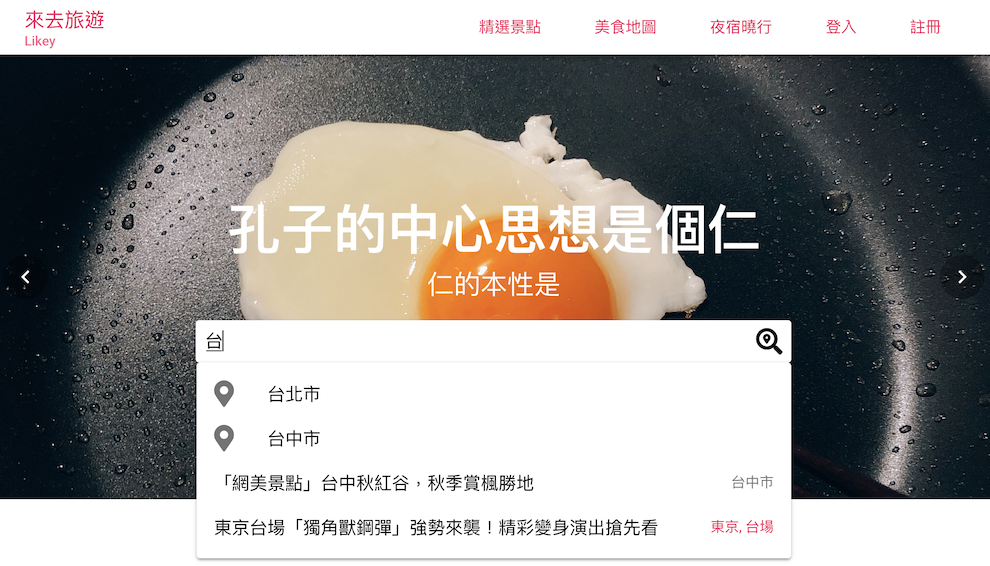
{ label:'「網美景點」台中秋紅谷,秋季賞楓勝地', stamp:'台中市' },
{ label:'東京台場「獨角獸鋼彈」強勢來襲!精彩變身演出搶先看' , stamp:'東京, 台場', rightTextColor:'pink-13'}
]
格式是一個陣列(Array)包數個物件(Object),裡面能用的數值可以參考官方文件
這個能用的東西蠻多的,我們就挑幾個用好了
label
就是要顯示的主文字啦
icon
主要的icon
stamp
主要用途是時間戳記,不過我們拿來顯示景點的地區吧
rightTextColor
右邊的文字顏色,雖然官方說明說是對letter跟icon有用,不過stamp一樣也吃得到哦
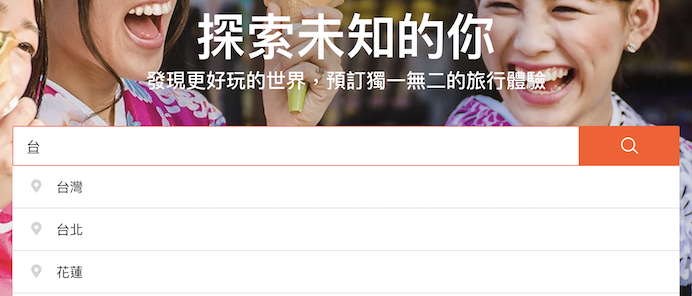
那我們試著搜尋看看吧~
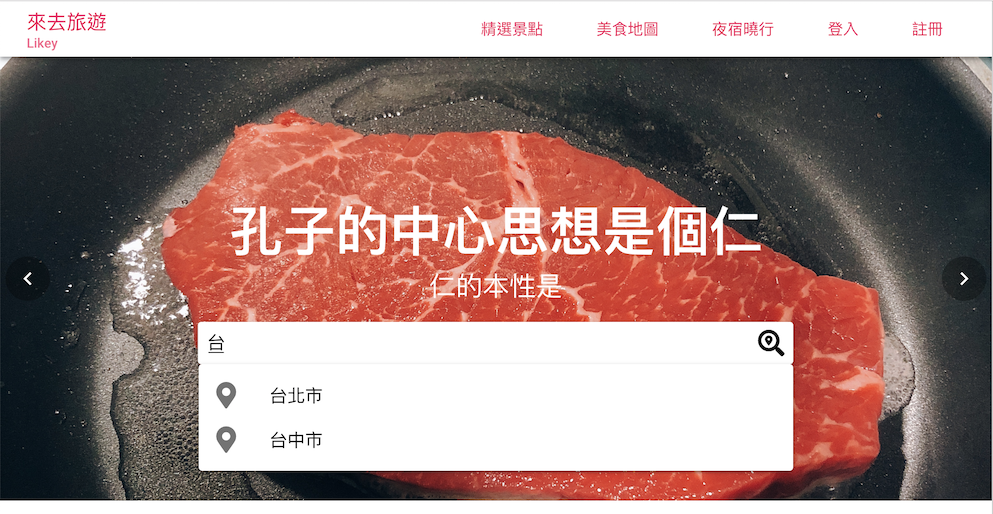
咦咦 怎麼沒有找到台中秋紅谷跟台場呢 !
因為他原本的搜尋過濾只支援英文在文字內的搜尋
中文字只能搜尋第一個字,有點難用~~
因此決定自己來做一個過濾器,不喜歡的同學可以不用做沒關係
剛好q-autocomplete也有提供自訂filter的功能
所以我們就在剛剛的q-autocomplete中放入filter吧
<q-autocomplete
  :static-data="{field: 'label', list: countries}"
  :filter="advFilter"
/>
就先給他叫做advFilter
這邊是呼叫一個function,所以要到下面的 methods 加入這個function
function能用的參數已經事先設好了,我們只要在裡面處理後
回傳要顯示的陣列Array就好
  methods:{
    advFilter(terms , { field, list}) {

		//把處理的code寫在這裡

    }
  }
為了快速處理陣列及物件,這裡推薦使用lodash來做操作
lodash是一套非常棒的插件,連quasar都在預設就幫你裝好了
所以這邊只要在script最上面直接引入就好
import _ from 'lodash'
這裡要用 lodash 的 filter 來找我們的資料
只要裡面有字是符合我們的關鍵字,就將它回傳
    advFilter(terms , { field, list}) {
      return _.filter( list , context => {
        return context[field].match(terms)
      })
    }
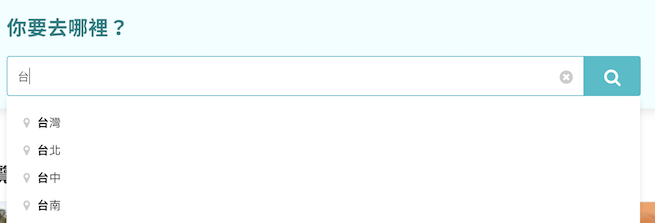
這邊改好就大功告成啦
畫面會這樣
是不是超級棒的啊~~~☺️☺️☺️☺️
<template>
  <q-carousel
    color="white"
    infinite
    arrows
    autoplay
    height="400px"
  >
    <q-carousel-slide img-src="statics/beef.JPG" />
    <q-carousel-slide img-src="statics/egg.JPG" />
    <q-carousel-control
      position="center"
      slot="control-nav"
      slot-scope="carousel"
      class="carouselInput"
    >
      <div class="main">
        <b class="title">孔子的中心思想是個仁</b>
        <p class="subtitle">仁的本性是</p>

        <div class="row">
          <div class="col-md-2 col-xs-1"></div>
          <div class="col-md-8 col-xs-10">
            <q-input
              inverted-light
              color="white"
              placeholder="輸入城市/景點 或是想去的地方"
              :after="[{
                icon:'fas fa-search-location'
              }]"
              v-model="search"
            >
                <q-autocomplete
                  :static-data="{field: 'label', list: countries}"
                  :filter="advFilter"
                />
            </q-input>
          </div>
          <div class="col-md-2 col-xs-1"></div>
        </div>


      </div>

    </q-carousel-control>
  </q-carousel>
</template>

<script>
import _ from 'lodash'
export default {
  data()
  {
    return {
      search: '',
      countries: [
        { label:'台北市' , icon:'fas fa-map-marker-alt' },
        { label:'新北市' , icon:'fas fa-map-marker-alt' },
        { label:'台中市' , icon:'fas fa-map-marker-alt' },
        { label:'「網美景點」台中秋紅谷,秋季賞楓勝地', stamp:'台中市' },
        { label:'東京台場「獨角獸鋼彈」強勢來襲!精彩變身演出搶先看' , stamp:'東京, 台場', rightTextColor:'pink-13'}
      ]
    }
  },
  methods:{
    advFilter(terms , { field, list}) {
      return _.filter( list , context => {
        return context[field].match(terms)
      })
    }
  }
}
</script>


<style lang="stylus" scoped>
  .carouselInput
    width 90%
  .carouselInput .main
    text-align center
    color white
  .carouselInput .main .search
    width 300px

  @media (min-width 768px)
    .carouselInput .title
      font-size 48px
    .carouselInput .subtitle
      font-size 24px

  @media (max-width 768px)
    .carouselInput .title
      font-size 24px
    .carouselInput .subtitle
      font-size 16px

</style>

 iThome鐵人賽