本文主要會談到
在進入行為委派前,先來回顧原型串鏈。當查找物件的屬性或方法時,若無法在本身這個物件找到,就會往更上一層物件尋找,直到串鏈尾端 Object.prototype,若還是無法找到就回傳 undefined,而這個尋找的脈絡就是依循著 [[Prototype]] 所構成的原型串鏈來查找-每個物件在建立之初都會有個 .__proto__ 內部屬性,它可用來存取另一個內部屬性 [[Prototype]] 的值,而 [[Prototype]] 存放其建構子原型參考。
而所謂循著原型串鏈查找的規則,這是個什麼樣的機制?
它就是「行為委派」,藉由物件與物件間的連結而取得特定的屬性或方法以完成工作。
這個部份要來探討類別 vs 委派這兩種設計模式的差異。
...
...
常有人問「類別」這麼好用,為什麼要去理解「委派」的機制呢?
傻孩子,因為我們前端工程師寫的是 JavaScript 呀!

...
...
再次強調,JavaScript 並不像 Java、C++ 這些知名的物件導向語言具有「類別」的概念,而只有「物件」,因此只能利用設計模式來模擬所謂的類別。而所謂的「模擬」就是使用「委派」這種物件與物件間的連結來達成的。是該打開黑色子,來看看其中的奧妙之處了!
類別理論中,在父類別會定義共通的行為,而在子類別定義了各自特化的行為並覆寫繼承自父類別的通用方法,最後實體化類別而得到實體、操作各自的方法以完成任務。
如先前提到的,「類別」可想像成是建構某特定物體的藍圖或模具,而「實體」就是按照這藍圖或模具製造出來的成品。這當中需要使用類別的一個特殊方法「建構子」來做初始化的動作,而建構子通常與類別同名。虛擬碼範例如下,Person 是一個類別,CoolPerson 繼承自 Person,利用建構子 CoolPerson 做初始化,進而建立出實體 Jack,方法 sayHi 繼承了來自 Person 的同名方法並做覆寫。
class Persion {
  career = null;

  Persion(job) {
    career = job;
  }

  sayHi() {
    pring('Hello, I am a/n', career);
  }
}

class CoolPerson inherits Person {
  CoolPerson() {
    super(career);
  }

  sayHi() {
    super();
    pring('I love my job!');
  }

  eat(food) {
    pring('I am eating...', food);
  }
}

Jack = new CoolPerson('engineer');
Jack.sayH();
接著,讓我們使用 JavaScript 的(Prototypal 原型式)繼承來實作這個概念。
function Persion(job) {
  this.career = job;
}

Persion.prototype.sayHi = function() {
  console.log(`Hello, I am a/n ${this.career}`);
};

function CoolPerson(job) {
  Persion.apply(this, [job]);
}

CoolPerson.prototype = Object.create(Persion.prototype);

CoolPerson.prototype.sayLoveJob = function() {
  this.sayHi();
  console.log('I love my job!');
};

var jack = new CoolPerson('engineer');
var apple = new CoolPerson('designer');

jack.sayLoveJob();
apple.sayLoveJob();
印出結果
Hello, I am a/n engineer
I love my job!

Hello, I am a/n designer
I love my job!
「行為委派」(behavior delegation)是指讓物件在自身找不到指定屬性的方法時而能進行委派,意即順著委派連結,也就是內部屬性 [[Prototype]] 在原型串鏈往上層物件尋找。
修改上例程式碼。
Person = {
  setCareer: function(career) {
    this.career = career;
  },
  sayHi: function() {
    console.log(`Hello, I am a/n ${this.career}`);
  }
}

// 讓 CoolPerson 委派 Person
CoolPerson = Object.create(Person); // 物件與物件間使用 `Object.create` 來建立連結

CoolPerson.sayLoveJob = function() {
  this.sayHi();
  console.log('I love my job!');
}

var jack = Object.create(CoolPerson);
jack.setCareer('engineer');

var apple = Object.create(CoolPerson);
apple.setCareer('designer');

jack.sayLoveJob();
apple.sayLoveJob();
印出結果
Hello, I am a/n engineer
I love my job!

Hello, I am a/n designer
I love my job!
在這個範例中,Person 與 CoolPerson 皆是平等的物件,都不是類別,並且,CoolPerson 藉由 Object.create 來將 [[Prototype]] 委派給 Person。
相較於類別導向(或稱物件導向)的設計概念,這種物件相連的風格即是「OLOO」(objects linked to other objects),我們通常稱 CoolPerson 為委派者,而 Person 是代理者或受委派者。
不同於傳統的類別會以同名方法來得到覆寫或多型的優點,JavaScript 在委派機制上會避免同名的方法(這會造成遮蔽),而改用該物件專屬的方法(命名最好能精準的描述任務的特性)來產生更容易理解和維護的程式碼。如上範例,我們刻意用 sayLoveJob 來區別 sayHi 的差異,
注意!「互相委派」的行為可能會在查找不存在屬性時造成無限循環而得到錯誤,因此這是不被允許的。
感受到類別與委派的差異了嗎? σ`∀´)σ
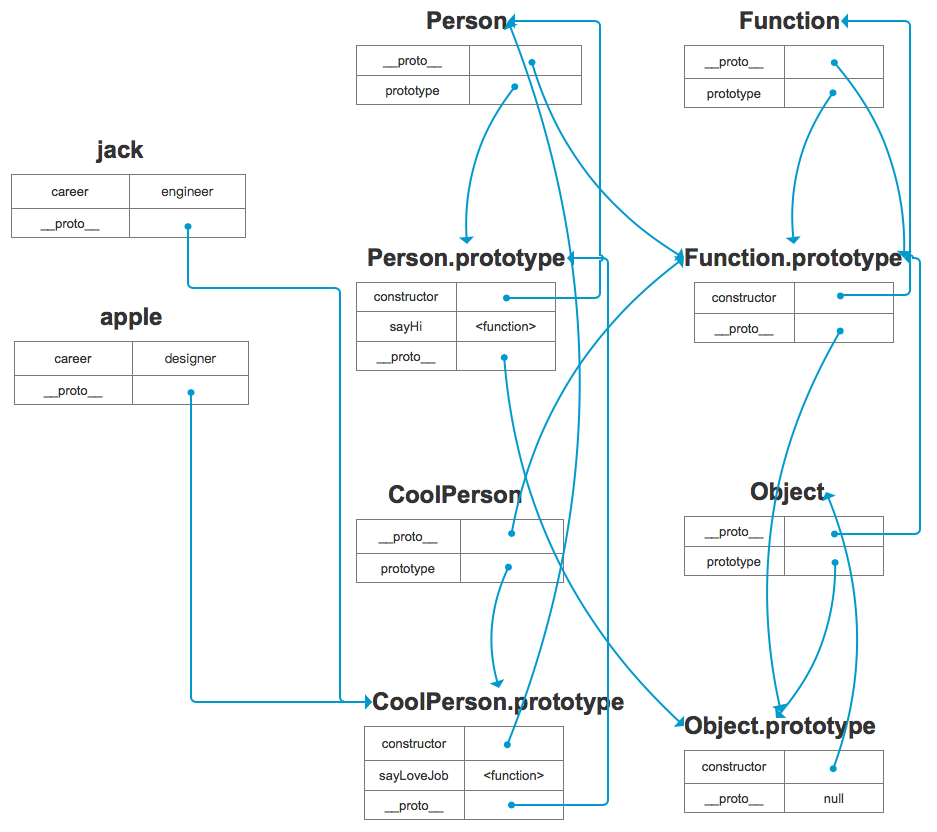
以類別的概念來實作的模型,在這裡實際上是使用(Prototypal 原型式)繼承的概念來實作。
...
...
以 OLOO 的概念來實作的模型。
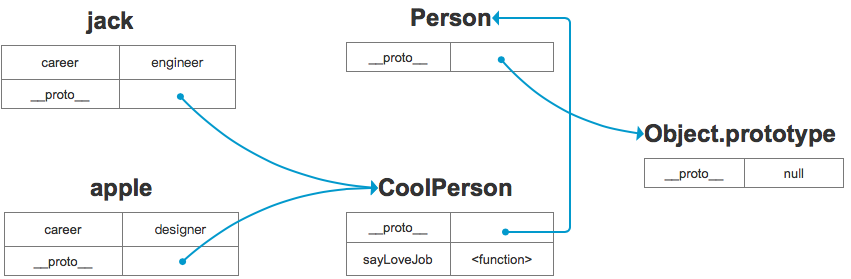
由模型圖可知,使用 OLOO 的概念來實作,除了使用相同的 [[Prototype]] 機制來實現委派功能外,還清楚表達了物件彼此間的連結關係,並且程式碼看起來更簡單易懂了-我們再也不用看到令人困惑的 new、建構子和原型了。
在這個部份,我們要來看更實際的應用,主要是以大家都非常熟悉的 jQuery 來實作 UI Widget,不管是做成 Widget 類別還是委派 Widget 物件。
以類別的概念來實作一個 widget,例如:一個具有 UI 共用行為的父類別與衍生出來的子類別 Button,範例如下。
function Widget(width = 50, height = 50) {
  this.width = width;
  this.height = height;
  this.$elem = null;
}

Widget.prototype.render = function($where) {
  this.$elem && this.$elem.css({
    width: `${this.width}px`,
    height: `${this.height}px`,
  }).appendTo($where);
}

function Button(width, height, label = 'Default') {
  Widget.apply(this, [width, height]);
  this.label = label;
  this.$elem = $('<button>').text(this.label);
}

Button.prototype = Object.create(Widget.prototype);

Button.prototype.render = function($where) {
  Widget.prototype.render.apply(this, [$where]);
  this.$elem.click(this.onClick.bind(this));
};

Button.prototype.onClick = function(e) {
  console.log(`Button ${this.label} cliked!`);
};

$(document).ready(function() {
  var $body = $(document.body);
  var btn1 = new Button(125, 30, 'Hello');
  var btn2 = new Button(150, 40, 'World');

  btn1.render($body);
  btn2.render($body);
});
這裡使用 apply 假裝是 super 來繼承父類別的功能,並用同名 render 來實現多型。
Demo。

使用 ES6 的類別語法糖改寫上例。
class Widget {
  constructor(width, height) {
    this.width = width || 50;
    this.height = height || 50;
    this.$elem = null;
  }

  render($where) {
    this.$elem && this.$elem.css( {
      width: this.width + "px",
      height: this.height + "px"
    }).appendTo( $where );
  }
}

class Button extends Widget {
  constructor(width,height,label) {
    super(width, height);
    this.label = label || 'Default';
    this.$elem = $('<button>').text(this.label);
	}

  render($where) {
    super.render($where);
    this.$elem.click(this.onClick.bind(this));
  }

  onClick(evt) {
    console.log(`Button ${this.label} cliked!`);
  }
}

$(document).ready(function() {
  var $body = $(document.body);
  var btn1 = new Button(125, 30, 'Hello');
  var btn2 = new Button(150, 40, 'World');

  btn1.render($body);
  btn2.render($body);
});
雖然看起來簡單清爽許多,但注意,事實上這裡的「類別」並非真正的類別,它只是語法糖,根本上仍是使用 [[Prototype]] 機制來實作,在後續 ES6 Class 的部份會再探討其美好與陷阱。
改用 OLOO 改寫上例。
var Widget = {
  init: function(width, height){
    this.width = width || 50;
    this.height = height || 50;
    this.$elem = null;
  },
  insert: function($where){
    if (this.$elem) {
      this.$elem.css({
        width: this.width + 'px',
        height: this.height + 'px'
      }).appendTo($where);
    }
  }
};

var Button = Object.create(Widget);

Button.setup = function(width, height, label){
  // delegated call
  this.init(width, height);
  this.label = label || 'Default';

  this.$elem = $('<button>').text(this.label);
};

Button.build = function($where) {
  // delegated call
  this.insert($where);
  this.$elem.click(this.onClick.bind(this));
};

Button.onClick = function(evt) {
  console.log("Button '" + this.label + "' clicked!");
};

$(document).ready(function() {
  var $body = $(document.body);

  var btn1 = Object.create(Button);
  btn1.setup(125, 30, 'Hello');

  var btn2 = Object.create(Button);
  btn2.setup(150, 40, 'World');

  btn1.build($body);
  btn2.build($body);
});
在此看到的是物件與物件之間平等的委派關係,而非父子類別的繼承關係。並且,使用相異也更具描述性的特化命名其方法,比起使用通用的名稱,除了可避免為了模擬多型而使用的醜陋語法(如先前的 apply)或偽類別程式碼(例如:constructor、prototype、new),還可更具體的描述各自要執行的任務,簡單易懂。另外,在關注點分離的議題上,有更多的彈性-原先使用 var btn1 = new Button(125, 30, 'Hello'); 來建立和初始化一個實體,而在這裡改用 btn1.setup( 125, 30, 'Hello'); 與 btn1.build($body); 分別做建構與初始化的動作。
內省是指檢視一個實體以判斷它是何種類型的物件,經由了解它是由何種方式被創造的來推理物件的結構和能力。
再一次來看 Person、CoolPerson 與 jack 的例子。
Person = {
  setCareer: function(career) {
    this.career = career;
  },
  sayHi: function() {
    console.log(`Hello, I am a/n ${this.career}`);
  }
}

// 讓 CoolPerson 委派 Person
CoolPerson = Object.create(Person); // 物件與物件間使用 `Object.create` 來建立連結

CoolPerson.sayLoveJob = function() {
  this.sayHi();
  console.log('I love my job!');
}

var jack = Object.create(CoolPerson);
jack.setCareer('engineer');

jack.sayLoveJob();
在原型的章節中,我們使用 instanceof 來檢視誰是誰的實體,或說是誰建立這個物件,但其中的限制是建立的物件必須是函式,而無法直接詢問兩個物件的關係。在 OLOO 的設計模式中,我們並沒有使用函式來建立類別並實體化物件,我們有的只是將物件們連結起來而已,所以目前有兩個選擇...
if (jack.setCareer) {
  console.log('jack is linked to Person');
}

if (jack.sayLoveJob) {
  console.log('jack is linked to CoolPerson');
}
...
...
這種「基於一個值可能會擁有什麼特性,而對它的型別做檢查」的方式,稱為鴨子定型法(duck typing),我們可以說「牠看起像鴨子、叫聲聽起來也像鴨子,那牠就是隻鴨子」。

...
...
但這種檢測方式是很脆弱的,例如,判斷一個物件是否為 promise 物件,就測試這個物件是否存在 .then() 方法,那假設這個物件就不是 promise 物件,但剛好又有一個 .then() 方法呢?難道要建議非 promise 物件不要命名一個方法為 then 嗎?(當然是這樣沒錯啦!)
isPrototypeOf 與 getPrototypeOf。isPrototypeOf 可檢視左邊的物件是否出現於右邊物件的原型串鏈中,而 getPrototypeOf 可取得物件的 [[Prototype]] 的值。Person.isPrototypeOf(CoolPerson) // true
Person.isPrototypeOf(jack) // true
CoolPerson.isPrototypeOf(jack) // true
jack.isPrototypeOf(CoolPerson) // false
jack.isPrototypeOf(Person) // false
Object.getPrototypeOf(CoolPerson) === Person // true
Object.getPrototypeOf(jack) === Person // false
Object.getPrototypeOf(jack) === CoolPerson // true
...
...
如果覺得很暈沒關係,附上前面提過的模型圖給大家參考(貼心)。
...
...
看完這篇文章,我們到底有什麼收穫呢?藉由本文可以理解到...
isPrototypeOf 與 getPrototypeOf 來做物件間的內省。同步發表於部落格。