昨天已經大略了解 firebase database 的運作,今天要來想想要把什麼資訊存到我們的 db 裡面,方便我們 coding 的使用
設定一下開發環境
npm install --save firebase
接下來想用 node 來做測試使用 firebase,然而又想使用 ECMAScript 模組,所以必須要做一點設定
babel-node is a CLI that works exactly the same as the Node.js CLI, with the added benefit of compiling with Babel presets and plugins before running it.
使用這個 CLI 會先將代碼使用 babel 轉譯過後讓 node 去執行。
@babel/preset-env is a smart preset that allows you to use the latest JavaScript without needing to micromanage which syntax transforms (and optionally, browser polyfills) are needed by your target environment(s). This both makes your life easier and JavaScript bundles smaller!
新的 babel-env 會知道執行的 target 是哪裡,然後編譯出相對可執行的 javascript ,像是現在要執行在 node 上,他就會編譯出 commonjs 的語法讓 node 執行
舊版的 babel 就必須要自行設定要跑什麼樣的環境
像是 browser 就可能要指定 es2015
nodejs 就要另外安裝 babel-plugin-transform-modules-commonjs
之後 babel-node 或者 babel-loader 執行時就會看這一份來做編譯囉~
{
  "presets": [
    "@babel/preset-env"
  ]
}
因為不太熟習 firebase 所以直接用 javascript 來對 firebase 做操作
我們的 TodoList 資料物件會像是這樣
[
  {
    "name": "第一個任務",
    "isDone": false
  },
  {
    "name": "第二個任務",
    "isDone": false
  }
]
所以要把這樣的資訊存進 firebase
來試試這個
import 'firebase/auth';
import 'firebase/database';

// Initialize Firebase
const config = {
  apiKey: 'AI----------------nExQ', // 雖然 git 上面有我還是刪掉它 XD
  authDomain: 'todolist-67ee2.firebaseapp.com',
  databaseURL: 'https://todolist-67ee2.firebaseio.com',
  projectId: 'todolist-67ee2',
};

const KEY_TODOS = 'todos';

const writeUserData = (name, checked) => {
  firebase.database().ref(`${KEY_TODOS}/`).push().set({
    name,
    checked,
  });
};

writeUserData('第一個任務', false);
writeUserData('第二個任務', true);
我將這個檔案存放在 src/service/firebase.js
用 node 執行看看
babel-node src/service/firebase.js
在 firebase console 上會看到項目被新增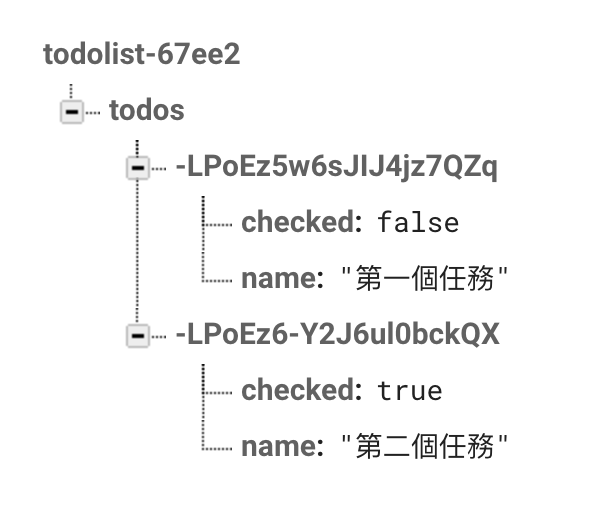
成功創了兩個
const getList = () => {
  const listRef = firebase.database().ref(KEY_TODOS);
  listRef.once('value', (snapshot) => {
    snapshot.forEach((childSnapshot) => {
      const childKey = childSnapshot.key;
      const childData = childSnapshot.val();
      console.log(childKey, childData);
    });
  });
};

getList();
會拿到
-LPoJS_3YqW7LkjAJMSF { checked: false, name: '第一個任務' }
-LPoEz6-LPoJTDfsMGLsJYBrld2 { checked: true, name: '第二個任務' }
但不確定排序是不是從小到大,為了確保起見,在每個 todo 都加上時間
getList 可以改成這樣
const listRef = firebase.database().ref(KEY_TODOS).orderByChild('ts');
使用 Ref 來做刪除
const deleteTodo = (id) => {
  const deleteRef = firebase.database().ref(`${KEY_TODOS}/${id}`);
  deleteRef.remove();
};
deleteTodo('-LPoJTDfsMGLsJYBrld2');
最後會得到
在 firebase console 上可以看到該項目被刪除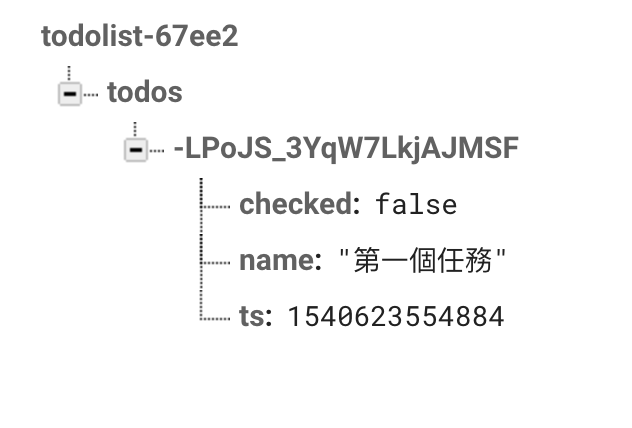
const updateTodo = (id, updatedTodo) => {
  const updateRef = firebase.database().ref(`${KEY_TODOS}/${id}`);
  return updateRef.update(updatedTodo);
};

updateTodo(
  '-LPoJTDfsMGLsJYBrld2',
  {
    checked: false,
    name: '第二個任務',
    ts: 1540623557547,
  },
);
得出來更新的結果!
[ { id: '-LPoJS_3YqW7LkjAJMSF',
    checked: false,
    name: '第一個任務',
    ts: 1540623554884 },
  { id: '-LPoJTDfsMGLsJYBrld2',
    checked: false,
    name: '第二個任務',
    ts: 1540623557547 } ]
附上今天的代碼
可以上 firebase 試玩看看,然後將 config 改成自己的喔!
下載下來之後再 todo-list 目錄安裝 npm install 再跑 babel-node src/service/firebase.js 就可以測試了


 iThome鐵人賽