iT邦幫忙

2019 iT 邦幫忙鐵人賽

DAY 30
0
自我挑戰組

Micropython x ESP H/W 之三十個錦囊妙計系列 第 31

[錦囊--番外篇] Line Beacon 實作 (Python/ Golang)

  • 分享至 

  • xImage
  •  

筆者這幾天因需要, 剛好在研究如何快速建立 Line beacon, 很不巧的是筆者很少寫web app, 加上網路上有各種不清不礎的教學就因此卡關很久.

以下將介紹如何快速實作Line bot with Beacon

[正文開始]

  1. 申請heroku 帳號 (heroku sign up
  2. 申請 Line bot Message APi 帳號
    https://ithelp.ithome.com.tw/upload/images/20181113/201038247k8rqOBMH2.png
    [秘訣]
    (1) 使用chatbot 就需要選擇Message API, 請不要選錯
    (2) 使用FB 帳戶申請Line account (不需要綁定電話號碼的做法)
    方法有兩種:
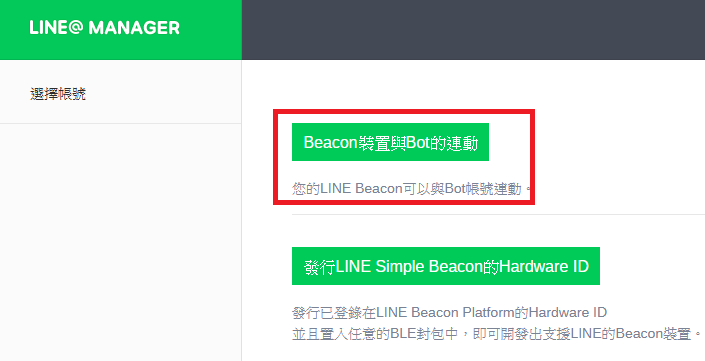
  3. 登入LINE@ Manager 後選擇Beacon裝置與Bot的連動
    https://ithelp.ithome.com.tw/upload/images/20181113/20103824cjFOqjZ093.png
    [秘訣] 如果沒有購買Line官方出的Line beacon 裝置的話, 可使用Raspberry Pi 做Line simple beacon 來玩
    可參考: Line Simple Beacon Github
  4. 選擇要連動的帳號
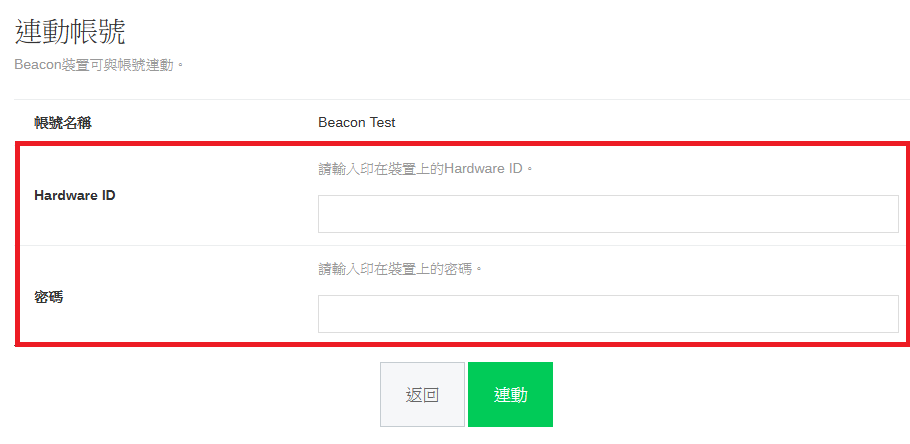
  5. 輸入Hardware ID/ code
    https://ithelp.ithome.com.tw/upload/images/20181113/20103824GwroWUUdD4.png
    [秘訣] 這兩組資料會在實體的Line Beacon裝置上看到
  6. 回到Line Development 後台, 產生兩組token 並記錄下來
    • Channel secret
    • Channel access token (long-lived)
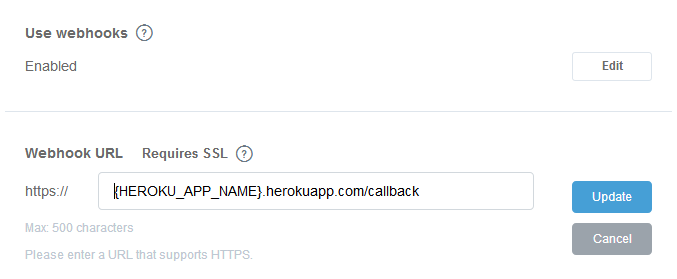
  7. 啟用webhook 及設定webhook 網址, 設定完成後按下Update
    https://ithelp.ithome.com.tw/upload/images/20181113/20103824QrRDHwAiWY.png
    [秘訣]
    (1) 請在大括號內輸入創建的herokuapp 名稱
    (2) 按下Verify前請先確認heroku APP 是否已經建立完成 (暫時先不按)
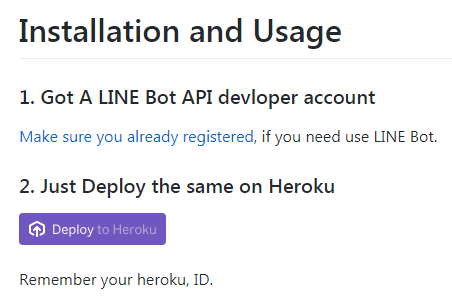
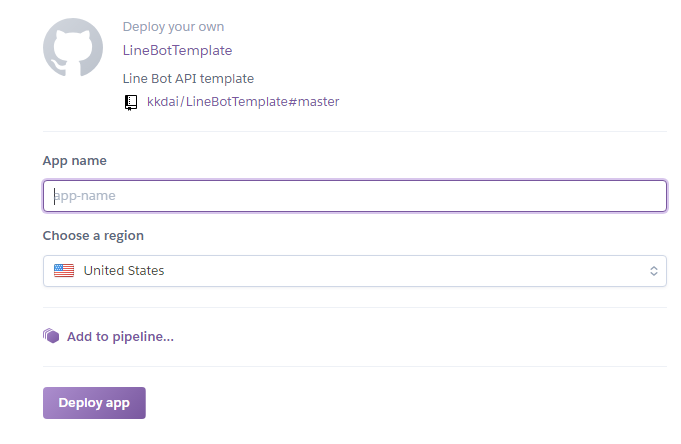
  8. 使用現成的Golang Line bot Template 佈署到heroku
    https://ithelp.ithome.com.tw/upload/images/20181113/20103824RQFqun1qup.png
    [秘訣] 這個Github 上面寫的修改原始碼的方式是不能用的, 筆者嘗試過發現無法使用. 需要使用老方法, 直接將Github 的資料clone 下來後才能修改原始碼
  9. 輸入Heroku App 名稱, 按下Deploy app 就自動會佈署成功
    https://ithelp.ithome.com.tw/upload/images/20181113/20103824OSYGgBVBro.png
  10. 完成後點入Manage APP, 進入頁面, 選擇Settings, 移到Config Vars, 新增以下兩個項目後存檔, 回到步驟7之秘訣2, 按下Verify 就會出現成功
    https://ithelp.ithome.com.tw/upload/images/20181113/20103824gyZRVEb3Mg.png
  11. ChatBot golang 版本這樣就可以使用, 但我們需要修改內容以回應beacon內容
  12. Clone Line-bot-template for golang
  13. 使用vscode editor 打開main.go
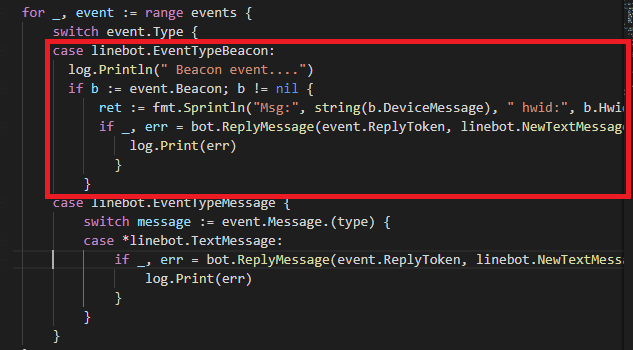
  14. 加入關於beacon event 回應的部份, 筆者是在自動回文的上面多加入回應beacon hardware ID
    https://ithelp.ithome.com.tw/upload/images/20181113/20103824r5iFTByKeU.png
    完整程式碼請參考: main.go
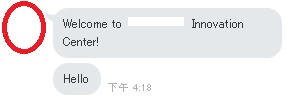
  15. 設定完後更新heroku app 後就會在line 看到回應
    https://ithelp.ithome.com.tw/upload/images/20181113/20103824ShxQVTllQ2.png
  16. Golang 版本實作完成

[Python 版本實作如下]
完整程式碼請參考 abeacon

  1. 創建heroku app , 名稱設定為abeacon
heroku create abeacon
  1. 下載空的abeacon repostiory
    [秘訣] 這邊有很多種作法, 可以不要下載, 直接init 一個也可以, 不過筆者嫌太麻煩. 選擇簡單的做法搞定
  2. 打開app.py, 在linebot model 中要載入BeaconEvent
    https://ithelp.ithome.com.tw/upload/images/20181113/20103824wo8qpTZlim.png
  3. app.py 中需要新增一個回應beacon的function
@handler.add(BeaconEvent)
def handle_beacon_event(event):
    if event.beacon.hwid == "{your HWId}":
        msg = '{your message 1}'
    else:
        msg = '{your message 2}'

    line_bot_api.reply_message(
        event.reply_token,
        TextSendMessage(text=msg)
* 接收到特定的beacon hwid 後會回應特殊的字串內容, 否則統一回一樣的字串內容
  1. 新增app.py/ Procfile/ Requirements.txt
  2. 設定好後重新更新heroku app 就可以開始使用Line bot with beacon
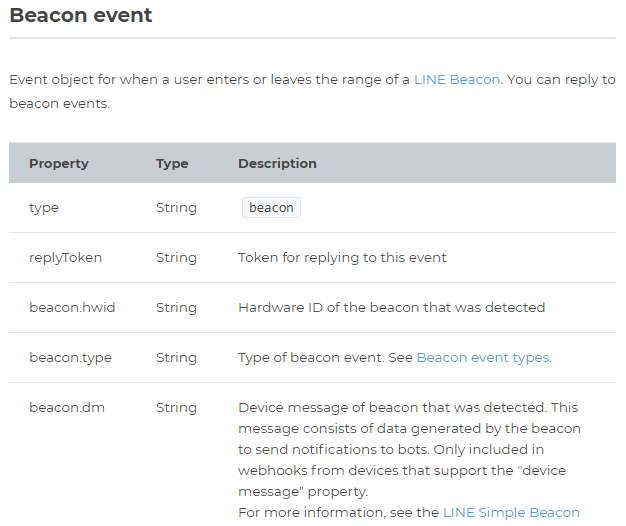
    [秘訣] 關於Beacon Event 相關的API 可以在[BeaconEvent] (https://developers.line.me/en/reference/messaging-api/#beacon-event) 查詢
    https://ithelp.ithome.com.tw/upload/images/20181113/20103824TNQy8u8NGy.png
  3. 當手機打開藍芽及Line 後就會收到Line Beacon
    https://ithelp.ithome.com.tw/upload/images/20181113/20103824Zq4x0geumG.png
    [秘訣] 若收不到Line Beacon , 請先確認Line app 的Location 權限是否有被允許. 由於Beacon 這個技術還是存在部分issue 待解, 如果真的得不到的話, 在正式場合上請記得還是要準備QR Code 以備不時之需

後記:
筆者在做Line beacon 時所搜尋到的Line Bot 都是應用跟變化版的居多或是使用nginx 在本機端自架server的版本. 真的是讓筆者超級傻眼. 心想: 沒有基本款嗎? 無奈之下只好直接實作, 這篇教學文就是這樣出現的, 雖然跟主題系列無關. 但就一起分享囉!!


上一篇
[錦囊-叁拾] MicroPython 的資源可以去哪找?
系列文
Micropython x ESP H/W 之三十個錦囊妙計31
圖片
  直播研討會
圖片
{{ item.channelVendor }} {{ item.webinarstarted }} |
{{ formatDate(item.duration) }}
直播中

1 則留言

0
hoihoi000a
iT邦新手 5 級 ‧ 2019-02-18 11:49:14

您好 我使用golang
實做到上傳code到heroku
但程式碼有syntax error 如下
./main.go:59:4: syntax error: unexpected switch, expecting expression
./main.go:60:4: syntax error: unexpected case, expecting :
./main.go:67:3: syntax error: non-declaration statement outside function body
! Push rejected, failed to compile Go app.
! Push failed

家誠 iT邦新手 2 級 ‧ 2019-02-19 13:23:26 檢舉

剛看了一下, 改成範例的時候不小心改到其他東西. 目前應該可以用了, 請參考main.go 謝謝

我要留言

立即登入留言