文章連結
開源企業備份軟體 Bareos
Bareos 由 bacula 分支而來
大部分的東西都一樣
最大的優點是 webui 好用很多,安裝也非常簡單
以下內容從 blog 轉貼過來,排版、內容可能會有誤
建議點上面的連結到部落格去看
簡介
在 centos 中,官方預設的備份軟體是 Amanda
另外有一套 bacula
但這兩套實際上並沒有這麼好用
作為上面兩套 netbackup 的替代方案 Bareos 是由 bacula 分支而來
簡單來說,他更好用
Bareos 官網
Bareos 架構如下 引用自 https://www.serveradminz.com/blog/what-is-bareos-and-how-to-install-bareos/
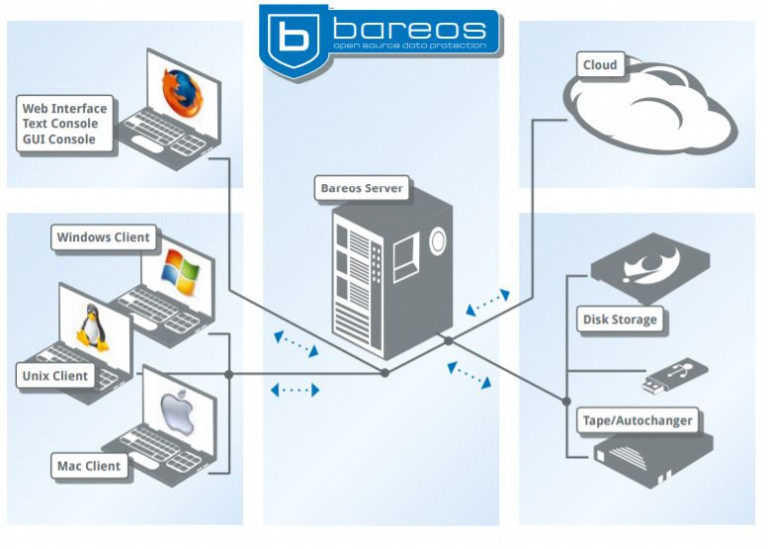
Bareos 分成幾個服務元件
Director – 作為中央控制服務
Bareos Console – 指令控制介面
File Daemon – 作為控制檔案存取 (備份、還原)
Storage Daemon – 作為提供儲存備份空間的服務
Catalog – 資料庫,用來維護備份索引 (那些檔案有備份、存在哪裡…..的紀錄)
bareos-webui 能夠觀看備份狀態、簡易的手動備份/還原操作、控制
這些東西可以安裝在單一 server 上
也可以拆開
好處是 一個 Director ,可以同時控制多個服務
比如說的多個存放備份的地方,成為分散式儲存
支援系統清單
支援的系統清單如下
https://docs.bareos.org/Appendix/OperatingSystems.html
Director Daemon 即為能作為 server 端
Client Daemon 能被備份的對象
Server 端安裝
Server 端介紹
Server 端
即包含所有元件
Director
Bareos Console
File Daemon
Storage Daemon
Catalog
bareos-webui
這邊要講清楚
因為他是 linux 上的軟體
雖然官方有支援在 windows 上安裝 server 端
但會碰到 Unicode 的問題
非英文語系字元會全部變成亂碼,以個人慘痛經驗來說
不 要 裝 在 windows 上 !!
實際操作安裝
以下安裝採用,單一伺服器架構
Centos 7 Minimal
Bareos 18.2
MariaDB 10.4
apache 2.4
php 7.2
首先安裝 epel repository 、 工具程式
apache2 、php7.2、mariadb
yum install -y epel-release
yum install -y wget nano
yum install -y http://rpms.remirepo.net/enterprise/remi-release-7.rpm
yum install -y yum-utils
yum-config-manager --disable remi-php54
yum-config-manager --enable remi-php72
curl -sS https://downloads.mariadb.com/MariaDB/mariadb_repo_setup | sudo bash
cd /etc/yum.repos.d && wget https://repo.codeit.guru/codeit.el`rpm -q --qf "%{VERSION}" $(rpm -q --whatprovides redhat-release)`.repo
匯入官方 Bareos  REPO (18.2 穩定版)
wget -O /etc/yum.repos.d/bareos.repo  http://download.bareos.org/bareos/release/18.2/CentOS_7/bareos.repo
安裝套件
yum clean all
yum install -y httpd php php-gd bareos bareos-database-mysql bareos-webui mariadb-server
優化 PHP 設定
timedatectl set-timezone Asia/Taipei
sed -e 's/memory_limit = 128M/memory_limit = 1024M/' -i /etc/php.ini
sed -e 's/max_execution_time = 30/max_execution_time = 3600/' -i /etc/php.ini
sed -e 's/max_input_time = 60/max_input_time = 3600/' -i /etc/php.ini
sed -e 's/upload_max_filesize = 2M/upload_max_filesize = 1024M/' -i /etc/php.ini
sed -e 's/post_max_size = 8M/post_max_size = 1024M/' -i /etc/php.ini
sed -e 's/^;date.timezone =/date\.timezone ="Asia\/Taipei"/' -i /etc/php.ini
讓服務開機自動執行
systemctl start mariadb &&
systemctl start bareos-dir &&
systemctl start bareos-sd &&
systemctl start bareos-fd &&
systemctl start httpd &&
systemctl enable mariadb &&
systemctl enable bareos-dir &&
systemctl enable bareos-sd &&
systemctl enable bareos-fd &&
systemctl enable httpd
匯入 bareos schema
/usr/lib/bareos/scripts/create_bareos_database
/usr/lib/bareos/scripts/make_bareos_tables
/usr/lib/bareos/scripts/grant_bareos_privileges
selinux 允許 webui 連線
setsebool -P httpd_can_network_connect on
建立 bareos webui 帳密 admin/admin
執行
bconsole
輸入
configure add console name=admin password=admin profile=webui-admin tlsenable=false
重新套用 config
reload
離開
q
開通防火牆
firewall-cmd --zone=public --permanent --add-service=http
firewall-cmd --zone=public --permanent --add-port=9101/tcp
firewall-cmd --zone=public --permanent --add-port=9102/tcp
firewall-cmd --zone=public --permanent --add-port=9103/tcp
firewall-cmd --reload
最後這邊我建議重開機一下
再進去 webui
http:// server-IP-address/bareos-webui/
如果能夠登錄,代表上述步驟都沒有問題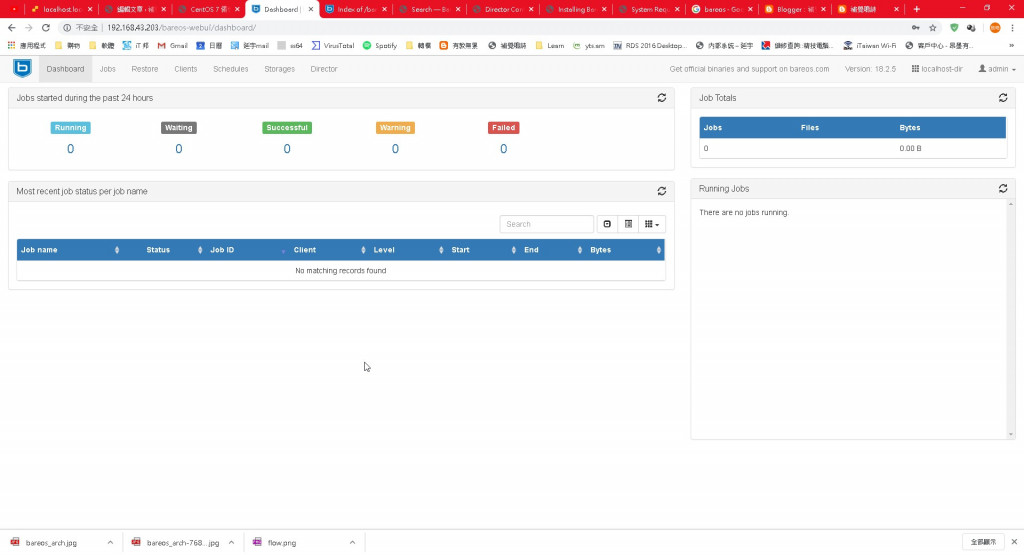
Server 端 config 位置、優化
位置
Server 端主要有三個 config
/etc/bareos/bareos-dir.d # Director
/etc/bareos/bareos-fd.d # File
/etc/bareos/bareos-sd.d # storage
#進入 Director conf 目錄
cd /etc/bareos/bareos-dir.d/
bareos 在 config 切得相當細,提供了大量的彈性應用
在這裡有幾個 conf 目錄是我們新增備份來源會用到的
client – 要備份的裝置
Job – 要執行備份的工作
JobDefs – job 的範本,用在快速引用
FileSet – 要備份的項目
pool – 備份檔的存放空間
schedule – 備份排程
備份存放位置
Archive Device 是指存放備份檔的目錄
依自己的實際情況做更改
nano /etc/bareos/bareos-sd.d/device/FileStorage.conf
Device {
  Name = FileStorage
  Media Type = File
  Archive Device = /var/lib/bareos/storage
  LabelMedia = yes;                   # lets Bareos label unlabeled media
  Random Access = yes;
  AutomaticMount = yes;               # when device opened, read it
  RemovableMedia = no;
  AlwaysOpen = no;
  Description = "File device. A connecting Director must have the same Name and MediaType."
}
以我的例子 我是把它改到 /home/
記得目錄也要建立 擁有者是 bareos
client 連線 storage 服務位置
Address = localhost

localhost 改成 server 的 IP (不一定要用 FQDN)

nano /etc/bareos/bareos-dir.d/storage/File.conf
Storage {
  Name = File
  Address = 192.168.43.203                 # N.B. Use a fully qualified name here (do not use "localhost" here).
  Password = "JytUV8gWZhPxY/koRhEzRdsVEH3d/q8YLzxI5qLOtA8B"
  Device = FileStorage
  Media Type = File
Maximum Concurrent Jobs = 10
}
不改的話 client 會連線至 localhost 等於client 一直連自己
Maximum Concurrent Jobs = 10
讓該儲存空間最多能同時接受 10 個作業
備份使用空間大小
https://docs.bareos.org/Configuration/Director.html#directorresourcepool
nano /etc/bareos/bareos-dir.d/pool/File.conf
Pool {
  Name = File_pool
  Pool Type = Backup
  Recycle = yes                       # Bareos can automatically recycle Volumes
  AutoPrune = yes                     # Prune expired volumes
  Volume Retention = 7 days         # How long should the Full Backups be kept? (#06)
  Maximum Volume Bytes = 100G          # Limit Volume size to something reasonable
  Maximum Volumes = 5               # Limit number of Volumes in Pool
  Label Format = "Full-"              # Volumes will be labeled "Full-<volume-id>"
Purge Oldest Volume = yes
Recycle Oldest Volume = yes
}
範例說明
這裡建立一個存放備份檔的 pool
命名為 File_pool
File_pool 底下會有 5 個 Volumes ,每個 100GB
等於這個 File_pool 最大能存放 500GB 的備份資料
Volume Retention 什麼時候備份內容會過期
AutoPrune 、Recycle 基本上一同使用,代表備份內容過期後能夠被複寫
當空間已滿但沒有任何 pool 可存放備份時
這時備份 job 就會停擺
要解決這問題就要加上這兩個參數
Purge Oldest Volume = yes
Recycle Oldest Volume = yes
不論備份是否過期,皆會自動清除回收最後的備份空間
Client 端安裝
windows
再來下一步是新增 windows 裝置進行備份
在官方網站下載 client 後 http://download.bareos.org/bareos/release/18.2/windows/
以預設選項安裝即可 (client)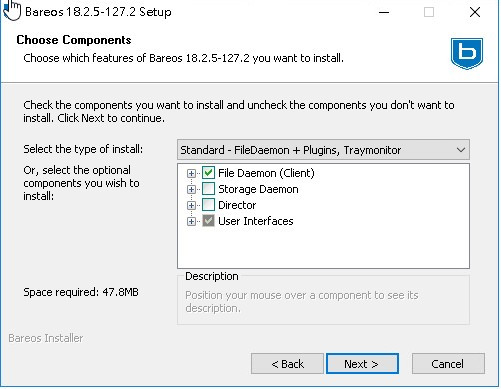
參數的部分
如果你有多台電腦要備份
我的建議密碼都設一樣即可
不然管理上會很累
記住,networkaddress 是 client 自己的 IP
設定範例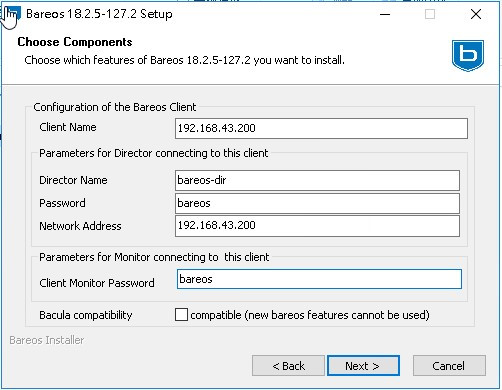
之後就是下一步、下一步安裝完成
接著他會產生一段 conf 要你放到 server 端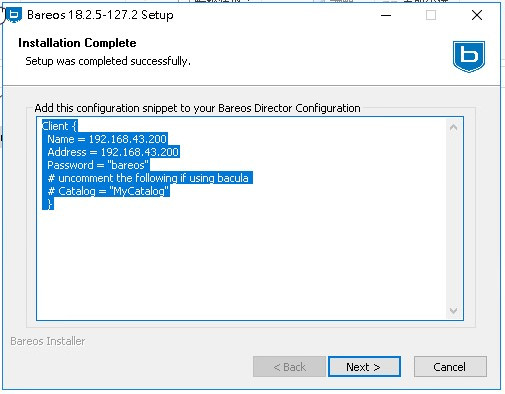
如果你在安裝時都採用同樣的模式,倒也不必特別記
安裝完成後只要一登錄系統
在app tray 就會看到 bareos tray monitor 可以看到自己的備份狀況
而相關的 config 都會放在
C:\ProgramData\Bareos
日後如果有需要修改來這邊即可
建立備份任務
回到 server 上
#進入 Director conf 目錄
cd /etc/bareos/bareos-dir.d/
再次說明每個目錄對應的功能
client – 要備份的裝置
Job – 要執行備份的工作
JobDefs – job 的範本,用在快速引用
FileSet – 要備份的項目
pool – 備份檔的存放空間
schedule – 備份排程
新增備份 Client
意思就是能被控制的 client
我們在 client 目錄新增一個 conf
我的習慣檔名就是該 client 的名稱
這邊輸入
nano /etc/bareos/bareos-dir.d/client/192.168.43.200.conf
Client {
Name = 192.168.43.200
Address = 192.168.43.200
Password = "bareos"
# uncomment the following if using bacula
# Catalog = "MyCatalog"
Auto Prune=yes
Maximum Concurrent Jobs = 4
}
Auto Prune=yes
這個參數可以讓資料滿的時候
自動將舊資料刪除
Maximum Concurrent Jobs = 4
讓該 client 能同時接受 4 個作業 (每個作業只會吃掉一個 cpu thread)
藉此加速備份速度
新增備份項目 FileSet
意思就是要備份哪些檔案
我們新增一個備份項目,可以參考 Windows All Drives.conf 做修改
而我這裡建立一個備份 D:\ 的項目
這邊要特別注意,linux 的路徑以 / 表示而不是
所以 config 要用 / 表示
儘管來源是 windows
compression 可以調整壓縮率,細節請參考文件
nano /etc/bareos/bareos-dir.d/fileset/WinD_fileset.conf
FileSet {
Name = "WinD_fileset"
Enable VSS = yes
Include {
Options {
Signature = MD5
Drive Type = fixed
IgnoreCase = yes
WildFile = "[A-Z]:/pagefile.sys"
WildDir = "[A-Z]:/RECYCLER"
WildDir = "[A-Z]:/$RECYCLE.BIN"
WildDir = "[A-Z]:/System Volume Information"
Exclude = yes
compression=GZIP
}
File = D:/
}
}
這邊有個特別的參數
Drive Type = fixed
代表外接式裝置是排除掉的,包含網路磁碟(待求證?)
如果要讓 client 多工備份
你可以選擇建立兩個 FileSet
比如說 C 槽、D槽
建立排程 Schedule
官方文件
這邊指的是建立一個時間表
後面的 jobdefs
可以依這邊的 Schedule 執行備份作業
nano /etc/bareos/bareos-dir.d/schedule/CyclePM21_Schedule.conf
Schedule {
  Name = "CyclePM21_Schedule"
  Run = Full 1st saturday at 00:01                   # 每個月的第一周的禮拜六早上 00:01 執行全備份
  Run = Differential daily at 21:00       #  每天晚上 9 點執行差異備份 (沒有全備份紀錄會變成跑全備份工作)
}
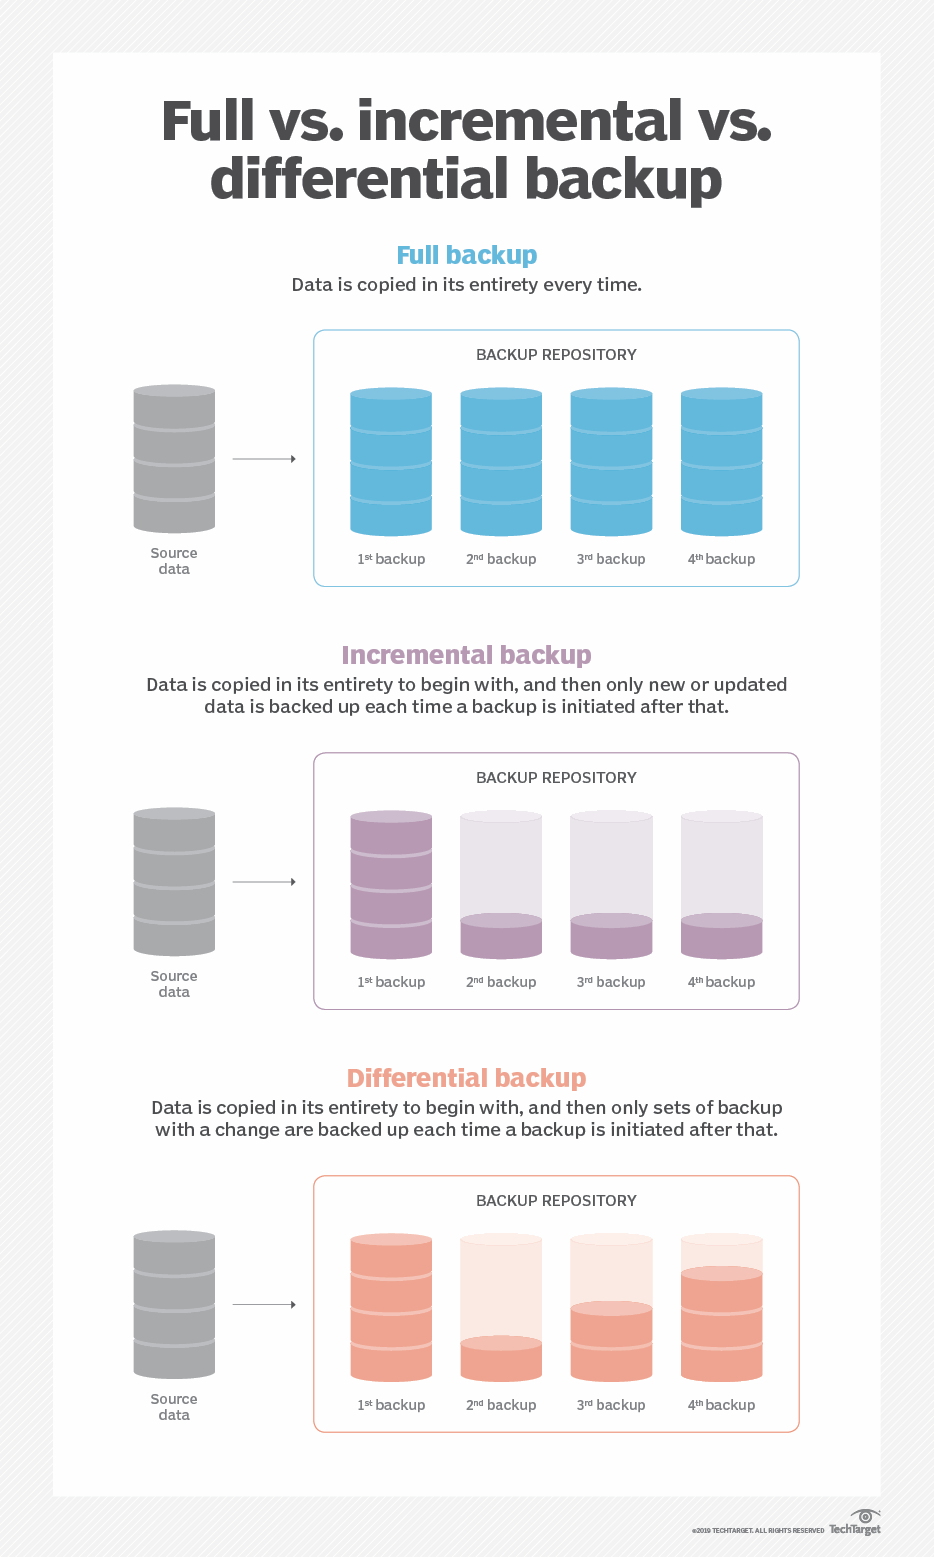
Full
Differential
Incremental
三者間的關係
https://searchdatabackup.techtarget.com/tip/Data-backup-types-explained-Full-incremental-differential-and-incremental-forever-backup
job 範本 jobdefs
jobdefs 他並不是一個必要的 config
它的用途在建立一個 job 的範本
設定好後
在最後建立 job 的 config 會輕鬆很多
nano /etc/bareos/bareos-dir.d/jobdefs/winD_jobdefs.conf
JobDefs {
        Name = "winD_jobdefs"
        Type = Backup
        Level = Incremental
   Client = "192.168.43.200"
        FileSet = "WinD_fileset"                     # selftest fileset
        Schedule = "CyclePM21_Schedule"
        Storage = File
        Messages = Standard
        Pool = File_pool
        Priority = 10
        Write Bootstrap = "/var/lib/bareos/%c.bsr"
Maximum Concurrent Jobs = 4
}
記得要多工 這邊也要給
Maximum Concurrent Jobs
建立 job
總算到最後了,job 要建立非常簡單
因為我們建好 jobdefs 了
所以最後只要帶進來就可以使用
nano /etc/bareos/bareos-dir.d/job/192.168.43.200_job.conf
Job {
  Name = "192.168.43.200_job"
  JobDefs = "winD_jobdefs"
  Client = "192.168.43.200"
}
重新讀取 config
最後進入 bareos 操作工具,執行 reload 命令
bconsole
reload
這樣前面的設定就會套進去 bareos 中
接著去 webui
job – actions
就能手動執行工作
或是等排程到,job 也會自動進行
其他
刪除備份
進入 bconsole 執行 purge 指令
按照提示進行即可,以下範例
*purge
This command can be DANGEROUS!!!
It purges (deletes) all Files from a Job,
JobId, Client or Volume; or it purges (deletes)
all Jobs from a Client or Volume without regard
to retention periods. Normally you should use the
PRUNE command, which respects retention periods.
This command requires full access to all resources.
Automatically selected Catalog: MyCatalog
Using Catalog "MyCatalog"
You have the following choices:
     1: files
     2: jobs
     3: volume
     4: quota
Choose item to purge (1-4): 2
The defined Client resources are:
     1: bareos-fd
     2: 192.168.43.200
Select Client (File daemon) resource (1-2): 2
Begin purging jobs from Client "192.168.43.200"
Found 5 Jobs for client "192.168.43.200" in catalog "MyCatalog".
Purge (yes/no)? yes
*
故障排除
如果遇到服務起不來
記得所有相關目錄、config 都要是用 bareos 的權限
chown -R bareos: /etc/bareos/*
或是利用 config 檢測工具
能告訴你是哪邊有錯
官方文件
su bareos -s /bin/sh -c "/usr/sbin/bareos-dir -t"
su bareos -s /bin/sh -c "/usr/sbin/bareos-sd -t"
bareos-fd -t
bconsole -t
bareos-tray-monitor -t
實際檢測會是這樣
[root@localhost job]# su bareos -s /bin/sh -c "/usr/sbin/bareos-dir -t"
bareos-dir: ERROR TERMINATION at lib/res.cc:574
Config error: Could not find config resource "winD_jobdefs11" referenced on line 3:   JobDefs = "winD_jobdefs11"
            : line 3, col 28 of file /etc/bareos/bareos-dir.d/job/192.168.43.200_job.conf
  JobDefs = "winD_jobdefs11"
減少重複數據
簡單來說 就是找一台的備份當作 base
後面的備份就跟他比較,一樣的檔案就不進行備份
可參考
https://www.funkypenguin.co.nz/howto/deduplicating-using-base-jobs-bacula/
多工處理
bareos 預設一個 client 同時只會有一個 job
打開壓縮功能後,一般備份大概只能跑 10MB/s
這速度其實蠻慢的
為了要解決這種狀況
我們可以建立多個 job
比如說
job1 備份 C 槽
job2 備份 D 槽
會動到的參數
Maximum Concurrent Jobs = <數值>
會動到的 config
/etc/bareos/bareos-dir.d/director/
/etc/bareos/bareos-dir.d/client/
/etc/bareos/bareos-dir.d/storage/
/etc/bareos/bareos-dir.d/jobdefs/
/etc/bareos/bareos-dir.d/job/
director、storage 影響 server 端
其他影響 client 端
建議公式
client 端 < CPU 線程數
我個人建議用 4
server 端 I/O 除以10MB
比如說 server 使用 1Gb 的網路
那
Maximum Concurrent Jobs = 10
記得 fileset
要去設定分工作業
備份 C
備份 D
最後 job
也要建立多份讓他同步執行
 owan
owan

 iThome鐵人賽