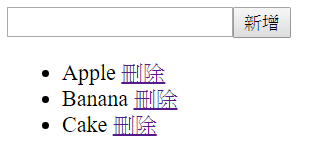
今天新增了deleteItem的方法,並在JSX中加入我們的刪除按鈕,並綁到deleteItem上。
這邊用到官方文檔給出的一個方法,可以同時間事件跟參數綁到監聽函數上,就是在onClick的監聽事件上,直接綁一個箭頭函式,讓那個箭頭函式去接event,再用bind將他跟id綁到我們的監聽函式上。
import React from "react"

class List extends React.Component {
  constructor(props) {
    super(props);
    this.state = {
      itemData: props.itemData,
      inputValue: ""
    };
    this.InputChangeHandler = this.InputChangeHandler.bind(this);
    this.clickHandler = this.clickHandler.bind(this);
    this.deleteItem = this.deleteItem.bind(this);
  }

  clickHandler(e) {
    const addValue = this.state.inputValue;
    const newItemData = this.state.itemData;
    const dataId = Math.max.apply(null, (newItemData.map(p => p.id)))+1;
    newItemData.push({id: dataId, name: addValue});

    this.setState({itemData: newItemData});
    this.setState({inputValue: ''});
  }

  InputChangeHandler(e) {
    const value = e.target.value;
    this.setState({inputValue: value});
  }

  deleteItem(e, id) {
    e.preventDefault();
    const newItemData = this.state.itemData.filter(function(value) {
      return value.id !== id;
    });
    this.setState({itemData: newItemData});

  }

  render(){
    return(
      <div>
        <input type="text" name="name" onChange={this.InputChangeHandler} value={this.state.inputValue}/>
        <button onClick={this.clickHandler}>新增</button>
        <ul>
          {this.state.itemData.map((data)=>(<li key={data.id}>{data.name} <a href="/" onClick={(e) => this.deleteItem(e, data.id)}>刪除</a></li>))}
        </ul>
      </div>
    )
  }
}

export default List;
在deleteItem中,我們用id去從dataItem裡過濾掉屬性為id這個值的項,更新state,畫面便會重新渲染。

React一些基本的功能就寫到這裡,畢竟這只是我們主題中的一部分而已,所以無法花太多篇幅介紹,雖然之前有去了解一些JS底層的運作原理,但JS畢竟不是我平時最常碰的語言,所以很多地方還是沒辦法很深度的去解析。
有興趣的再去翻翻其他人的文章跟官方文檔吧~
React官方文檔: https://reactjs.org/docs/getting-started.html
明天起,我們來學gatsby中第二個主要的構成元素,GraphQL~
