在Day8提到建立MySQL數據庫,相信大家都成功做到。同一時間在過去的幾天,大家對Spring Boot的認識也多了一些,接下來就是和大家講一下怎樣在Spring Boot連接MySQL數據庫。
由於今天的教學需要建立各種檔案,所以大家需要多花時間來閱讀及完成練習。
詳細可以去Day 8的教學看看
今天的教學會使用的數據庫的表格如下:
use sys;
CREATE TABLE `staffInfo` (
  `ID` int(11) NOT NULL AUTO_INCREMENT,
  `EMAIL` varchar(40) COLLATE utf8_unicode_ci DEFAULT NULL,
  `PASSWORD` varchar(45) COLLATE utf8_unicode_ci DEFAULT NULL,
  `POSITION` varchar(45) COLLATE utf8_unicode_ci DEFAULT NULL,
  `PHONE` varchar(45) COLLATE utf8_unicode_ci DEFAULT NULL,
  `CREATE_DATE` datetime DEFAULT NULL,
  PRIMARY KEY (`ID`)
  )
在< dependencies > </dependencies>之間加入下面的代碼
        <!-- For DataBase connection -->
    	<dependency>
    		<groupId>mysql</groupId>
    		<artifactId>mysql-connector-java</artifactId>
			<scope>runtime</scope>
		</dependency>

		<!-- For DataBase connection -->
    	<dependency>
    		<groupId>org.springframework.boot</groupId>
    		<artifactId>spring-boot-starter-jdbc</artifactId>
		</dependency>
最終的完整代碼是:
<?xml version="1.0" encoding="UTF-8"?>
<project xmlns="http://maven.apache.org/POM/4.0.0" xmlns:xsi="http://www.w3.org/2001/XMLSchema-instance"
	xsi:schemaLocation="http://maven.apache.org/POM/4.0.0 https://maven.apache.org/xsd/maven-4.0.0.xsd">
	<modelVersion>4.0.0</modelVersion>
	<parent>
		<groupId>org.springframework.boot</groupId>
		<artifactId>spring-boot-starter-parent</artifactId>
		<version>2.1.8.RELEASE</version>
		<relativePath/> <!-- lookup parent from repository -->
	</parent>
	<groupId>com.example</groupId>
	<artifactId>spring-project-2026</artifactId>
	<version>0.0.1-SNAPSHOT</version>
	<packaging>war</packaging>
	<name>spring-project-2026</name>
	<description>Demo project for Spring Boot</description>

	<properties>
		<java.version>1.8</java.version>
	</properties>

	<dependencies>
		<dependency>
			<groupId>org.springframework.boot</groupId>
			<artifactId>spring-boot-starter-web</artifactId>
		</dependency>

		<dependency>
			<groupId>org.springframework.boot</groupId>
			<artifactId>spring-boot-starter-tomcat</artifactId>
			<scope>provided</scope>
		</dependency>
		<dependency>
			<groupId>org.springframework.boot</groupId>
			<artifactId>spring-boot-starter-test</artifactId>
			<scope>test</scope>
		</dependency>

		<!-- Template Engine -->
		<dependency>
      		<groupId>org.springframework.boot</groupId>
      		<artifactId>spring-boot-starter-thymeleaf</artifactId>
    	</dependency>

    	<!-- For DataBase connection -->
    	<dependency>
    		<groupId>mysql</groupId>
    		<artifactId>mysql-connector-java</artifactId>
			<scope>runtime</scope>
		</dependency>

		<!-- For DataBase connection -->
    	<dependency>
    		<groupId>org.springframework.boot</groupId>
    		<artifactId>spring-boot-starter-jdbc</artifactId>
		</dependency>


	</dependencies>

	<build>
		<plugins>
			<plugin>
				<groupId>org.springframework.boot</groupId>
				<artifactId>spring-boot-maven-plugin</artifactId>
			</plugin>
		</plugins>
	</build>

</project>
JDBC(Java Database Connectivity)是一種規範(API),是Java語言中用來規範用戶端程式怎樣存取數據庫的應用程式介面,提供查詢和更新資料庫中資料等的方法。所以當建立一個數據庫連線時,除了加入有關數據庫的類型的依賴還要加入為Java存取數據庫的應用程式介面的依賴。
# For MySQL connection
spring.datasource.url=jdbc:mysql://localhost:3306/sys?serverTimezone=UTC&useSSL=false
spring.datasource.username=root
spring.datasource.password=root
spring.datasource.driver-class-name=com.mysql.cj.jdbc.Driver
spring.http.encoding.force=true
最終的完整代碼是:
spring.thymeleaf.prefix=classpath:/templates/
spring.thymeleaf.suffix=.html

# For MySQL connection
spring.datasource.url=jdbc:mysql://localhost:3306/sys?serverTimezone=UTC&useSSL=false
spring.datasource.username=root
spring.datasource.password=root
spring.datasource.driver-class-name=com.mysql.cj.jdbc.Driver
spring.http.encoding.force=true
解釋:
localhost:3306 是數據庫的port位置,預設是3306,可以根據不同情況去修改的。
sys 是數據庫的名稱(注意不是資料表的名稱而是數據庫的名稱,數據庫可以有很多。(假設你的數據庫的名稱是hellodatabase, 那在localhost:3306/後面就填上” hellodatabase”。(就變成jdbc:mysql://localhost:3306/hellodatabase)
在問號後面是各種參數的值,如果大家和我一樣都是用MySQL,就必須要包括以下兩個參數。
serverTimezone=UTC&useSSL=false
serverTimezone 是一個和時區有關的,而UTC是全球標準時間,可以根據你的時區選擇合適的值。
useSSL是指需不需要SSL連線,必須要包括這參數的值,否則會報錯。
而它的值選擇useSSL=false就可以。
負責資料的收集或提取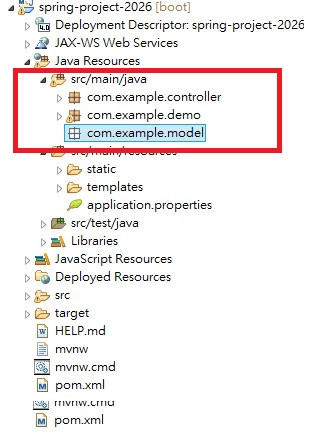
完整代碼:
package com.example.model;

import org.springframework.stereotype.Component;

@Component
public class StaffModel {

	 private int id;
	  private String email;
	  private String phone;
	  private String password;
	  private String position;

	  public int getId() {
		return id;
	  }

	  public void setId(int id) {
		this.id = id;
	  }
	  public String getEmail() {
		return email;
	  }

	  public void setEmail(String email) {
		this.email = email;
	  }

	  public String getPhone() {
		return phone;
	  }

	  public void setPhone(String phone) {
		this.phone = phone;
	  }

	  public String getPassword() {
		return password;
	  }

	  public void setPassword(String password) {
		this.password = password;
	  }

	  public String getPosition() {
		return position;
	  }

	  public void setPosition(String position) {
		this.position = position;
	  }


}
負責與數據庫溝通,需要運用SQL語言來操作CRUD。
完整代碼:
package com.example.repository;

import org.springframework.beans.factory.annotation.Autowired;
import org.springframework.jdbc.core.JdbcTemplate;
import org.springframework.stereotype.Repository;

import com.example.model.StaffModel;

@Repository
public class StaffRepository {

	@Autowired
	private JdbcTemplate jdbcTemplate;

	public void addStaff(StaffModel staffModel){
		System.out.println("EXCUTE INSERT MEMBER");
	  jdbcTemplate.update("INSERT INTO staffInfo(PASSWORD, EMAIL, POSITION, PHONE, CREATE_DATE) "
	  		+ "VALUES (?,?,?,?,NOW())",staffModel.getPassword(), staffModel.getEmail(),
	  		staffModel.getPosition(),staffModel.getPhone());
  }


}
負責簡化代碼,在這裡建立各種CRUD的指令。
完整代碼:
package com.example.service;

import org.springframework.beans.factory.annotation.Autowired;
import org.springframework.stereotype.Service;

import com.example.model.StaffModel;
import com.example.repository.StaffRepository;

@Service
public class StaffService {

	@Autowired
	StaffRepository staffRepository;
	public void addStaff(StaffModel staffModel){
		staffRepository.addStaff(staffModel);
	}

}
在src/main/java底下創建新的package叫com.example.controller
負責做各種mapping,如果在url找到相應用的mapping就會執行。
完整代碼:
package com.example.controller;

import org.springframework.beans.factory.annotation.Autowired;
import org.springframework.web.bind.annotation.RequestMapping;
import org.springframework.web.bind.annotation.RestController;

import com.example.model.StaffModel;
import com.example.service.StaffService;

@RestController
public class StaffController {

		@Autowired
		StaffModel staffModel;

		@Autowired
		StaffService staffService;
	    @RequestMapping("/addStaff")
	    public String hello(){
	    	staffModel = new StaffModel();
	    	staffModel.setPassword("1234");
	    	staffModel.setEmail("email@email.com");
	    	staffModel.setPhone("22334455");
	    	staffModel.setPosition("Manager");
	    	staffService.addStaff(staffModel);
	        return "New Staff added";
	    }


}
要運用@ComponentScan把所有相關的package都加在括號內
還有@EntityScan,把所有相關的package都加在括號內
目的是讓系統去檢查各個package的檔案。
完整代碼:
package com.example.demo;

import org.springframework.boot.SpringApplication;
import org.springframework.boot.autoconfigure.SpringBootApplication;
import org.springframework.boot.autoconfigure.domain.EntityScan;
import org.springframework.boot.web.servlet.support.SpringBootServletInitializer;
import org.springframework.context.annotation.ComponentScan;

@SpringBootApplication
@ComponentScan({"com.example.demo","com.example.model","com.example.controller","com.example.service","com.example.repository"})
@EntityScan({"com.example.demo","com.example.model","com.example.controller","com.example.service","com.example.repository"})
public class SpringProject2026Application extends SpringBootServletInitializer {

	public static void main(String[] args) {
		SpringApplication.run(SpringProject2026Application.class, args);
	}

}
http://localhost:8080/spring-project-2026/addStaff
如果成功會出現以下畫面:
開啟MySQL數據庫,檢查有沒有新的資料寫進數據庫中的staffInfo。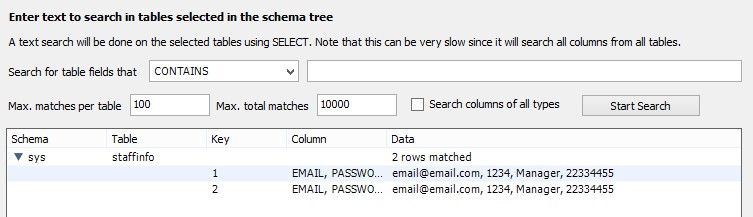
參考文章/網站/書本:
請問 我執行到最後一個步驟 執行spring boot 應用程式
之後進入http://localhost:8080/spring-project-2020/addStaff (我專案改成2020)
可是進入之後出現這個畫面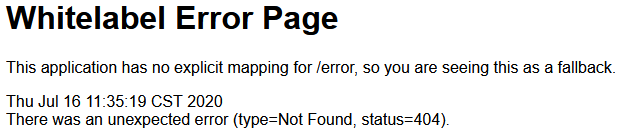
請問是環境設定錯了還是程式碼的部分有問題呢?
痾 解決了 可是我也不知道為什麼解決了
我把StaffController.java移到跟SpringProject2020Application.java同一個package
之後又移回到原本的package裡就突然可以了
另外我想問一下
run on server用Tomcat做連結 跟 用spring boot app 這兩個是差在哪裡
我用前者不會出現上方的錯誤 用下方的話就會
是因為沒有透過Tomcat 去跟MySQL做連結的關係嗎?
當spring boot 執行我記得tomcat 就會自己起了我記得是這樣
有誤的話可以糾正我一下XD
我也碰到同樣的問題,我的 Sever Tomcat failed to stop 了,請問有大大可以替小弟解釋一樣可能會 failed 的原因嗎?
如果說這一段有報錯的
   <!-- For DataBase connection -->
	<dependency>
		<groupId>mysql</groupId>
		<artifactId>mysql-connector-j</artifactId>
		<scope>runtime</scope>
	</dependency>

	<!-- For DataBase connection -->
	<dependency>
		<groupId>org.springframework.boot</groupId>
		<artifactId>spring-boot-starter-jdbc</artifactId>
	</dependency>
可以看看下列影片,就可以知道怎麼解決了~