先前的範例只用了最簡單的 GET,來看看其他的用法是怎麼使用的
@GET("teams/16")
fun getTeam(): Call<Teams>
@POST("teams/16")
fun getTeam(@Body user: User): Call<Teams>
@PUT("teams/16")
fun getTeam(): Call<Teams>
@DELETE("teams/16")
fun getTeam(): Call<Teams>
都是改註解名稱而已,很簡單
@Headers(
    "Content-Type:application/json",
    "Key:value"
)
@GET("teams/{teamNo}")
fun getTeam(): Call<Teams>
如果後面的參數會有不同的值時,傳進這個 fun 並用 @Path 註解起來,在需要替換掉的地方用{}包起來並對應到剛剛這個參數的 key
@GET("teams/{teamNo}")
fun getTeam(@Path("teamNo") teamNo: String): Call<Teams>
多個參數
@GET("{teams}/{teamNo}")
fun getTeam(
    @Path("teams") teams: String,
    @Path("teamNo") teamNo: String)
: Call<Teams>
@GET("teams")
fun getTeam(@Query("teamNo") teamNo: Int?): Call<Teams>
這邊的參數可以用上 Kotlin 宣告為可空變數,傳 null 進來時這個 "teamNo" 就會跟著被省略不會送出
參數需要用@Filed註解
@FormUrlEncoded
@POST("teams/16")
fun getTeam(@Field("teamNo") teamNo: Int): Call<Teams>
參數需要用@Part
@Multipart
@POST("teams/16")
fun getTeam(@Part("teamNo") teamNo: Int): Call<Teams>
addConverterFactory(GsonConverterFactory.create())
上一篇是把 response 用 Gson 解析成想要的物件,但是 Retrofit 的 ConverterFactory 還有很多種,
需要的時候再加進 Gradle 就可以了
| Converter | Gradle |
|---|---|
| Gson | 'com.squareup.retrofit2:retrofit:2.2.0' |
| Jackson | 'com.squareup.retrofit2:converter-jackson:2.0.2' |
| Simple XML | 'com.squareup.retrofit2:converter-simplexml:2.2.0' |
| Protobuf | 'com.squareup.retrofit2:converter-protobuf:2.2.0' |
| Moshi | 'com.squareup.retrofit2:converter-moshi:2.2.0' |
| Wire | 'com.squareup.retrofit2:converter-wire:2.2.0' |
| Scalars | 'com.squareup.retrofit2:converter-scalars:2.2.0' |
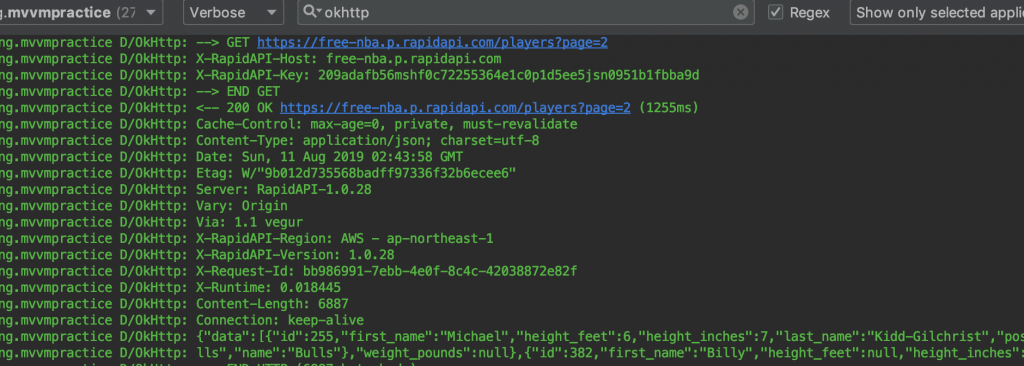
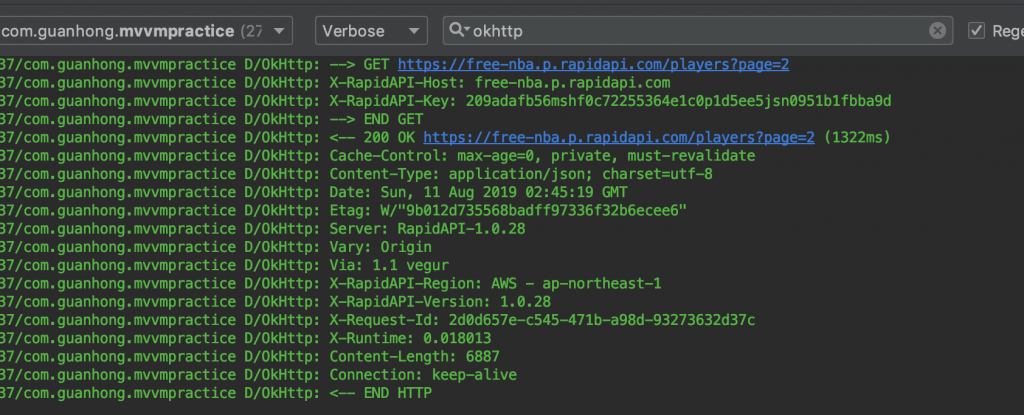
okhttp 有提供 log 的解析器,可以看到呼叫 api 的一些資訊,使用上也非常方便
添加依賴
implementation "com.squareup.okhttp3:logging-interceptor:4.0.1"
Sync Project 後就可以使用
val httpLoggingInterceptor = HttpLoggingInterceptor()
接著把一些需要的屬性設定完成:
指定想要的 level
httpLoggingInterceptor.level = HttpLoggingInterceptor.Level.BASIC
這裡選 Level.BASIC 可以看到 response 的狀態和打出去的網址
也可以換成其他選項
如果有些版本不想要顯示 log 也可以選擇 Level.NONE 也就是什麼不要顯示
加進 client
 val client= OkHttpClient
            .Builder()
            .addInterceptor(httpLoggingInterceptor)
            .build()
再把這個 client 加進之前創建的 retrofit 就可以在 logcat 看到想要的資訊了
   val retrofit = Retrofit
            .Builder()
            .addConverterFactory(GsonConverterFactory.create())
            .baseUrl("https://free-nba.p.rapidapi.com/")
            .client(client)
            .build()
最一開始都是用 okhttp 在做 api 的處理
最麻煩的部分就是 response 那邊要把 JsonObject 轉成自己的物件
call.enqueue(new Callback() {

    @Override
    public void onResponse(Call call, Response response) throws IOException {

        String response = response.body().string();
        try {
                JSONObject responseToJsonObject = new JSONObject(voyageRespose);
             //parse JSONObject

             } catch(e: Exeption){}
用了 Retrofit 搭配 Gson 可以輕鬆把 response 直接轉成自定義的物件,省時省力,
在呼叫 api 時搭配註解一目了然這支 api 需要的條件是什麼,可讀性提高, bug 也更好找
還沒試過的趕快來試試吧~
有任何問題或講得不清楚的地方歡迎留言和我討論。
更歡迎留言糾正我任何說錯的地方!
下一篇:淺談 Android 設計架構 MVC、MVP、MVVM