這篇是使用Operator install Istio

Required: Helm
這邊會稍微講解一下,如何在Mac install Helm Client
brew install kubernetes-helm
接下來確認K3d服務是否正常,如果都正常我們就要開始安裝Helm Server(Tiller)
#先在K3s創建Tiller ServiceAccount
cat <<EOF | kubectl create -f -
apiVersion: v1
kind: ServiceAccount
metadata:
  name: tiller
  namespace: kube-system
---
apiVersion: rbac.authorization.k8s.io/v1
kind: ClusterRoleBinding
metadata:
  name: tiller
roleRef:
  apiGroup: rbac.authorization.k8s.io
  kind: ClusterRole
  name: cluster-admin
subjects:
- kind: ServiceAccount
  name: tiller
  namespace: kube-system
EOF

#Install Tiller
helm init --service-account tiller --history-max 5
helm list

#如果沒有出現下面的錯誤訊息就是正常
#Error: configmaps is forbidden:
#User "system:serviceaccount:kube-system:default" cannot list resource "configmaps" in API group "" in the namespace "kube-system"
helm repo add banzaicloud-stable https://kubernetes-charts.banzaicloud.com/

cat <<EOF | kubectl create -n istio-system -f -
apiVersion: istio.banzaicloud.io/v1beta1
kind: Istio
metadata:
  labels:
    controller-tools.k8s.io: "1.0"
  name: istio-sample
spec:
  version: "1.3.0"
  mtls: false
  includeIPRanges: "*"
  excludeIPRanges: ""
  autoInjectionNamespaces:
  - "default"
  controlPlaneSecurityEnabled: false
  defaultResources:
    requests:
      cpu: 10m
  sds:
    enabled: false
  pilot:
    enabled: true
    image: "docker.io/istio/pilot:1.3.0"
    replicaCount: 1
    minReplicas: 1
    maxReplicas: 5
    traceSampling: 1.0
    resources:
      requests:
        cpu: 500m
        memory: 2048Mi
  citadel:
    enabled: true
    image: "docker.io/istio/citadel:1.3.0"
  galley:
    enabled: true
    image: "docker.io/istio/galley:1.3.0"
    replicaCount: 1
  gateways:
    enabled: true
    ingress:
      enabled: true
      replicaCount: 1
      minReplicas: 1
      maxReplicas: 5
      serviceType: "LoadBalancer"
      loadBalancerIP: ""
      serviceAnnotations: {}
      serviceLabels: {}
      ports:
        - port: 15020
          targetPort: 15020
          name: status-port
        - port: 80
          targetPort: 80
          name: http2
          nodePort: 31380
        - port: 443
          name: https
          nodePort: 31390
        - port: 15443
          targetPort: 15443
          name: tls
      applicationPorts: ""
      resources:
        requests:
          cpu: 100m
          memory: 128Mi
        limits:
          cpu: 2000m
          memory: 1024Mi
    egress:
      enabled: true
      replicaCount: 1
      minReplicas: 1
      maxReplicas: 5
      serviceType: "ClusterIP"
      serviceAnnotations: {}
      serviceLabels: {}
      ports:
        - port: 80
          name: http2
        - port: 443
          name: https
        - port: 15443
          targetPort: 15443
          name: tls
      applicationPorts: ""
      resources:
        requests:
          cpu: 100m
          memory: 128Mi
        limits:
          cpu: 2000m
          memory: 256Mi
    k8singress:
      enabled: false
  mixer:
    enabled: true
    image: "docker.io/istio/mixer:1.3.0"
    replicaCount: 1
    minReplicas: 1
    maxReplicas: 5
  sidecarInjector:
    enabled: true
    image: "docker.io/istio/sidecar_injector:1.3.0"
    replicaCount: 1
    rewriteAppHTTPProbe: true
    autoInjectionPolicyEnabled: true
    init:
      resources:
        requests:
          cpu: 10m
          memory: 10Mi
        limits:
          cpu: 100m
          memory: 50Mi
  nodeAgent:
    enabled: false
    image: "docker.io/istio/node-agent-k8s:1.3.0"
  proxy:
    image: "docker.io/istio/proxyv2:1.3.0"
    accessLogFile: "/dev/stdout"
    accessLogFormat: ""
    accessLogEncoding: "TEXT"
    enableCoreDump: false
    resources:
      requests:
        cpu: 100m
        memory: 128Mi
      limits:
        cpu: 2000m
        memory: 1024Mi
  proxyInit:
    image: "docker.io/istio/proxy_init:1.3.0"
  defaultPodDisruptionBudget:
    enabled: true
  outboundTrafficPolicy:
    mode: ALLOW_ANY
  tracing:
    enabled: true
    tracer: zipkin
    zipkin:
      address: zipkin.istio-system:9411
    datadog:
        address: 127.0.0.1:8126
    lightstep:
        address: lightstep-satellite.lightstep:9292
        accessToken: <access-token>
        secure: true
        cacertPath: /etc/lightstep/cacert.pem
    localityLB:
      enabled: false
      # distribute:
      # - from: "us-central1/*"
      # to:
      #     "us-central1/*": 80
      #     "us-central2/*": 20
      # failover:
      # - from: us-east
      #   to: eu-west
      # - from: us-west
      #   to: us-east
EOF
Istio Operator Pods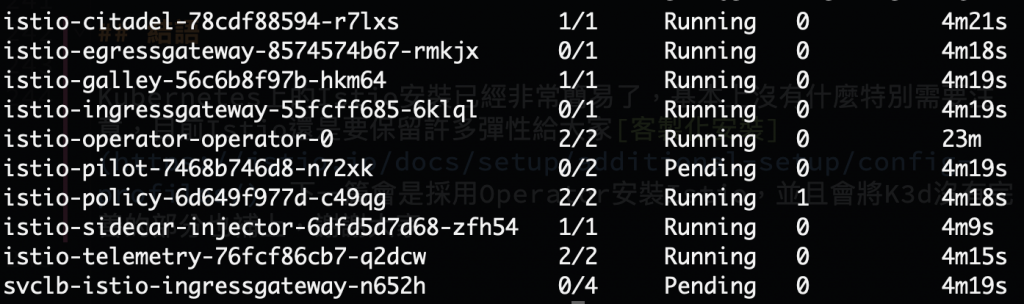
Istio Operator Service
造上面的步驟安裝完,會發現因為Opeartor已經把Istio許多可以調整的地方都先包裝,導致如果不熟悉的直接使用會有許多困擾,並且Istio-Operato必須給的Resource又比單純的Helm要高出許多,因此後面我們將採用K3d + Helm install Istio當作實驗環境
但是如果想要讓不熟悉Kubernetes的人快速上手,Operator的確是非常快速且方便的工具,甚至還不需要特別管理Kubernetes Object Life Cycle,有興趣的可以參考這邊
雖然Operator已經發展一段時間,但是對於不懂Kubernetes卻要使用Operator的話,容易有不知為何的感覺,因此最好還是先以Helm,在循序導入Operator會比較好