
引言
嗨~大家好,大家可以看到標題相較於前三天有點不太一樣...
沒錯!這就是這個引擎最重要的一Part了~ 我們今天要開始設計Renderer,
也就是引擎中負責繪製的部分,繪製直線、繪製方塊、旋轉的運算等等都是由他負責啦~
然後我知道前幾天的都執行不出什麼新東西,較為苦悶... 這邊要跟各位道歉一下Orz
畢竟前幾天的部分都是為了輔助Renderer而出現的,算是「配角」囉~
而今天的部分也是Day10之前所出現過的各種知識正是出現的地方啦,大家準備好了嗎?
流程講解
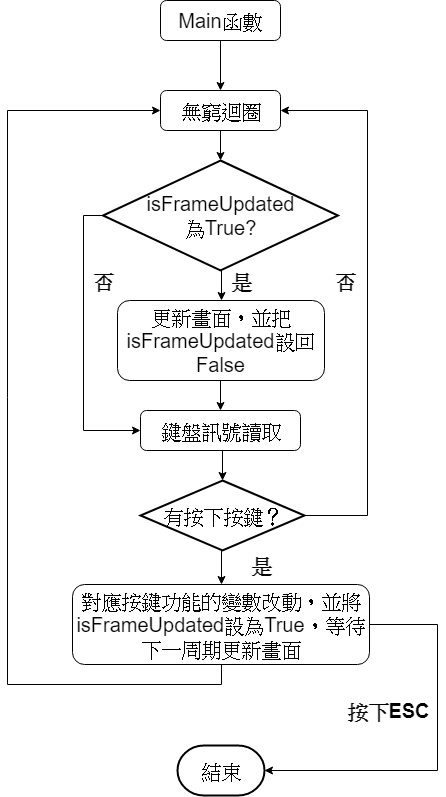
這邊直接講程式的話大家可能會覺得有點亂,所以我先簡單做個引擎運作的流程講解:
繪圖器Renderer
首先先創立:"Renderer.h"以及"Renderer.c"在專案中
先打上基礎定義與include:
/* File: Renderer.h */

#ifndef __RENDERER_H__
#define __RENDERER_H__


#endif // __RENDERER_H__
/* File: Renderer.c */

#include"Renderer.h"
/* File: Renderer.h */

#ifndef __RENDERER_H__
#define __RENDERER_H__

// ------------新增部分-------------------
#define _CLEAN_MODE_ 0  // 底下render_screen的參數所需,事先定義好
#define _RENDER_MODE_ 1

float camera_x_pos, camera_y_pos, camera_z_pos;  // 攝影機(大家的螢幕)位置
float camera_speed;  // 相機移動速度,決定按下同樣按鍵時間攝影機移動快慢
float fov;  // 視野,等同於前幾天所說的esd(眼睛到螢幕距離)
float x1, y1, z1, x2, y2, z2;  // 畫直線時用來暫存兩端點的變數
double rot_x, rot_y;  // 沿x, y軸轉動的角度
double sin_x, cos_x, sin_y, cos_y;  // 算好後的三角函數放這裡
int rx, ry;  // 最後輸出到螢幕上的二維座標

void init_renderer();  // 初始化以上所有變數
void div_zero_adjust(float *n);  // 遇到z = 0的特殊情況時,將z調整為0.5避免程式出錯

void render_line(char style, int lx1, int ly1, int lz1, int lx2, int ly2, int lz2);
// 畫線的函數,所有圖形繪製中樞

void render_zplane(char style, int cx, int cy, int cz, int left, int right, int top, int bottom);
void render_yplane(char style, int cx, int cy, int cz, int left, int right, int f, int r);
void render_xplane(char style, int cx, int cy, int cz, int top, int bottom, int f, int r);
// 畫平面的函數,由多組render_line組合而成

void render_cube(char style, int cx, int cy, int cz, int left, int right, int top, int bottom, int f, int r);
// 畫方塊,由畫平面的組合而成

void render_screen(int mode);
// 繪製出一幀內所有存在的圖形

void calc_tri();
// 事先計算三角函數值(較費時)
// --------------------------------------

#endif // __RENDERER_H__
/* File: Renderer.c */

#include"Renderer.h"

// ------------新增部分-------------------
#include<stdlib.h>  // 標準函式庫
#include<math.h>  // 計算三角函數、四捨五入等
#include"RenderMemory.h"  // 需要取用render_memory二維陣列,才有辦法更新畫面
#include"GameStatus.h"  // isFrameUpdated的取用需要此標頭檔

void init_renderer()  // 初始化各項變數,其中幾項可以自由調整,目前是我測試起來較為合適的值
{
    camera_x_pos = 0.0;
    camera_y_pos = 0.0;
    camera_z_pos = -150;  //
    camera_speed = 5.0;   // 此三項主要影響視野遠近、相機移動速度,可自由實驗調整
    fov = 120;            //
    x1 = 0.0;
    y1 = 0.0;
    z1 = 0.0;
    x2 = 0.0;
    y2 = 0.0;
    z2 = 0.0;
    rx = 1;  // 初始化為最左上角的像素
    ry = 1;  //
    rot_x = 0.0;
    rot_y = 0.0;
    sin_x = 0.0;
    cos_x = 0.0;
    sin_y = 0.0;
    cos_y = 0.0;
}
// --------------------------------------
/* File: Renderer.c */

// 寫在init_renderer之下

void div_zero_adjust(float *n)  // 避免除以零,或是除以太小的數造成結果過大
{                               // 此處以指標傳入,因為需要更動到(*n)值
    if((*n) < 0.5)  // 只要 (*n) 小於0.5都設為0.5
    {
        *n = 0.5;
    }
}

void calc_tri()  // 事先運算三角函數值,避免計算量太大
{
    sin_x = sin(rot_x);  // 須注意角度以弧度計算
    sin_y = sin(rot_y);
    cos_x = cos(rot_x);
    cos_y = cos(rot_y);
}
礙於篇幅,我們將在明天Renderer(下)把Renderer完成!
