
引言
接續昨天的進度,今天我們來把Renderer完成~
首先會是render_line函數,這個函數結合了投影、DDA演算法、寫入RenderMemory等步驟;
再來是render_xplane, render_yplane, render_zplane三個繪製平面用的函數,分別是畫以x為軸、以y為軸、以z為軸的平面,內部實作是以上面的render_line來組成四個邊;
最後是render_cube,我們假設這個世界都是以方塊組成,因此一個方塊就是一個最基本單位囉,內部實作是以三個繪製平面函數組成。
瞭解之後,我們就開始來實作囉!
Render Line 直線繪製
以下是該函數流程圖: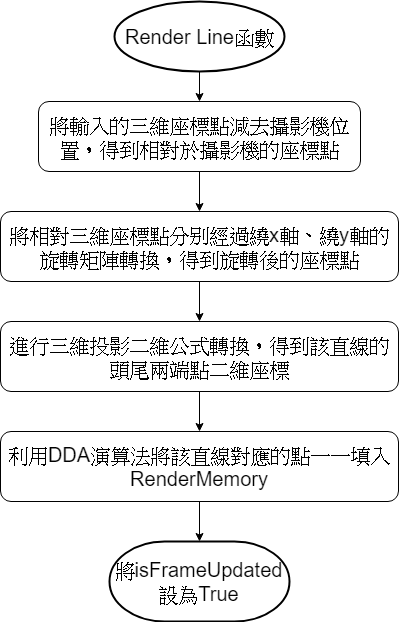
再來就是程式碼:
/* File: Renderer.c */

// 寫在calc_tri之下

void render_line(char style, int lx1, int ly1, int lz1, int lx2, int ly2, int lz2)
{                                            // 參數依序為:style-構成每個點的字元
                                             //     lx1, ly1, lz1-直線第一個端點的x, y, z
                                             //     lx2, ly2, lz2-直線第二個端點的x, y, z

    int rx1 = 0, rx2 = 0, ry1 = 0, ry2 = 0;  // 最後轉換出的兩組二維座標點,繪製於RenderMemory中

    /*將座標點減去攝影機位置*/
    x1 = (float)(lx1 - camera_x_pos);  // 將輸入的座標點減去自己攝影機的位置,
    y1 = (float)(ly1 - camera_y_pos);  // 就是相對於攝影機的座標
    z1 = (float)(lz1 - camera_z_pos);
    x2 = (float)(lx2 - camera_x_pos);
    y2 = (float)(ly2 - camera_y_pos);
    z2 = (float)(lz2 - camera_z_pos);

    float temp_x1 = 0.0, temp_y1 = 0.0, temp_x2 = 0.0, temp_y2 = 0.0;

    /*繞y軸旋轉,此部分請參考Day10*/
    temp_x1 = x1;  //防止x1被下面這行竄改過,影響z1的運算結果(因為x1已在z1賦值前就被竄改)
    x1 = (z1 * sin_y) + (x1 * cos_y);
    z1 = (z1 * cos_y) - (temp_x1 * sin_y);

    temp_x2 = x2;  //防止x2被下面這行竄改過,影響z2的運算結果(因為x2已在z2賦值前就被竄改)
    x2 = (z2 * sin_y) + (x2 * cos_y);
    z2 = (z2 * cos_y) - (temp_x2 * sin_y);

    /*繞x軸旋轉,此部分請參考Day10*/
    /* x1 = x1; */
    temp_y1 = y1;  //防止y1被下面這行竄改過,影響z1的運算結果(因為y1已在z1賦值前就被竄改)
    y1 = (y1 * cos_x) - (z1 * sin_x);
    z1 = (temp_y1 * sin_x) + (z1 * cos_x);

    /* x2 = x2; */
    temp_y2 = y2;  //防止y2被下面這行竄改過,影響z2的運算結果(因為y2已在z2賦值前就被竄改)
    y2 = (y2 * cos_x) - (z2 * sin_x);
    z2 = (temp_y2 * sin_x) + (z2 * cos_x);

    /*三維投影二維,此部分請參考Day6*/
    div_zero_adjust(&z1);  // z1將會在分母,若其為0,將拋出異常,因此將其先置換成0.5
    rx1 = round(fov*(x1/z1));  // 投影公式(三維 -> 二維)
    ry1 = round(fov*(y1/z1));

    div_zero_adjust(&z2);  // z2將會在分母,若其為0,將拋出異常,因此將其先置換成0.5
    rx2 = round(fov*(x2/z2));  // 投影公式(三維 -> 二維)
    ry2 = round(fov*(y2/z2));

    /*DDA演算法,此部分請參考Day8*/
    int dx = rx2 - rx1, dy = ry2 - ry1, steps, k;
    float xinc, yinc, x, y;
    if(abs(dx) > abs(dy)) steps = abs(dx);
    else steps = abs(dy);
    xinc = dx/(float)steps;
    yinc = dy/(float)steps;
    x = rx1;
    y = ry1;
    rx = round(x);
    ry = round(y);
    if((rx + (SCREEN_WIDTH/2) >= 0 &&
        rx + (SCREEN_WIDTH/2) < SCREEN_WIDTH) &&
       (ry + (SCREEN_HEIGHT/2) >= 0 &&
        ry + (SCREEN_HEIGHT/2) < SCREEN_HEIGHT))
    {
        render_memory[ry + (SCREEN_HEIGHT/2)][rx + (SCREEN_WIDTH/2)] = style;
    }
    for(k=0;k<steps;k++)
    {
        x += xinc;
        y += yinc;
        rx = round(x);
        ry = round(y);
        if((rx + (SCREEN_WIDTH/2) >= 0 &&
            rx + (SCREEN_WIDTH/2) < SCREEN_WIDTH) &&
           (ry + (SCREEN_HEIGHT/2) >= 0 &&
            ry + (SCREEN_HEIGHT/2) < SCREEN_HEIGHT))
        {
            render_memory[ry + (SCREEN_HEIGHT/2)][rx + (SCREEN_WIDTH/2)] = style;
        }
    }

    isFrameUpdated = True;
}
Day10(旋轉矩陣):https://ithelp.ithome.com.tw/articles/10219907
Day6(三維投影二維):https://ithelp.ithome.com.tw/articles/10217954
Day8(DDA演算法):https://ithelp.ithome.com.tw/articles/10219229
Render Plane 平面繪製
有了直線繪製,平面繪製就沒有難度啦,直接呼叫直線函數就好:
/* File: Renderer.c */

// 寫在render_line之下


// 這裡每個函數都是輸入一個中心點(cx, cy, cz),並輸入往其中四個邊多少距離(left, right, top, bottom, f, r其中四個,分別代表左、右、頂、底、前、後)
/*繪製Z平面*/
void render_zplane(char style, int cx, int cy, int cz, int left, int right, int top, int bottom)
{
    render_line(style, cx-left, cy-top, cz, cx+right, cy-top, cz);
    render_line(style, cx+right, cy-top, cz, cx+right, cy+bottom, cz);
    render_line(style, cx-left, cy+bottom, cz, cx+right, cy+bottom, cz);
    render_line(style, cx-left, cy+bottom, cz, cx-left, cy-top, cz);
}

/*繪製Y平面*/
void render_yplane(char style, int cx, int cy, int cz, int left, int right, int f, int r)
{
    render_line(style, cx-left, cy, cz+f, cx+right, cy, cz+f);
    render_line(style, cx+right, cy, cz+f, cx+right, cy, cz-r);
    render_line(style, cx-left, cy, cz-r, cx-left, cy, cz+f);
    render_line(style, cx+right, cy, cz-r, cx-left, cy, cz-r);
}

/*繪製X平面*/
void render_xplane(char style, int cx, int cy, int cz, int top, int bottom, int f, int r)
{
    render_line(style, cx, cy-top, cz+f, cx, cy+bottom, cz+f);
    render_line(style, cx, cy+bottom, cz+f, cx, cy+bottom, cz-r);
    render_line(style, cx, cy-top, cz-r, cx, cy-top, cz+f);
    render_line(style, cx, cy+bottom, cz-r, cx, cy-top, cz-r);
}
Render Cube 方塊繪製
方塊繪製的話,則是繪製上、下、左、右、頂、底六個面:
void render_cube(char style, int cx, int cy, int cz, int left, int right, int top, int bottom, int f, int r)
{
    render_zplane(style, cx, cy, cz+f, left, right, top, bottom);
    render_zplane(style, cx, cy, cz-r, left, right, top, bottom);
    render_yplane(style, cx, cy-top, cz, left, right, f, r);
    render_yplane(style, cx, cy+bottom, cz, left, right, f, r);
    render_xplane(style, cx-left, cy, cz, top, bottom, f, r);
    render_xplane(style, cx+right, cy, cz, top, bottom, f, r);
}
Render Screen 螢幕更新繪製
每次更新螢幕會呼叫這個函數,這次我們在程式開始時先設定一個平台
void render_screen(int mode)
{
    char render_style = '#';  // 設置要以哪個字元繪製

    if(mode == _CLEAN_MODE_)  // 每次更新畫面需要把前一次的內容清空
    {
        render_style = ' ';
    }
    else if(mode == _RENDER_MODE_)  // 繪製模式
    {
        render_style = '#';
    }
    else  /* 預設 */
    {
        render_style = '#';
    }

    calc_tri();  /* 每次更新螢幕重新計算一次當下三角函數值 */

    render_cube(render_style, 0, 5, -150, 50, 50, 2, 2, 50, 50);  // 繪製一個寬平台
}
明天我們將把main函數按鍵讀取部分設定好,並瞭解繪製函數使用時機!
