昨天介紹了Mininet基本的使用方法與相關實用工具結合的應用,今天會繼續介紹Mininet與加入OpenFlow的學習
使用Mininet的Python API來定義網路拓樸,好處是能快速的移植到新的環境,部署相同的網路拓樸。
下面的範例是要模擬不同網段的實現,使用Node元件啟用轉發功能模擬路由器效果
#!/usr/bin/python
from mininet.topo import Topo
from mininet.node import Node

#繼承Mininet node類別
class LinuxRouter( Node ):
    #實做設定方法,啟用轉發功能
    def config( self, **params ):
        super( LinuxRouter, self).config( **params )
        self.cmd( 'sysctl net.ipv4.ip_forward=1' )
    #實做關閉方法,取消轉發功能
    def terminate( self ):
        self.cmd( 'sysctl net.ipv4.ip_forward=0' )
        super( LinuxRouter, self ).terminate()

#繼承Mininet topo類別
class MyTopo( Topo ):

    def __init__( self ):
        #運行父類別init方法
        Topo.__init__( self )
        #定義預設ip
        defaultIP = '192.168.1.1/24'
        #加入上方定義的LinuxRouter元件
        router = self.addNode( 'r0', cls=LinuxRouter, ip=defaultIP )
        #定義交換器元件 s1,s2
        s1, s2 = [ self.addSwitch( s ) for s in ( 's1', 's2' ) ]
        #將交換器與LinuxRouter串連
        self.addLink( s1, router, intfName2='r0-eth1',
                      params2={ 'ip' : defaultIP } )
        self.addLink( s2, router, intfName2='r0-eth2',
                      params2={ 'ip' : '172.16.0.1/24' } )
        #添加虛擬主機 h1,h2 並設定在不同網段
        h1 = self.addHost( 'h1', ip='192.168.1.100/24',
                           defaultRoute='via 192.168.1.1' )
        h2 = self.addHost( 'h2', ip='172.16.0.100/24',
                           defaultRoute='via 172.16.0.1' )
        #虛擬主機與交換器串連
        for h, s in [ (h1, s1), (h2, s2) ]:
            self.addLink( h, s )

#定義拓樸變數dict key=mytopo,value=上方自定義拓樸物件
topos = { 'mytopo': ( lambda: MyTopo() ) }
使用以上程式時,需要把註解刪除,有中文時編碼會出錯
使用--custom載入自定義腳本與--topo指定拓樸名稱
mn --custom ./router.py --topo mytopo
查看h1 ip為程式定義的192.168.1.100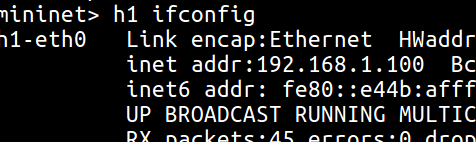
查看h2 ip為程式定義的172.16.0.100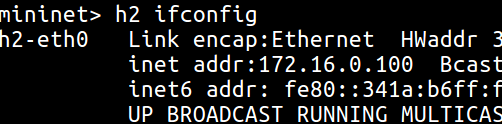
使用ping工具測試網路連線狀況
學習如何添加vlan tag隔離在相同網段上的實體主機,圖表示h1與h3的封包添加vid20,藉此隔離在相同網段(10.0.0.0/24)間的溝通(h1與h2)
建立以上圖的拓樸,並測試全部的主機連線
查看ovs上面的port與ovs上的flow規則
預設switch規則有Normal行為的Flow,也就是實做一般L2 switch的轉發功能(學習mac位址)
mn --topo=single,4
pingall
sh ovs-ofctl show s1
sh ovs-ofctl dump-flows s1
對進入port 1的封包加上vlan tag 並轉送到table表1
sh ovs-ofctl add-flow s1 "table=0, priority=20, in_port=1, actions=mod_vlan_vid:20, resubmit(,1)"
對進入port 3的封包加上vlan tag 並轉送到table表1
sh ovs-ofctl add-flow s1 "table=0, priority=20, in_port=3, actions=mod_vlan_vid:20, resubmit(,1)"
測試規則:模擬來源port 1的封包進入
sh ovs-appctl ofproto/trace s1 in_port=1
可以看到下圖,有匹配到in_port=1的規則,但目前沒有table表1,所以結果會顯示drop封包
最後加入表1,並且拔除vlan tag並轉送到相應的端口
sh ovs-ofctl add-flow s1 "table=1, priority=30, in_port=1, dl_vlan=20, actions=strip_vlan,3"
sh ovs-ofctl add-flow s1 "table=1, priority=30, in_port=3, dl_vlan=20, actions=strip_vlan,1"
使用ping工具測試h1與h2和h3的連線狀況,可以看到h1、h3連線成功,但h1、h2無法連線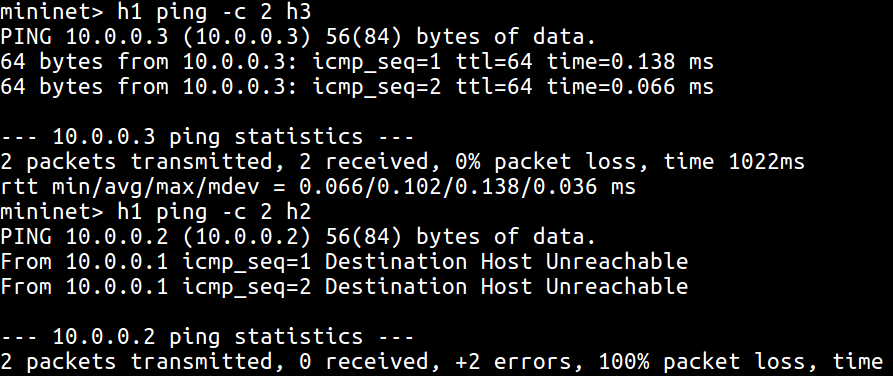
n_packets欄位表示通過的封包數量
https://github.com/mininet/mininet/tree/master/examples
https://github.com/mininet/openflow-tutorial/wiki/Create-a-Learning-Switch