
接下來更詳細的餐廳資訊
點進去餐廳地址以後
就會跳轉到地圖頁面
但使用的其實不是原生地圖
是Google Map
但既然提到地圖
這次就來介紹兩個地圖的差別
先來看原生 Uber eat的表現
Demo
iOS Swift 目前原生Map是MKMapView
這些基本的地圖功能MKMapView通通有
但是一般在使用地圖
都是使用Google Map
實際在馬路上看機車族使用地圖
也都是拿iPhone 開 Google Map
詳細為什麼呢
我們下次討論 Google Map再來說
但有一點是Google Map沒辦法做到
就是使用siri直接呼叫導航或搜尋地圖功能
看來原生還是有存在的意義
那我們就來看看Swift MKMapView要怎麼使用
首先需要addSubview MKMapView
並且把CLLocationManagerDelegate 添加進controller
這樣才可以監聽自身GPS
var mLocationManager :CLLocationManager!
var mMapView :MKMapView!
// 地圖設置
mMapView = MKMapView()
mMapView.delegate = self
mMapView.frame = CGRect.init(x: 0.0, y: 0.0, width: self.view.frame.width, height: self.view.frame.height)
self.view.addSubview(mMapView)

// 經緯度控制
mLocationManager = CLLocationManager()
mLocationManager.delegate = self
// 取得自身定位位置的精確度
mLocationManager.desiredAccuracy = kCLLocationAccuracyBest
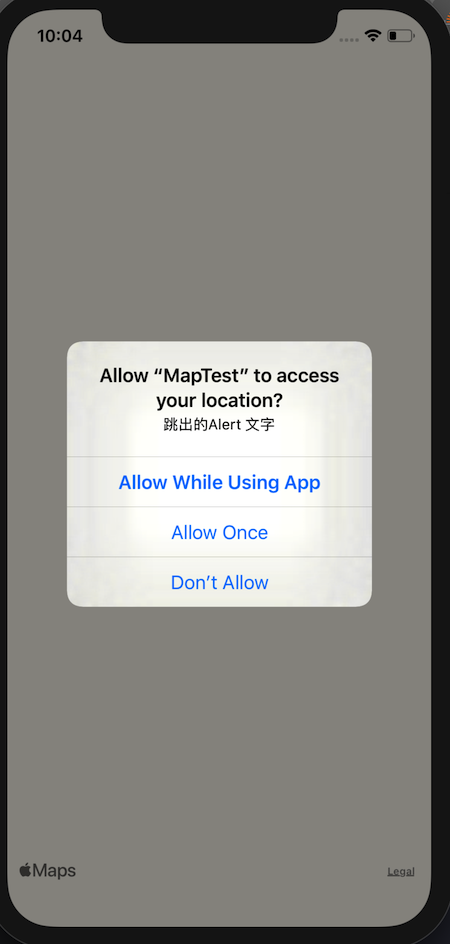
使用手機的GPS的話
需要與使用者詢問權限
可以在viewWillAppear詢問使用者目前的權限狀態
notDetermined 使用者為選擇authorizationStatus 使用者已經拒絕authorizedWhenInUse 使用者已經同意在針對不同狀態
可以跳出同意Alert
或是引導使用者到設定頁面
把權限改變
避免使用者不小心點到
我們這邊間單判斷未選擇的使用者
並且詢問就可以了
override func viewWillAppear(_ animated: Bool) {
	super.viewWillAppear(animated)
	// 開啟APP會詢問使用權限
	if CLLocationManager.authorizationStatus()  == .notDetermined {
	    // 取得定位服務授權
	    mLocationManager.requestWhenInUseAuthorization()
	    // 開始定位自身位置
	    mLocationManager.startUpdatingLocation()
	}
}
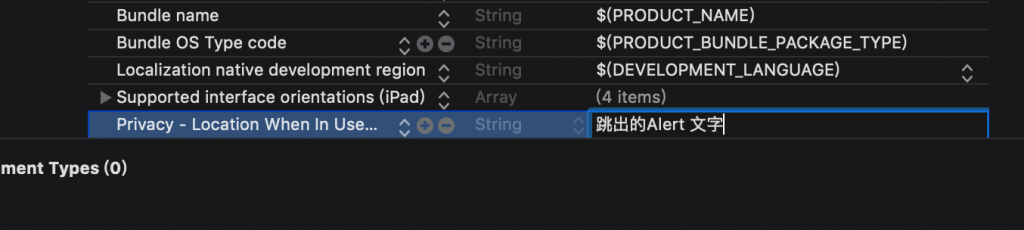
info部分也要設置權限跳出的Alert
要新增 Privacy - Location When In Use Usage Description
後面的Value就是Alert跳出來訊息
這樣就算是成功了
CLLocation可以針對地圖設定座標
以及要顯示的範圍 大小
並且利用 currentLocation.coordinate 取得自身座標
然後用setRegion 把地圖移動到自己座標
func locationManager(_ manager: CLLocationManager,
  didUpdateLocations locations: [CLLocation]) {
    //取得當下座標
    let currentLocation :CLLocation =
      locations[0] as CLLocation
    //總縮放範圍
    let range:MKCoordinateSpan = MKCoordinateSpan(latitudeDelta: 0.01, 0.01: lonRange)

    //自身
    let myLocation = currentLocation.coordinate
    let appearRegion:MKCoordinateRegion = MKCoordinateRegion(center: myLocation, span: range)

    //在地圖上顯示
    mMapView.setRegion(appearRegion, animated: true)
}
Demo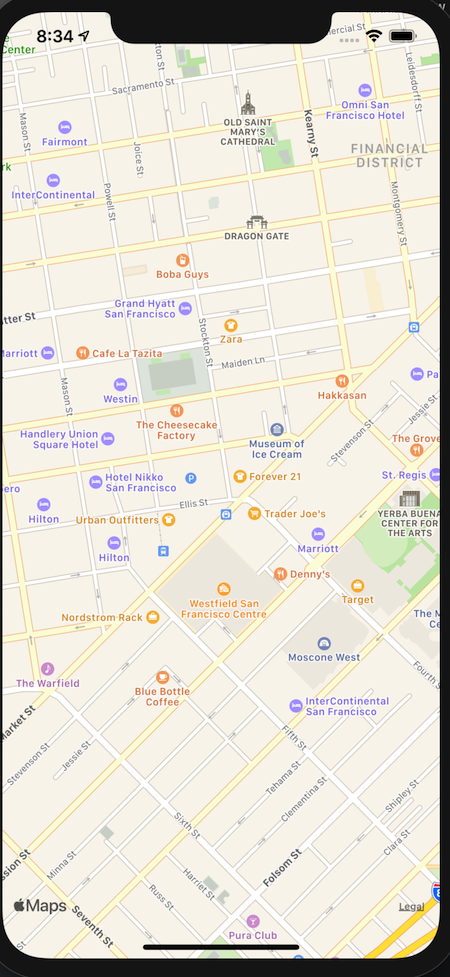
模擬器的座標應該是在美國
目前沒有更改
如果你要去特定的座標
比如說台北101
這時候可以去查一下101的座標
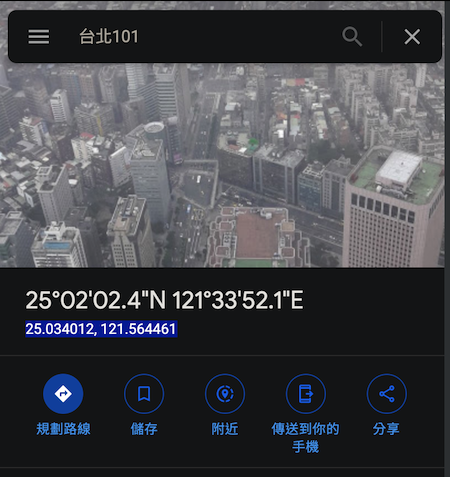
然後在剛剛的func setRegion 台北101的座標
func locationManager(_ manager: CLLocationManager,
  didUpdateLocations locations: [CLLocation]) {
    //取得當下座標
    let currentLocation :CLLocation =
      locations[0] as CLLocation
    //總縮放範圍
    let range:MKCoordinateSpan = MKCoordinateSpan(latitudeDelta: 0.01, 0.01: lonRange)

    //自身
    let myLocation = currentLocation.coordinate
    let appearRegion:MKCoordinateRegion = MKCoordinateRegion(center: myLocation, span: range)

    //設定經緯度
    let center:CLLocation = CLLocation(
    latitude: 25.034012, longitude: 121.56446)
    let currentRegion:MKCoordinateRegion = MKCoordinateRegion( center: center.coordinate, span: range)

    //在地圖上顯示
    mMapView.setRegion(currentRegion, animated: true)
}
這樣的話就會就會移動到經緯度
但是誒誒誒沒有標示
只有移動過去
Demo
既然都到定點了
當然要標記出自己想要標記的東西
可以利用addAnnotation
來標記大頭針
使用得是MKPointAnnotation
在裡面可以設定經緯度
以及標題和點擊時的副標題
來看看要標記吧
var objectAnnotation = MKPointAnnotation()
objectAnnotation.coordinate = CLLocation(
  latitude: 25.063059,
  longitude: 121.536838).coordinate
objectAnnotation.title = "客戶"
objectAnnotation.subtitle =
  "本肥宅目前位置"
mMapView.addAnnotation(objectAnnotation)

// 建立另一個地點圖示 (經由委任方法設置圖示)
objectAnnotation = MKPointAnnotation()
objectAnnotation.coordinate = CLLocation(
  latitude: 25.063059,
  longitude: 121.533838).coordinate
objectAnnotation.title = "餐廳"
objectAnnotation.subtitle =
  "正在處理訂單"
mMapView.addAnnotation(objectAnnotation)
Demo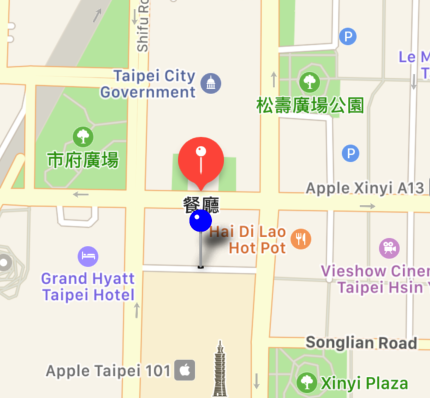
完成 生病先這樣

 iThome鐵人賽