要使用Tacker來建立VNF、VNFFG前需要對ETSI NFV MANO中VIM做一些設定,實驗使用的VIM為OpenStack
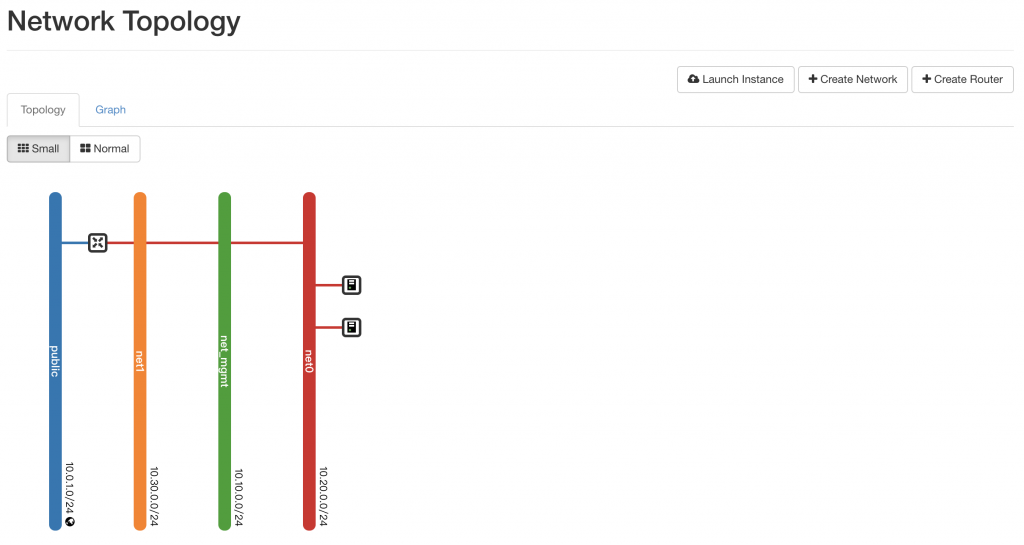
首先需先建立之後實驗會使用到的Network
給VM對外使用的Network需與上層router網路設定相同
$ openstack network create  --share --external \
--provider-physical-network physnet1 \
--provider-network-type flat public

$ openstack subnet create --network public \
--allocation-pool start=10.0.1.20,end=10.0.1.40 \
--gateway 10.0.1.254 \
--subnet-range 10.0.1.0/24 public
接下來實驗會使用admin project進行,並準備所需Network
# Create net_mgmt network
$ openstack network create net_mgmt
$ openstack subnet create net_mgmt --network net_mgmt \
--subnet-range 10.10.0.0/24 \
--gateway 10.10.0.254

# Create net0 network
$ openstack network create net0
$ openstack subnet create net0 --network net0 \
--subnet-range 10.20.0.0/24 \
--gateway 10.20.0.254

# Create net1 network
$ openstack network create net1
$ openstack subnet create net1 --network net1 \
--subnet-range 10.30.0.0/24 \
--gateway 10.30.0.254
$ openstack router create testRouter
$ openstack router set testRouter --external-gateway public
$ openstack router add subnet testRouter net0
在實驗中會建立兩台VM來當http_client、http_server,flavor用來提供建立VM的規格
$ openstack flavor create --ram 2048 --vcpus 2 --disk 96 m1.tiny
# 查看身份驗證資訊
$ cat /etc/kolla/admin-openrc.sh
export OS_PROJECT_DOMAIN_NAME=Default
export OS_USER_DOMAIN_NAME=Default
export OS_PROJECT_NAME=admin
export OS_TENANT_NAME=admin
export OS_USERNAME=admin
export OS_PASSWORD=2bYiAgHvccZoaDIZyeGhbVlR5ZkQt1LgNV76bp7Q
export OS_AUTH_URL=http://10.0.1.101:35357/v3
export OS_INTERFACE=internal
export OS_IDENTITY_API_VERSION=3
export OS_REGION_NAME=RegionOne
export OS_AUTH_PLUGIN=password

# 新增NFV MANO VIM配置檔
$ vim vim_config.yaml
auth_url: 'http://10.0.1.101:35357/v3'
username: 'admin'
password: '2bYiAgHvccZoaDIZyeGhbVlR5ZkQt1LgNV76bp7Q'
project_name: 'admin'
project_domain_name: 'Default'
user_domain_name: 'Default'
cert_verify: 'False'

# 建立NFV MANO VIM
$ openstack vim register --config-file vim_config.yaml --description 'my first vim' --is-default hellovim
將本機public ssh key加入OpenStack,用來登入VM使用,此實驗Kry Pairs名稱為Demo
$ net_id=$(openstack network list | grep net0 | awk '{print $2}')
$ openstack server create --flavor m1.tiny --image ubuntu --key-name Demo --nic net-id=$net_id http_client
$ net_id=$(openstack network list | grep net0 | awk '{print $2}')
$ openstack server create --flavor m1.tiny --image ubuntu --key-name Demo  --nic net-id=$net_id http_server
等待VM建立完成
# 新增floating ip
$ openstack floating ip create public

# 查看floating ip列表
$ openstack floating ip list
+--------------------------------------+---------------------+------------------+------+--------------------------------------+----------------------------------+
| ID                                   | Floating IP Address | Fixed IP Address | Port | Floating Network                     | Project                          |
+--------------------------------------+---------------------+------------------+------+--------------------------------------+----------------------------------+
| 326dc5aa-387b-4825-b1f1-2ed16c91b8ae | 10.0.1.27           | None             | None | 4c59b059-6e66-4449-97c4-0d80a78f276e | ff85695b36394474b2375f1215273760 |
+--------------------------------------+---------------------+------------------+------+--------------------------------------+----------------------------------+

# 建立floating ip關聯
$ openstack server add floating ip http_server 10.0.1.27
$ ssh ubuntu@10.0.1.27
The programs included with the Ubuntu system are free software;
the exact distribution terms for each program are described in the
individual files in /usr/share/doc/*/copyright.

Ubuntu comes with ABSOLUTELY NO WARRANTY, to the extent permitted by
applicable law.

To run a command as administrator (user "root"), use "sudo <command>".
See "man sudo_root" for details.

ubuntu@http-server:~$
實驗使用NodeJS建立一個簡單的Web Server,以下腳本用來安裝NodeJS環境即啟動Web Server
$ vim shell.sh
# 新增以下內容

#!/bin/sh
sudo apt-get update
sudo apt-get install -y build-essential libssl-dev
curl https://raw.githubusercontent.com/creationix/nvm/v0.25.0/install.sh | bash
source ~/.profile
nvm install 8
nvm alias default 8
npm install koa
npm install koa-router
npm install -g pm2
cat << EOF >> /home/ubuntu/app.js
const koa = require('koa');
const Router = require('koa-router');
const app = new koa();
const router = Router();
router.get('/',async (ctx) => {
  console.log('web server run successfully');
  ctx.body = 'Web server run successfully';
});
app.use(router.routes());
app.listen(3000);
EOF
pm2 start /home/ubuntu/app.js
$ . shell.sh
$ curl 10.0.1.27:3000
Web server run successfully