API的設計精髓在於符合人性。
參照Restful API的原則,我們應該盡可能的讓router(action)name減少,多使用get/post/delete等http原生請求方法達到API操作,進而達到我們的需要。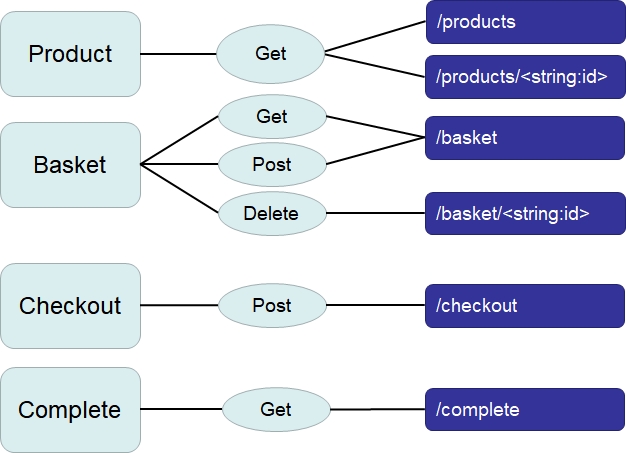
並利用Flask-HTTPAuth做統一使用驗證,保護API;利用JWT(JSON Web Token)做SSO,確認使用者單一身份,避免CSRF(跨站請求偽造)攻擊(不紀錄在cookie);然後再利用cache機制,避免較為固定的資料重複大量讀取資料庫,減少資料庫的loading。
資料庫設定透過ORM同時映射至postgresql與sqlite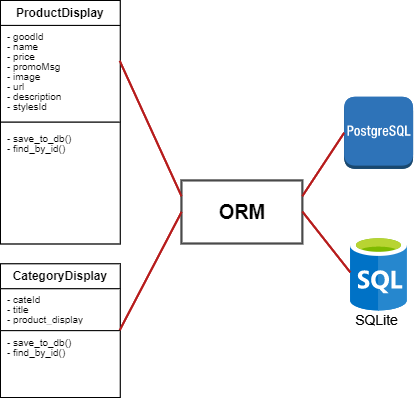
class ProductDisplayModel(db.Model):
    __tablename__= "product"
    goodId = db.Column(db.Integer, primary_key=True)
    name = db.Column(db.String(80))
    price = db.Column(db.Integer)
    promoMsg = db.Column(db.String(80))
    image = db.Column(db.String(1024))
    url = db.Column(db.String(1024))
    description = db.Column(db.String(1024))
    cateId = db.Column(db.Integer, db.ForeignKey('category.cateId'), nullable=True)
    ...
並將資料表至少做到第二正規化。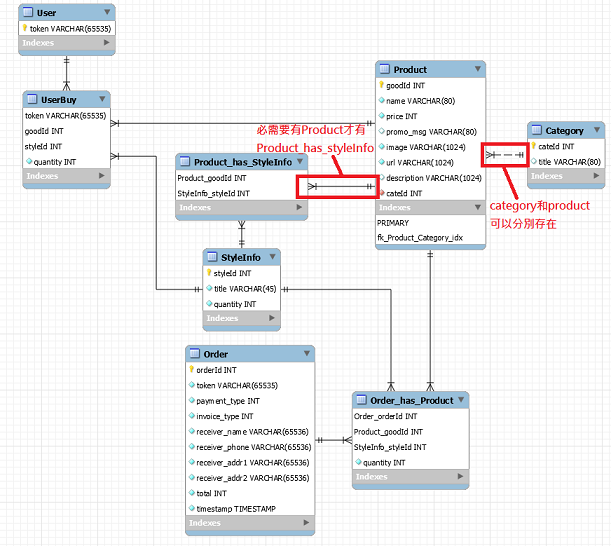
只做必要的關聯設計。
然後熟悉在Local python env環境, Heroku local虛擬環境, 與Heroku線上環境的差異。
Local python env
Python的VENV使用Pipfile記錄專案使用的套件以供他人使用,如同node的package.json
#使用現有的虛擬環境(查找.venv) or 產生一個新的虛擬環境pipenv shell
#在虛擬環境中安裝此專案Pipfile使用的packagepipenv install
#執行flask程式export FLASK_APP=app.pyflask run
Heroku local虛擬環境
#安裝windows下虛擬heroku環境執行server套件pip install waitress
#Procfile.windows(for local windows)檔案裡面寫以下這一行web: waitress-serve --listen=*:8000 app:app
#執行local虛擬heroku環境heroku local web -f Procfile.windows(在windows下要指定procfile)
Heroku線上環境
#Heroku帳號登入heroku login
#git與Heroku上現有app專案綁定heroku git:remote -a <app name>
#部署repo到Herokugit push heroku master
#重啟Heroku Serverheroku restart -a <app name>
Flask如何部署到Heroku的完整過程可以參考這篇文章連結。
撰寫API測試。
我們使用pytest
pipenv shell
pipenv install -dev
pytest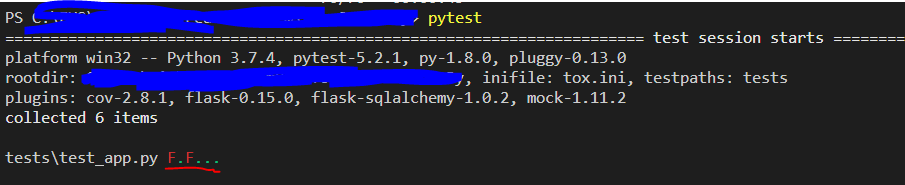
透過單元測試的紅綠燈機制,了解如何重構的過程。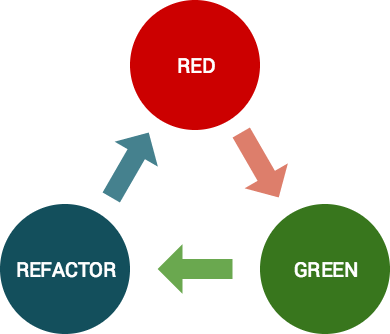
完成重構單一商品查詢時候使用懶加載的設計模式回傳資料,或稱作惰性初始模式(Lazy Initialization)。
class ProductObj:
    def __init__(self, goodId):
        #讀取資料庫
        self.product = ProductDisplayModel.query.filter_by(goodId=goodId).first().data

class ProductObjs:
    def __init__(self):
        self.products = {}

    def get_product(self, goodId):
        if goodId not in self.products:
            #若不在self.products裡頭,則到資料庫讀取
            self.products[goodId] = ProductObj(goodId).product
        #有的話,直接回傳
        return self.products[goodId].copy()
最後完成Facebook graph api串接。這也是課前花最多時間的地方。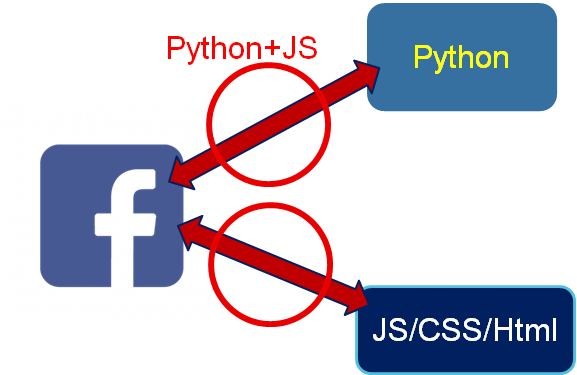
簡單列一下步驟:
class FBWebhook(Resource):
    def get(self):
        args = parser.parse_args()
        token = args['hub.verify_token'] if 'hub.verify_token' in args else None
        if FB_TOKEN == token:
            challenge = args['hub.challenge'] if 'hub.challenge' in args else None
            return int(challenge), 200
        return 'Hello World!', 200
    def post(self):
        try:
            args = parser.parse_args()
            message_entries = args['entry'] if 'entry' in args else None
            for entry in message_entries:
                if entry.get('messaging'):
                    messagings = entry['messaging']
                    for message in messagings:
                        sender = message['sender']['id']
                        if message.get('message'):
                            text = message['message']['text']
                            return self.sendToSender(sender, text)
            return {
                'isSuccess': False,
                'message': 'there is no message received'
            }
        except BaseException as e:
            print('BaseException', e)
            return {
                'isSuccess': False,
                'message': e.args
            }
if token is not None:
s = requests.session()
url = 'https://graph.facebook.com/v4.0/me/live_videos?status=LIVE_NOW&access_token='+token
response = s.get(url)
html = json.loads(response.text)
id = html['data'][0]['id']
comment_url = 'https://graph.facebook.com/v4.0/'+id+'/comments?access_token='+token
comment_response = s.get(comment_url)
comment_html = json.loads(comment_response.text)
comment = comment_html['data'][-1]['message']
comment_id = comment_html['data'][-1]['id']
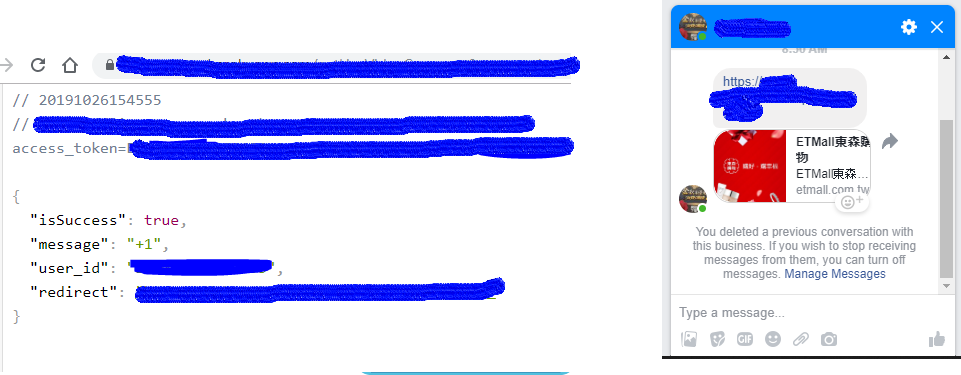
if comment.find('+1') >=0:
redirectLink = "https://redirect.link"
try:
#將擷取到的訊息內容存入資料庫
fb = FBSendModel(comment_id, redirectLink, comment)
fb.save_to_db()
return {'isSuccess': True, 'message': comment, 'comment_id':comment_id, 'redirect':redirectLink}
except BaseException as e:
return {
'isSuccess': False,
'message': e.args
}
messagesObj = FBSendModel.query.filter_by(is_sent=False).order_by(FBSendModel.commentId).all()
if messagesObj is not None:
    for messageObj in messagesObj:
        messageData = messageObj.data
        to = messageData['commentId']
        message = messageData['pageLink']
        post_message_url = 'https://graph.facebook.com/v4.0/{comment}/private_replies?access_token={token}&message={message}'.format(comment=to, token=FB_TOKEN, message=message)
        req = requests.post(post_message_url)
        if req.status_code == 200:
            FBSendModel.query.filter_by(commentId=to).update({'is_sent': True})
    return {'isSuccess': True, 'message': "Message sent successfully!"}
因為時間不是很充裕,我還不敢說這堂課已經到「離」的境界,頂多還在「破」的程度,就看最後一堂課如何了。
就讓我們繼續在技術領域中摸黑前進!(感謝好友Kenny今日相挺協助拍攝)