今天我們要來探討一下群集相關的操作,在前些時候有提到過HA的觀念,這邊會對比minikube與AWS做個整合性的說明。再來就是跨集群的溝通部分了,這裡將會實作一個Federation,並將一個Deployment部署到兩個不同的cluster上。
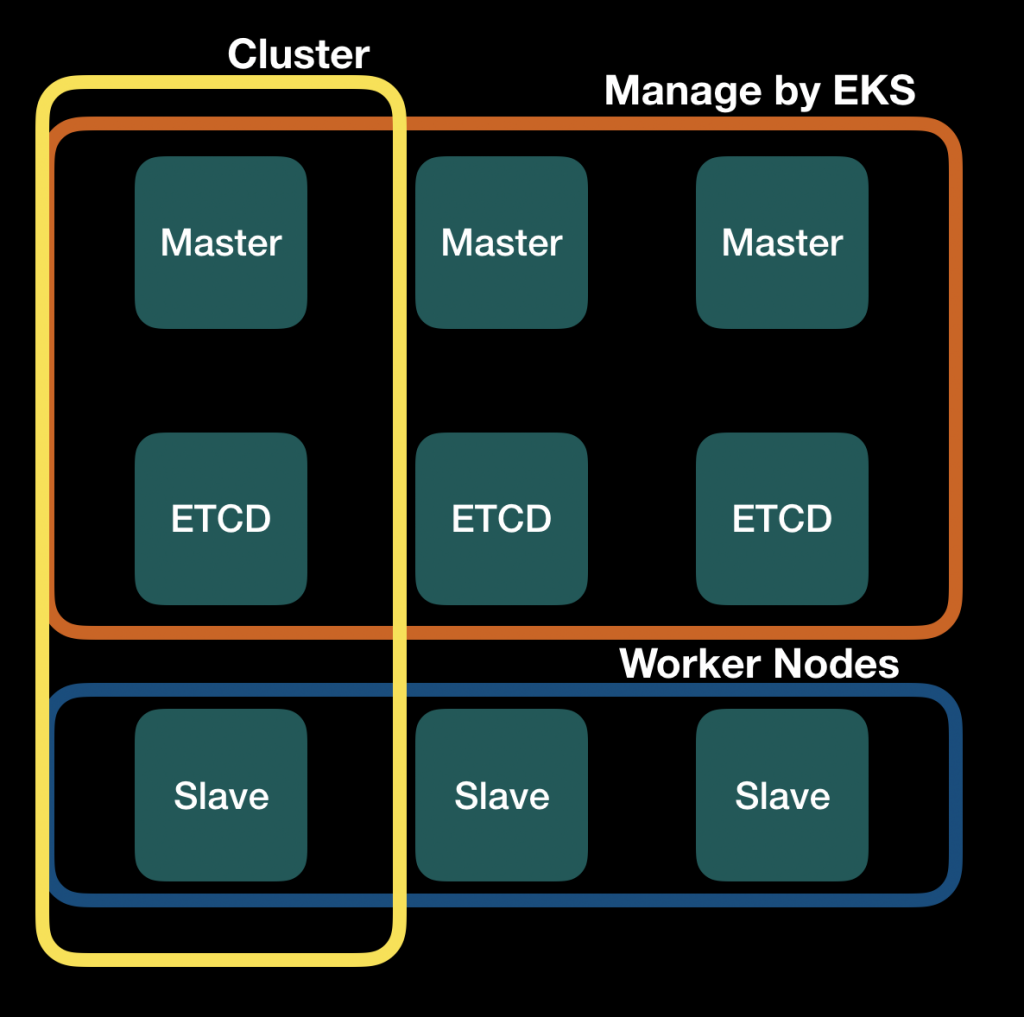
HA(High Availability),是指高可用性,它可以用在主節點的備援上,因為minikube是單節點的cluster,所以它沒法設置,EKS的話就可以,但我們也不需特別去設置它,因為在AWS上的EKS,主節點的管理是在EKS內進行的,底下看個架構圖:

可以看到EKS會自動幫我們把Master和ETCD自動Scale up成3個,我們能控制的只有藍色區塊的部分
當我們正在使用的Master掛掉的時候,這時候EKS就會自動幫我們把備援的主節點換上去,它會始終讓主節點數保持3個,這個3是要達成HA的基本要件。
這邊我們不用實作,因為EKS都已經幫我們做好了,而且要升版的時候,它也能夠自動幫我們完成喔!很方便吧?
Federation(聯邦)自開始出現後一直都是讓人很感興趣的議題,不過因為v1的版本架構設計瑕疵,目前已經被棄用,現在是直接用v2版,比較符合現有的k8s架構需求,底下我們操作下,看看怎麼使用,也比較下minikube與EKS這兩個不同的環境使用上有何不同。
下載Kubefed主程式,從這裡下載
$tar -zxvf kubefedctl-*.tgz
$chmod u+x kubefedctl
$sudo mv kubefedctl /usr/local/bin/ # make sure the location is in the PATH
注意到這個只有支援linxu和OSX,筆者是用Mac
接著我們新增兩個minikube的群集(要開啟RBAC
$minikube start -p cluster1 --kubernetes-version v1.13.4 --extra-config=apiserver.Authorization.Mode=RBAC
$minikube start -p cluster2 --kubernetes-version v1.13.4 --extra-config=apiserver.Authorization.Mode=RBAC
檢查一下
$kubectl get all
NAME                 TYPE        CLUSTER-IP   EXTERNAL-IP   PORT(S)   AGE
service/kubernetes   ClusterIP   10.96.0.1    <none>        443/TCP   4m6s
如果要切換群集的話
$kubectl config use-context cluster1
Switched to context "cluster1".
$kubectl config use-context cluster2
Switched to context "cluster2".
$kubectl config current-context
cluster2
設置Helm
$helm repo add kubefed-charts https://raw.githubusercontent.com/kubernetes-sigs/kubefed/master/charts
$helm repo list
NAME            URL
stable          https://kubernetes-charts.storage.googleapis.com
local           http://127.0.0.1:8879/charts
istio.io        https://storage.googleapis.com/istio-release/releases/1.3.1/charts/
kubefed-charts  https://raw.githubusercontent.com/kubernetes-sigs/kubefed/master/charts
檢查對應版本
$helm search kubefed
NAME                            CHART VERSION   APP VERSION     DESCRIPTION
kubefed-charts/kubefed          0.1.0-rc6                       KubeFed helm chart
kubefed-charts/federation-v2    0.0.10                          Kubernetes Federation V2 helm chart
RBAC設置
$vim rbac.yaml
apiVersion: v1
kind: ServiceAccount
metadata:
  name: tiller
  namespace: kube-system
---
apiVersion: rbac.authorization.k8s.io/v1
kind: ClusterRoleBinding
metadata:
  name: tiller
roleRef:
  apiGroup: rbac.authorization.k8s.io
  kind: ClusterRole
  name: cluster-admin
subjects:
  - kind: ServiceAccount
    name: tiller
    namespace: kube-system
套用設定
$kubectl apply -f rbac.yaml
role.rbac.authorization.k8s.io/tiller created
Helm初始化
$helm init --service-account tiller
透過Helm安裝
$helm install kubefed-charts/kubefed --name kubefed --version=0.1.0-rc6 --namespace kube-system
接著我們把這兩個集群加到Federation中
$kubefedctl join cluster1 --cluster-context cluster1 \
    --host-cluster-context cluster1 --v=2
$kubefedctl join cluster2 --cluster-context cluster2 \
    --host-cluster-context cluster1 --v=2
檢查federation狀態
$kubectl -n kube-federation-system get kubefedclusters
NAME       READY   AGE
cluster1   True    1m
cluster2   True    1m
新增一個Namespace,測試用
$kubectl create namespace test
namespace/test created
新增一個Federation的Namespace
$vim fed-namespace.yaml
apiVersion: types.kubefed.io/v1beta1
kind: FederatedNamespace
metadata:
  name: test
  namespace: test
spec:
  placement:
    clusters:
    - name: cluster1
    - name: cluster2
調度它
$kubectl apply -f fed-namespace.yaml
federatednamespace.types.kubefed.io/test created
部署Deployment
$vim fed-deployment.yaml
apiVersion: types.kubefed.io/v1beta1
kind: FederatedDeployment
metadata:
  name: test
  namespace: test
spec:
  template:
    metadata:
      labels:
        app: nginx
    spec:
      replicas: 3
      selector:
        matchLabels:
          app: nginx
      template:
        metadata:
          labels:
            app: nginx
        spec:
          containers:
          - image: nginx
            name: nginx
  placement:
    clusters:
    - name: cluster2
    - name: cluster1
  overrides:
  - clusterName: cluster2
    clusterOverrides:
    - path: "/spec/replicas"
      value: 5
    - path: "/spec/template/spec/containers/0/image"
      value: "nginx:1.17.0-alpine"
    - path: "/metadata/annotations"
      op: "add"
      value:
        foo: bar
我們可以在設定裡面繼承既有的Deployment設定,或是覆寫它,如同replicas中的設置
調度它
$kubectl apply -f fed-deployment.yaml
federateddeployment.types.kubefed.io/test created
驗證結果
$kubectl --context cluster1 -n test get deployments
NAME   READY   UP-TO-DATE   AVAILABLE   AGE
test   3/3     3            3           3m
$kubectl --context cluster2 -n test get deployments
NAME   READY   UP-TO-DATE   AVAILABLE   AGE
test   5/5     5            5           3m5s
恢復原狀
$kubectl delete ns/test
namespace "test" deleted
$kubectl --context cluster2 -n test get deployments
No resources found.
看起來沒啥問題,我們接續看EKS的部分
首先,因為EKS預設是開啟RBAC的,所以我們不需要在這塊再調整參數,以及,因為EKS有使用的特定K8s版本,目前是使用1.13.8,固定的,同樣的也不需要去修改
我們套用前方的設置YAML直接操作,我們直接裝目前最新的、因為是Ubuntu,OS要改成linux
VERSION=0.1.0-rc6
OS=linux
ARCH=amd64
$curl -LO https://github.com/kubernetes-sigs/kubefed/releases/download/v${VERSION}/kubefedctl-${VERSION}-${OS}-${ARCH}.tgz
$tar -zxvf kubefedctl-*.tgz
$chmod u+x kubefedctl
$sudo mv kubefedctl /usr/local/bin/ # make sure the location is in the PATH
接著用eksctl新增兩個群集
$eksctl create cluster --name=cluster1 --region=ap-southeast-1
$eksctl create cluster --name=cluster2 --region=ap-southeast-1
切換群集
$kubectl config use-context cluster1
Switched to context "cluster1".
$kubectl config use-context cluster2
Switched to context "cluster2".
$kubectl config current-context
cluster2
套用RBAC
$kubectl apply -f rbac.yaml
role.rbac.authorization.k8s.io/tiller created
Helm初始化
$helm init --service-account tiller
透過Helm安裝
$helm install kubefed-charts/kubefed --name kubefed --version=0.1.0-rc6 --namespace kube-system
將這兩個集群加到Federation
$kubefedctl join cluster1 --cluster-context cluster1 \
    --host-cluster-context cluster1 --v=2
$kubefedctl join cluster2 --cluster-context cluster2 \
    --host-cluster-context cluster1 --v=2
檢查federation狀態
$kubectl -n kube-federation-system get kubefedclusters
NAME       READY   AGE
cluster1   True    1m10s
cluster2   True    1m10s
新增一個Namespace,測試用
$kubectl create namespace test
namespace/test created
調度Federation的Namespace
$kubectl apply -f fed-namespace.yaml
federatednamespace.types.kubefed.io/test created
調度Federation的Deployment
$kubectl apply -f fed-deployment.yaml
federateddeployment.types.kubefed.io/test created
驗證結果
$kubectl --context cluster1 -n test get deployments
NAME   READY   UP-TO-DATE   AVAILABLE   AGE
test   3/3     3            3           5m
$kubectl --context cluster2 -n test get deployments
NAME   READY   UP-TO-DATE   AVAILABLE   AGE
test   5/5     5            5           5m20s
恢復原狀
$kubectl delete ns/test
namespace "test" deleted
$kubectl --context cluster2 -n test get deployments
No resources found.
OK,測試結束了!
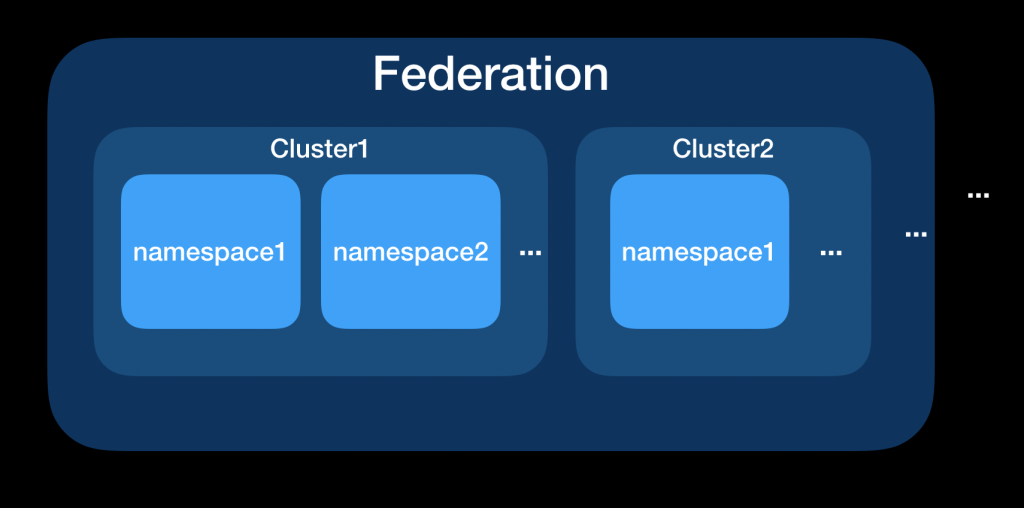
今天我們理解了HA、Federation的觀念及其所代表的重要性,這兩個的概念都是與備援有關係的,我們看張架構圖:

從Federation看到我們可以把一至多個Cluster(群集)指派給它,在每個Cluster中我們也可以設置多個Namespace(虛擬群集),當然,如果還是不放心的話,我們甚至可以設置多個Federation,達到全方位的控管備援機制。明天就是最後一天啦!會有一整個系列統整的內容帶給大家,敬請期待,我們明天見囉!
本文同步刊載於https://github.com/x1y2z3456/ironman
感謝您撥冗閱讀此文章,不喜勿噴,有任何問題建議歡迎下方留言:)
說個笑話,希望我能寫滿30天啊(笑
