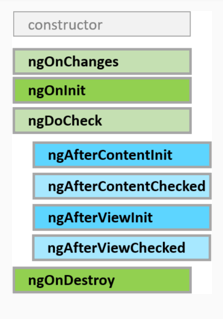
元件(component)從建立到銷毀的一整個生命週期當中,會經歷數個階段。
Angular提供了lifecycle hooks,讓我們可以藉由對應每個生命周期階段的方法執行程式碼。
我們最常用的OnInit介面方法ngOnInit(),便是其中一個生命週期階段所呼叫的方法。
lifecycle hooks。這邊只是要說明它是元件建立之初最早被呼叫的方法。@Input/@Output所綁定的屬性值改變時呼叫。@Input/@Output才會有ngOnChanges階段。ngOnChanges()完成之後呼叫,只調用一次。AComponent
import { Component, OnInit } from '@angular/core';
@Component({
  selector: 'app-a',
  templateUrl: './a.component.html',
  styleUrls: ['./a.component.scss']
})
export class AComponent implements OnInit {
  valueA = 0;
  constructor() { }
  ngOnInit(): void {
  }
  onAddValueA() {
    this.valueA++;
  }
}
AComponent Template
<app-b [valueA]="valueA"></app-b>
<button (click)="onAddValueA()">AddValueA</button>
BComponent
import { Component, OnInit, Input, OnChanges } from '@angular/core';
@Component({
  selector: 'app-b',
  templateUrl: './b.component.html',
  styleUrls: ['./b.component.scss']
})
export class BComponent implements OnInit, OnChanges {
  @Input() valueA: number;
  constructor() {
    console.log('constructor called');
  }
  ngOnChanges() {
    console.log('ngOnChanges called');
  }
  ngOnInit() {
    console.log('ngOnInit called');
  }
}
BComponent Template
<p>Bcomponent valueA: {{ valueA }}</p>
AppComponent Template
<app-a></app-a>
AComponent為BComponent的父元件,透過@Input()將valueA值傳給子元件。
在BComponent,呼叫constructor()、ngOnChanges()、ngOnInit(),觀察呼叫順序: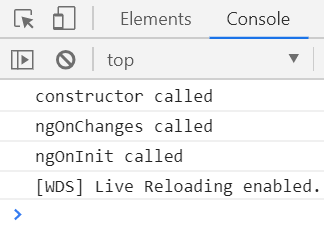
可以得知呼叫順序依序為:constructor() -> ngOnChanges() -> ngOnInit()。
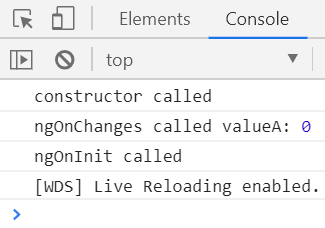
將ngOnChanges()內,改為輸出valueA的值:
ngOnChanges() {
    console.log('ngOnChanges called valueA:', this.valueA);
  }
click Button:
可以發現,頁面上的valueA有變化,但只有ngOnChanges()被呼叫,而其他方法未被呼叫。
這是因為ngOnInit()只會在元件建立後呼叫一次,而ngOnChanges()則是會根據@input()所綁定的屬性值改變時呼叫。
紀錄變化內容
呼叫ngOnChanges()時,可以藉由傳入SimpleChange型別的參數,來取得@input()屬性改變前後的值:
ngOnChanges(changes: SimpleChanges) {
    console.log('ngOnChanges called ', this.valueA);
    console.log(changes);
  }
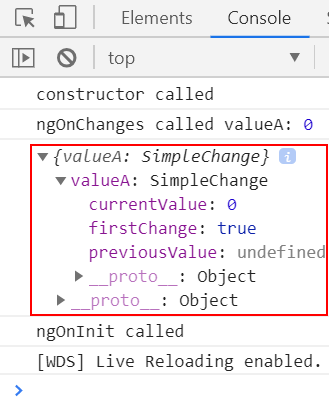
傳入的物件內,屬性為valueA,其型別為SimpleChange,有3個屬性:
currentValue:當前的值firstChange: 只有第一次呼叫為true,之後都是false
previousValue: 上一次的值,第一次呼叫為undefined
ngDoCheck。ngDoCheck被呼叫的頻率很高,成本高昂,這點要特別注意,以免影響使用者體驗。將AComponent中的valueA,改成物件:
import { Component, OnInit } from '@angular/core';
@Component({
  selector: 'app-a',
  templateUrl: './a.component.html',
  styleUrls: ['./a.component.scss']
})
export class AComponent implements OnInit {
  obj = { valueA: 0 };
  constructor() { }
  ngOnInit(): void {
  }
  onAddValueA() {
    this.obj.valueA++;
  }
}
將物件傳入BComponent:
<app-b [obj]="obj"></app-b>
<button (click)="onAddValueA()">AddValueA</button>
BComponent中的@Input(),改為物件,實作ngDoCheck():
import { Component, OnInit, Input, OnChanges, SimpleChanges, DoCheck } from '@angular/core';
@Component({
  selector: 'app-b',
  templateUrl: './b.component.html',
  styleUrls: ['./b.component.scss']
})
export class BComponent implements OnInit, OnChanges, DoCheck {
  @Input() obj: { valueA: number };
  constructor() {
    console.log('constructor called');
  }
  ngOnChanges() {
    console.log('ngOnChanges called obj.valueA:', this.obj.valueA);
  }
  ngOnInit() {
    console.log('ngOnInit called');
  }
  ngDoCheck() {
    console.log('ngDoCheck called obj.valueA:', this.obj.valueA);
  }
}
BComponent Template
<p>Bcomponent valueA: {{ obj.valueA }}</p>
click Button:
valueA確實如預期的增加3,但ngOnChanges()只呼叫一次,ngDoCheck()卻每加一次就呼叫一次。
這是因為,所增加的只是@Input()物件裡的屬性值,並未改變obj物件的參考位址,所以Angular會判斷@Input()物件並未變更,自然就不會呼叫ngOnChanges()。
而ngDoCheck()能做到像是這種Angular無法檢測出的變化。
ngDoCheck()之後呼叫,只呼叫一次。<ng-content>顯示出來,增加子元件共用的彈性。AComponent Template
<app-b>
  <span>Bcomponent obj.valueA : {{ obj.valueA }}</span>
</app-b>
<button (click)="onAddValueA()">AddValueA</button>
將輸入的內容(<span>Bcomponent obj.valueA : {{ obj.valueA }}</span>)放入<app-b>的Template。
BComponent Template
<p>
  <ng-content></ng-content>
</p>
內容藉由<ng-content>顯示於子元件。
BComponent
import { Component, OnInit, Input, OnChanges, SimpleChanges, DoCheck, AfterContentInit, AfterContentChecked } from '@angular/core';
@Component({
  selector: 'app-b',
  templateUrl: './b.component.html',
  styleUrls: ['./b.component.scss']
})
export class BComponent implements OnInit, OnChanges, DoCheck, AfterContentInit {
  //Input() obj: { valueA: number };
  constructor() {
    console.log('constructor called');
  }
  ngOnChanges(changes: SimpleChanges) {
    console.log('ngOnChanges called');
  }
  ngOnInit() {
    console.log('ngOnInit called');
  }
  ngDoCheck() {
    console.log('ngDoCheck called');
  }
  ngAfterContentInit() {
    console.log('ngAfterContentInit called');
  }
}
暫時不需要obj,先註解@Input()
依序顯示: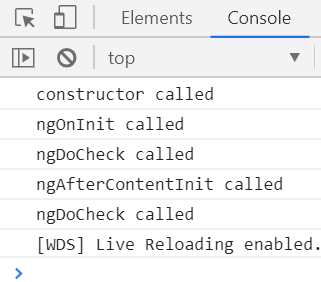
可以發現,ngOnChanges()不見了,因為我們將@Input()拿掉,自然就不會有ngOnChanges階段。
ngAfterContentInit()和每次ngDoCheck()之後呼叫。BComponent
import { Component, OnInit, Input, OnChanges, SimpleChanges, DoCheck, AfterContentInit, AfterContentChecked } from '@angular/core';
@Component({
  selector: 'app-b',
  templateUrl: './b.component.html',
  styleUrls: ['./b.component.scss']
})
export class BComponent implements OnInit, OnChanges, DoCheck, AfterContentInit, AfterContentChecked {
  //Input() obj: { valueA: number };
  constructor() {
    console.log('constructor called');
  }
  ngOnChanges(changes: SimpleChanges) {
    console.log('ngOnChanges called');
  }
  ngOnInit() {
    console.log('ngOnInit called');
  }
  ngDoCheck() {
    console.log('ngDoCheck called');
  }
  ngAfterContentInit() {
    console.log('ngAfterContentInit called');
  }
  ngAfterContentChecked() {
    console.log('ngAfterContentChecked called');
  }
}
顯示: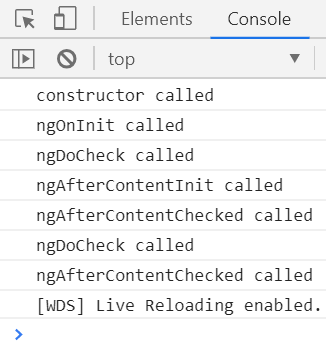
click Button:
只有ngDoCheck()、ngAfterContentChecked()被呼叫。
因為,父元件投射至子元件的內容改變,但並未銷毀子元件,所以ngAfterContentChecked()被呼叫。
也因為子元件的內容改變了,自然會呼叫ngDoCheck()。
ngAfterContentChecked()之後呼叫,只調用一次。AComponent template
<app-b [obj]="obj"></app-b>
<button (click)="onAddValueA()">AddValueA</button>
新增CComponent
import { Component, OnInit, Input } from '@angular/core';
@Component({
  selector: 'app-c',
  templateUrl: './c.component.html',
  styleUrls: ['./c.component.scss']
})
export class CComponent implements OnInit {
  @Input() valueA: number;
  constructor() { }
  ngOnInit(): void {
  }
}
CComponent template
<p>Ccomponent obj.valueA : {{ valueA }}</p>
BComponent Template
<app-c [valueA]="obj.valueA"></app-c>
修改BComponent,使用@ViewChild取得CComponent實體,我們嘗試在不同的生命週期階段取得子元件的實體:
import { Component, OnInit, Input, OnChanges, DoCheck, AfterContentInit,
  AfterContentChecked, AfterViewInit, ViewChild } from '@angular/core';
import { CComponent } from '../c/c.component';
@Component({
  selector: 'app-b',
  templateUrl: './b.component.html',
  styleUrls: ['./b.component.scss']
})
export class BComponent implements OnInit, OnChanges, DoCheck, AfterContentInit, AfterContentChecked,
  AfterViewInit {
  @Input() obj: { valueA: number, valueB: number };
  @ViewChild(CComponent) cComponent: CComponent;
  constructor() {
    console.log('constructor called');
  }
  ngOnChanges() {
    console.log('ngOnChanges called');
  }
  ngOnInit() {
    // 還未取得子元件實體
    console.log('ngOnInit called : ', this.cComponent);
  }
  ngDoCheck() {
    console.log('ngDoCheck called');
    // 第一次呼叫時,還未取得子元件實體
    console.log('ngDoCheck called', this.cComponent);
  }
  ngAfterContentInit() {
    console.log('ngAfterContentInit called');
  }
  ngAfterContentChecked() {
    console.log('ngAfterContentChecked called');
  }
  ngAfterViewInit() {
    // 子元件的檢視初始化完之後,取得子元件的實體
    console.log('ngAfterViewInit called', this.cComponent);
  }
}
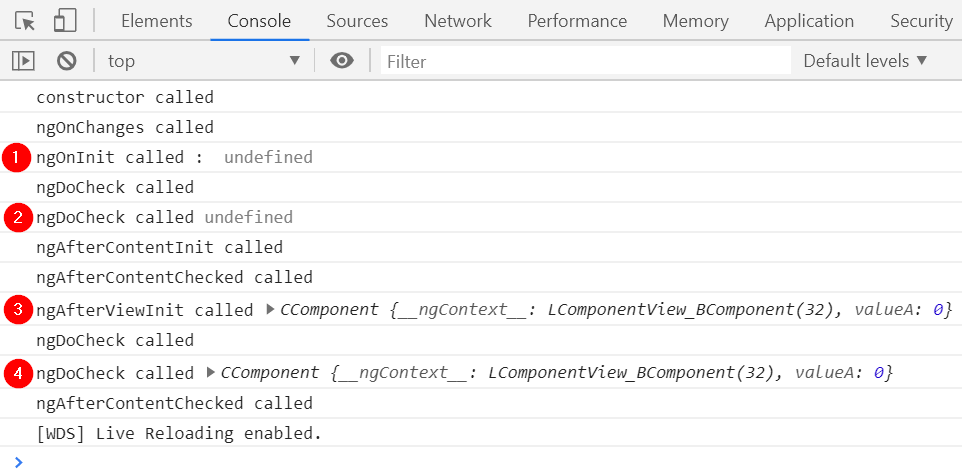
ngOnInit階段,子元件初始化還未完成,無法取得其實體。ngDoCheck階段,子元件初始化還未完成,無法取得其實體。ngAfterViewInit階段,子元件初始化完成,取得其實體。BComponent@ViewChild綁定的cComponent改變,ngDoCheck再次被呼叫,此時可以取得子元件的實體,也會觸發ngAfterContentChecked。從剛剛幾個範例,可以看出ngDoCheck觸發的頻率很高,關於這點之後會另開篇幅說明。
ngAfterViewInit()和每次ngAfterContentChecked()之後呼叫。在BComponent新增ngAfterContentChecked()
ngAfterViewChecked() {
    console.log('ngAfterViewChecked called', this.cComponent);
  }
click Button:
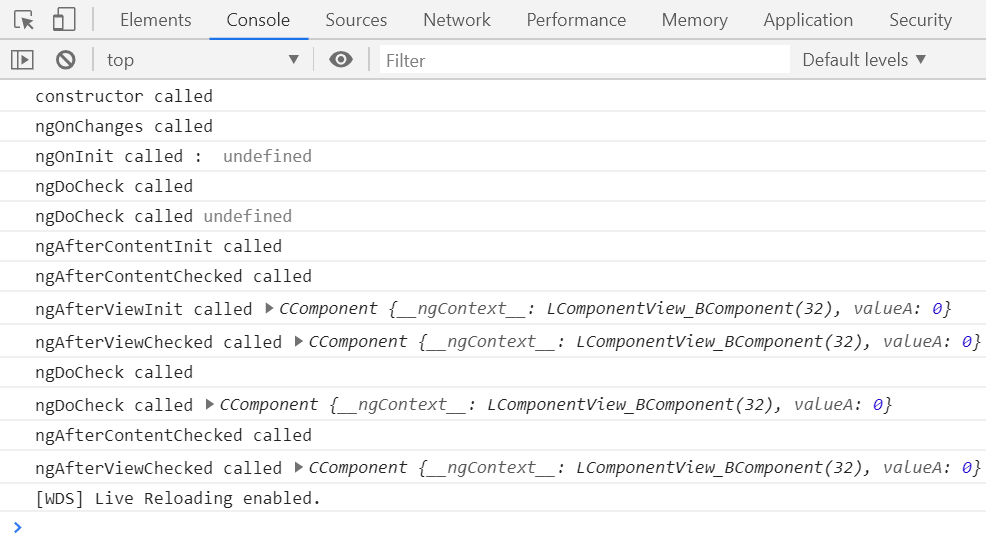
在ngDoCheck階段,還未偵測到子元件的變化。
直到ngAfterViewChecked階段,才偵測到子元件的變化。
當一個元件銷毀時,內部的屬性與方法也隨之消失,但某些情況,正在執行的程式並不會停止,而是繼續執行,這時我們就必須手動在元件銷毀之前對其做處理,最常見的就是取消RxJS訂閱。
AComponent template
<button (click)="display=!display">toggle Bcomponent</button>
<app-b *ngIf="display"></app-b>
利用button控制BComponent的建立/銷毀。AComponent
import { Component, OnInit } from '@angular/core';
@Component({
  selector: 'app-a',
  templateUrl: './a.component.html',
  styleUrls: ['./a.component.scss']
})
export class AComponent implements OnInit {
  display = true;
  constructor() { }
  ngOnInit(): void {
  }
}
BComponent template
<p>counter : {{ counter }}</p>
BComponent
import { Component, OnInit } from '@angular/core';
import { interval } from 'rxjs';
@Component({
  selector: 'app-b',
  templateUrl: './b.component.html',
  styleUrls: ['./b.component.scss']
})
export class BComponent implements OnInit {
  counter = 0;
  constructor() { }
  ngOnInit() {
    interval(1000).subscribe(val => {
      this.counter++;
      console.log(this.counter);
    });
  }
}
使用RxJS的interval產生每秒送出一個遞增1的數值的Observable,並且訂閱它:
按下button將BComponent銷毀後,可以看到interval依舊在執行,再次按下button,又產生新的訂閱:
可以在ngOnDestroy()中,取消訂閱:
import { Component, OnInit, OnDestroy } from '@angular/core';
import { interval, Subscription } from 'rxjs';
@Component({
  selector: 'app-b',
  templateUrl: './b.component.html',
  styleUrls: ['./b.component.scss']
})
export class BComponent implements OnInit, OnDestroy {
  counter = 0;
  subscription: Subscription;
  constructor() { }
  ngOnInit() {
    // 取得訂閱
    this.subscription = interval(1000).subscribe(val => {
      this.counter = val;
      console.log(this.counter);
    });
  }
  ngOnDestroy() {
    // 取消訂閱
    this.subscription.unsubscribe();
  }
}
隨著BComponent的銷毀,確實取消訂閱,當BComponent再次建立時,新的訂閱再次執行:
參考來源:
Angular-生命週期
[Angular 大師之路] Day 04 - 認識 Angular 的生命週期
 WM
WM

 iThome鐵人賽