延續前天跟昨天,今天要來看一下身為 children 的 component 是怎麼解析出 parent component 的!
每當我們在 component 的 constructor 上新增 parameters 的時候,Angular 的 compiler 就會在 constructor 上新增一個 ɵɵdirectiveInject 的函式,試著取得這些 parameters 的實體。
以昨天的 WorldComponent 來看,Angular 編譯出來的 main.js 就會是:
// ... 部分略
WorldComponent.ɵfac = function WorldComponent_Factory(t) {
  return new (t || WorldComponent)(_angular_core_["ɵɵdirectiveInject"]
                      (_hello_hello_component["HelloComponent"]));
};
而 ɵɵdirectiveInject 函式的實作如下:
export function ɵɵdirectiveInject<T>(token: Type<T>|InjectionToken<T>): T;
export function ɵɵdirectiveInject<T>(token: Type<T>|InjectionToken<T>, flags: InjectFlags): T;
export function ɵɵdirectiveInject<T>(
    token: Type<T>|InjectionToken<T>, flags = InjectFlags.Default): T|null {
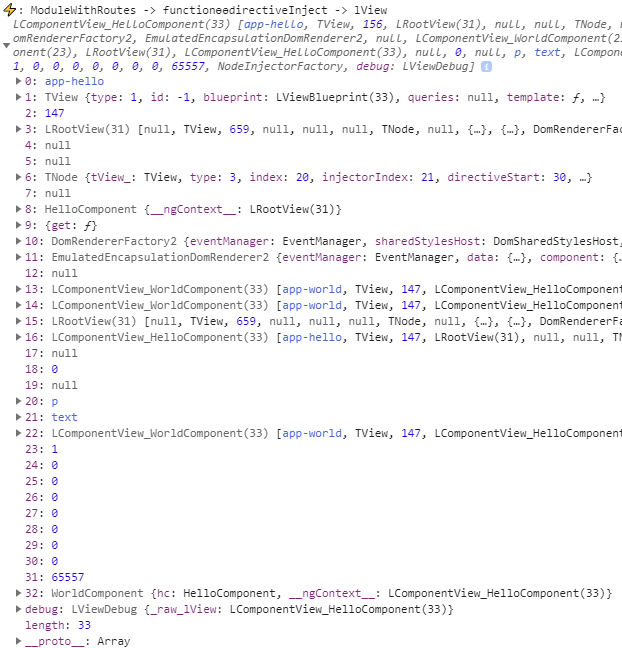
  const lView = getLView();
  // Fall back to inject() if view hasn't been created. This situation can happen in tests
  // if inject utilities are used before bootstrapping.
  if (lView == null) return ɵɵinject(token, flags);
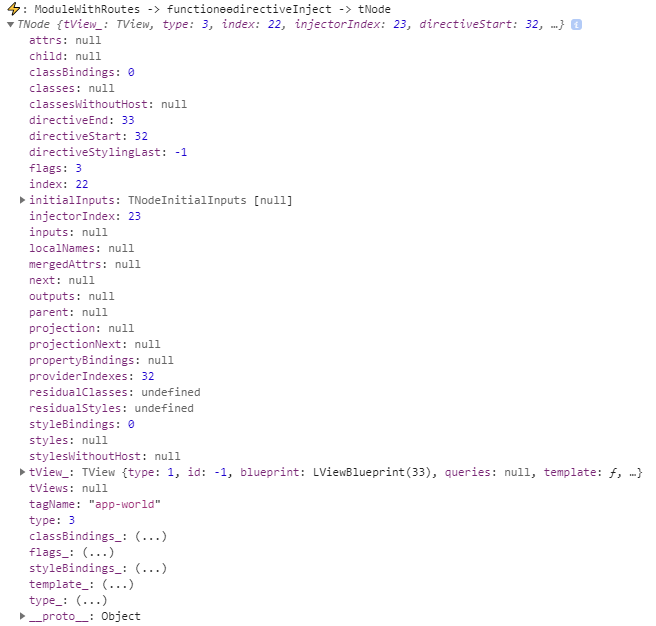
  const tNode = getPreviousOrParentTNode();
  return getOrCreateInjectable<T>(
      tNode as TDirectiveHostNode, lView, resolveForwardRef(token), flags);
}
這個函式算是一個中介層,用來讓 Angular 取得需要的資訊,像是 LView、TNode,這些資訊都有助於 Angular 在 getOrCreateInjectable 方法中取得對應的物件實體。
這時候 getOrCreateInjectable 的參數則是:
tNode

lView

token

flags

接著我們就可以來看 getOrCreateInjectable 這個函式的實作,是怎麼逐步把 HelloComponent 解析出來:
完整的程式碼有太多資訊是本篇文章不會使用的內容,若有興趣者,可以直接到 GitHub 看喔。
export function getOrCreateInjectable<T>(
    tNode: TDirectiveHostNode|null, lView: LView, token: Type<T>|InjectionToken<T>,
    flags: InjectFlags = InjectFlags.Default, notFoundValue?: any): T|null {
  if (tNode !== null) {
    const bloomHash = bloomHashBitOrFactory(token);
    // 下接 Block 2
  }

  // ...略
}
↑ Block 1
繼續往下到 Block 2 之前,會需要依照 token 取得 bloomHash,若傳入的 token 是一個Type(如本例中的 HelloComponent),則會回傳一個數字,若傳入的 token 是一個 InjectionToken 的物件,則會回傳建立與該 token 相關物件的工廠方法。
export function bloomHashBitOrFactory(token: Type<any>|InjectionToken<any>|string): number|Function|
    undefined {
  ngDevMode && assertDefined(token, 'token must be defined');
  if (typeof token === 'string') {
    return token.charCodeAt(0) || 0;
  }
  const tokenId: number|undefined =
      // First check with `hasOwnProperty` so we don't get an inherited ID.
      token.hasOwnProperty(NG_ELEMENT_ID) ? (token as any)[NG_ELEMENT_ID] : undefined;
  // Negative token IDs are used for special objects such as `Injector`
  return (typeof tokenId === 'number' && tokenId > 0) ? tokenId & BLOOM_MASK : tokenId;
}
↑ bloomHashBitOrFactory source code
根據 bloomHashBitOrFactory 函式,可以計算出 HelloComponent 的 bloomHash 值是:0。
算式如下:
tokenId = 0                 // 因為 HelloComponent 是第一個被建立的 component
BLOOM_MASK = 255            // 常數
tokenId & BLOOM_MASK = 0
↑ HelloComponent bloomHash 的計算過程
if (typeof bloomHash === 'function') {
      // ...略
  } else if (typeof bloomHash == 'number') {
    if (bloomHash === -1) {
      // ...略
    }
    // If the token has a bloom hash, then it is a token which could be in NodeInjector.

    // A reference to the previous injector TView that was found while climbing the element
    // injector tree. This is used to know if viewProviders can be accessed on the current
    // injector.
    let previousTView: TView|null = null;
    let injectorIndex = getInjectorIndex(tNode, lView);
    let parentLocation: RelativeInjectorLocation = NO_PARENT_INJECTOR;
    let hostTElementNode: TNode|null =
        flags & InjectFlags.Host ? lView[DECLARATION_COMPONENT_VIEW][T_HOST] : null;

    // 下接 Block 3
  }
}
↑ Block 2
在 Block 2 的部分開始準備一些稍後會用到的變數,像是 Injector 在 LView 的 index、parentLocation 與 hostTElementNode 等等。
以本例來說,相關變數與其初始值對應關係如下:
// If we should skip this injector, or if there is no injector on this node, start by
// searching
// the parent injector.
if (injectorIndex === -1 || flags & InjectFlags.SkipSelf) {
  // ... 略
}

// Traverse up the injector tree until we find a potential match or until we know there
// *isn't* a match.
while (injectorIndex !== -1) {
  parentLocation = lView[injectorIndex + PARENT_INJECTOR];

  // Check the current injector. If it matches, see if it contains token.
  const tView = lView[TVIEW];
  if (bloomHasToken(bloomHash, injectorIndex, tView.data)) {
    // At this point, we have an injector which *may* contain the token, so we step through
    // the providers and directives associated with the injector's corresponding node to get
    // the instance.
    const instance: T|null = searchTokensOnInjector<T>(
        injectorIndex, lView, token, previousTView, flags, hostTElementNode);
    if (instance !== NOT_FOUND) {
      return instance;
    }
  }
  if (shouldSearchParent(
          flags, lView[TVIEW].data[injectorIndex + TNODE] === hostTElementNode) &&
      bloomHasToken(bloomHash, injectorIndex, lView)) {
    // The def wasn't found anywhere on this node, so it was a false positive.
    // Traverse up the tree and continue searching.
    previousTView = tView;
    injectorIndex = getParentInjectorIndex(parentLocation);
    lView = getParentInjectorView(parentLocation, lView);
  } else {
    // If we should not search parent OR If the ancestor bloom filter value does not have the
    // bit corresponding to the directive we can give up on traversing up to find the specific
    // injector.
    injectorIndex = -1;
  }
}
↑ Block 3
在 Block 3 時,parentLocation 會被替換成 lView[23 + 8] = 65557(PARENT_INJECTOR 為常數 8,屬於 LView Header 的內容之一)。
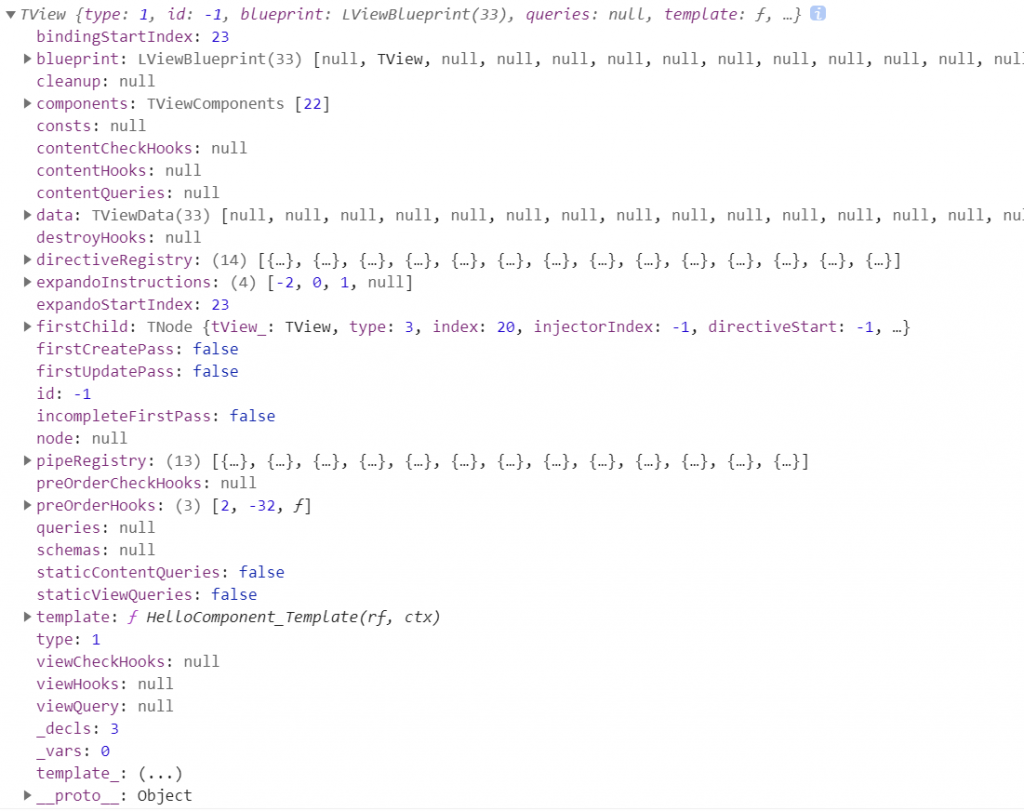
而 tView 為 lView[1](TVIEW 為常數 1,也屬於 LView Header 的內容之一),本例可以得到以下的 tView:

進到 while 迴圈後,Angular 會透過 bloomHasToken 函式來確認指定的 token 是否有被放入 WorldComponent 的 bloom filter 過,若有就可以直接透過 searchTokensOnInjector 函式來取得實體,若否的話則會根據 flags 及其他資訊來決定是否使用上一層 component(HelloComponent)的 injector 來取得實體。
因為把迴圈內的行為一一帶出實在過於枯燥乏味,我這邊就直接略過!有興趣的讀者可以開一個新專案自己嘗試是否能夠「人工」跟著原始碼解析出你想要的物件實體吧!
以上三篇文章就是 Angular 從新增 Component 至 Injector 到解析 token 取得物件實體的整個流程!
明天開始就可以介紹新的 Tip 啦 ?
以下按照入團順序列出我們團隊夥伴的系列文章!
