在 ES6 中,新增了 展開運算符(Spread Operator) 與 其餘參數運算符(Rest Operator),但它的寫法都是...,接下來我們來介紹一下他們到底哪裡不同?
展開運算符是一個把陣列
展開成個別的值的速寫語法
簡單來說,就是將陣列的值一個一個取出來,一般來說都會運用在陣列宣告(複製陣列到新的陣列中)或是函式呼叫(傳遞參數)使用。
舉例來說:
function average(a, b, c, d) {
    return (a + b + c + d)/4;
}
const arr1 = [1, 2];
const arr2 = [3, 4];
const arr3 = [...arr1, ...arr2]; // [1, 2, 3, 4]  陣列宣告
average(...arr3);    // 2.5  函式呼叫
let numberArray = [1, 2, 3, 4, 5, 6];
console.log(Math.max(numberArray)); // NAN,因為傳入的是陣列
console.log(Math.max(...numberArray)); // 6,會先轉換成 1,2,3,4,5,6,再去比較 Math.max
展開運算符還有一個特別的功能,可以將可迭代(Iterable)或與陣列相似(Array-like)的物件轉換成為陣列。
內建可以迭代(Iterable)的物件有 String, Array, TypedArray, Map, Set 物件。
舉例來說:
function TransferToArray(x) {
  console.log(arguments);
  console.log(Array.isArray(arguments));

  //轉換成陣列
  const arr = [...arguments];
  console.log(arr);
  console.log(Array.isArray(arr));
}
const obj1 = { a: 111, b: 222 };
const obj2 = { c: 333, d: 444 };
const merged = { ...obj1, ...obj2 }; // { a: 111, b: 222, c: 333, d: 444}
TransferToArray(merged); // [object Arguments]{} , false, [[object Object]], true
其餘運算符是
收集其餘(剩餘的)值轉變成一個陣列
其餘運算符一般來說都會用在函式定義中的傳入參數定義中,簡單來說其餘運算字會幫助我們把輸入函式中的參數值變成陣列,稱為其餘參數(Rest Parameters),又或是運用在解構賦值時。
舉例來說:
function sum(...numbers) {
  var result = 0;
  console.log(numbers);
  numbers.forEach(function (number) {
    result += number;
  });
  return result;
}
console.log(sum()); // 0 沒傳入值時,numbers = []
console.log(sum(1, 2, 3, 4, 5)); // 15,同時傳入多值

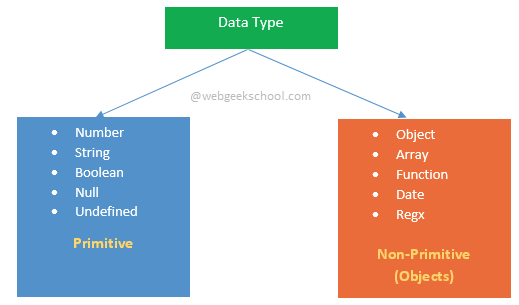
昨天我們有提到 JS 型別的類型分為基本型別(Primitives) 與物件型別(Object)兩大類,
這兩個型別最大的差異,就在於他們傳值的方式:
當資料在複製時,我們來看看 基本型別 跟 物件型別 的不同,這也是 傳值 跟 傳址 的不同:
let a = 123;
let b = a;
a = 467;
console.log(a);  // 456
console.log(b);  // 123

let obj1 = {
    foo: 'test'
}
let obj2 = obj1;
obj1.foo = 'changed';
console.log(obj1.foo); // changed
console.log(obj2.foo);  // changed
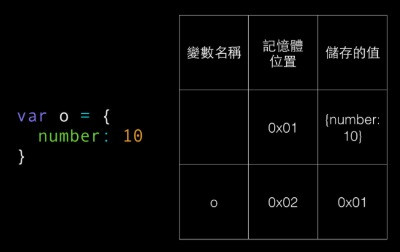
下張圖是說明 物件型別 在儲存時的狀態:
可以看得出來它是將 {number:10} 這個 object assign 給 o,當然它可以 assign 給其他變數,但它變動時更動的是同一個記憶體位址所儲存的值,所以就連帶改變所有被 assign 變數的值。

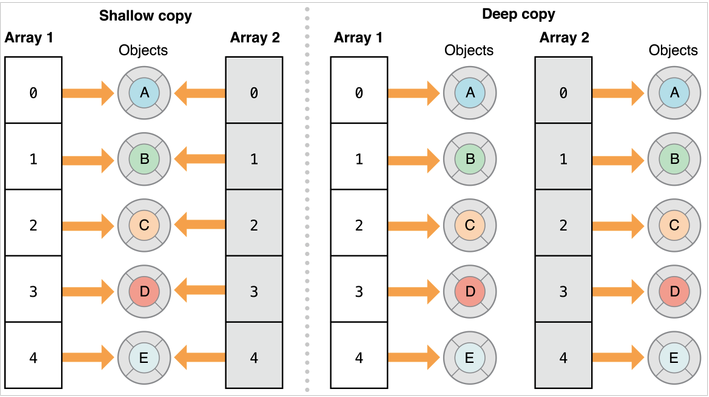
物件拷貝其實我們又可以拆分成 淺拷貝(Shallow Copy) 與 深拷貝(Deep Copy)。
const array1 = [['a', 0], ['b', 1]];
const obj = Object.fromEntries(array1);  // 轉成 obj {a: 0,b: 1}
const array2 = Object.entries(obj);     // 轉成 array [['a', 0], ['b', 1]]
const obj = {
	a1: 123,
 	get bar() { return 'test'}
};
const obj2 = Object.create({}, Object.getOwnPropertyDescriptors(obj));
console.log(obj2);  // { a1: 123,bar: "test" }
const obj1 = {
	set foo(value) {
  	console.log(value);
  }
};
const obj2 = {};
Object.defineProperties(obj2, Object.getOwnPropertyDescriptors(obj1));
// { foo: undefined }
Object.getOwnPropertyDescriptor(obj2, 'foo');
// { set foo(value) {console.log(value); }
以展開運算符方法為例子:
let obj = {a1: 'test', b1:{number: 10}}
let objCopy = {...obj};

obj.name = 'test2';
objCopy.b1.number = 99;

console.log(obj);  //{a1: "test", b1:{number: 99}}
console.log(objCopy); //{a1: "test2", b1:{number: 99}}
可以看到因為更動 objCopy 的值而導致 obj b1 number 的值也跟著更動
const DeepClone = (obj) => {
	if (typeof obj !== 'object') return;
  let NewObj = obj instanceof Array ? [] : {}
  for (let key in obj) {
  	if (typeof obj[key] === 'object') {
    	NewObj[key] = DeepClone(obj[key]);
    } else {
    	NewObj[key] = obj[key]
    }
  }
  return NewObj;
}
let obj1 = {
	a: {b: {c: 1}}
}
const obj2 = DeepClone(obj1); // a: {b: {c: 1}}
另外也可以使用 lodash 實作
JS-淺拷貝(Shallow Copy) VS 深拷貝(Deep Copy)
