For today and the upcoming series of articles, I will do some Laravel CRUD. Create, Read, Update, Delete data from our databases which I used Mysql. let's get into it.
Basic Setup
firstly you need to set your .env file set your DB, like: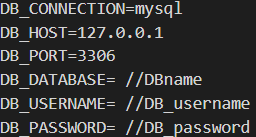
after you set your DB name, you have to go to your Phpmyadmin and create a database using the name you've set on your DB_DATABASE
creating Home page
right now we needed some home page, to create a home page we actually need a controller. to make a new controller we need to run a script
php artisan make:controller HomeController
nb: you don't have to you HomeController as a controller name
after your Controller is successfully created. your HomeController.php is located on app/Http/Controllers/HomeController.php
Now open your HomeController.php and copy this inside class:
public function index(){
    return view('home.index');
}
now, lets set the URL on routes/web.php and add this:
ROUTE::GET('/','HomeController@index');
this line of code means when we typing 'localhost:8000/' we go to HomeController and use the function called index. and soon after the codes get into the function, the codes actually execute a return value (in this case return a frontend page).
and for the frontend part. the folder directory located in resources/views.
inside view we create a folder called 'home', right now we have resources/views/home. now we created a file called 'index.blade.php'.

the codes on index.blade.php look like this:
<!DOCTYPE html>
<html lang="en">
<head>
    <meta charset="UTF-8">
    <meta name="viewport" content="width=device-width, initial-scale=1.0">
    <meta http-equiv="X-UA-Compatible" content="ie=edge">
    <link rel="stylesheet" href="https://stackpath.bootstrapcdn.com/bootstrap/4.5.2/css/bootstrap.min.css" integrity="sha384-JcKb8q3iqJ61gNV9KGb8thSsNjpSL0n8PARn9HuZOnIxN0hoP+VmmDGMN5t9UJ0Z" crossorigin="anonymous">
    <title>Document</title>
</head>
<body>
    <div class="container">
        <div class="row">
            <div class="col-4"></div>
            <div class="col-4" style="top:180px">
                <form>
                    @csrf
                    <div class="form-group">
                    <label for="exampleInputEmail1">Name</label>
                    <input type="text" class="form-control" name="user_name">
                    </div>
                    <div class="form-group">
                    <label for="exampleInputPassword1">Email</label>
                    <input type="email" class="form-control" name="user_email">
                    </div>
                    <div class="form-group">
                    <label for="exampleInputPassword1">Telephone</label>
                    <input type="tel" class="form-control" name="user_phone">
                    </div>
                    <button type="submit" class="btn btn-primary">Submit</button>
                </form>
            </div>
            <div class="col-4"></div>
        </div>
    </div>
</body>
</html>
now, let's open the Laravel service
php artisan serve
and go to localhost:8000, and it should show something like this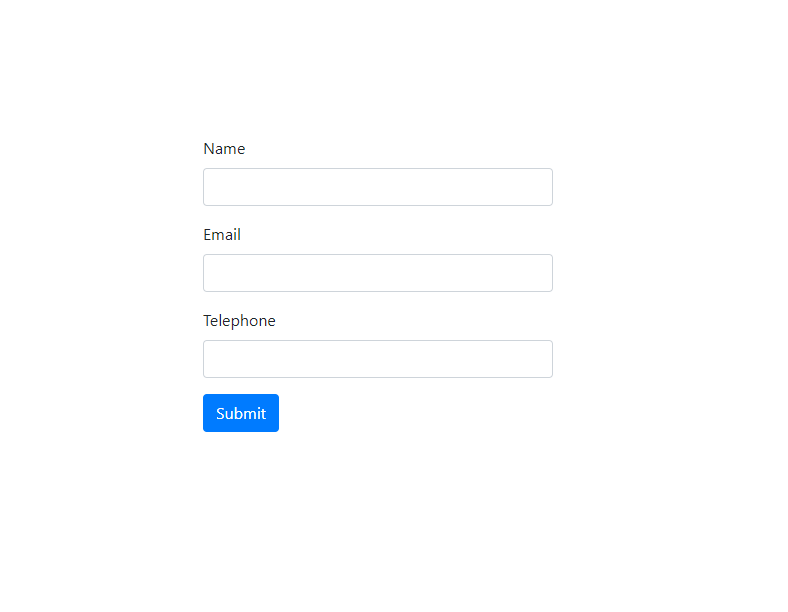
secondly, store data to the database (C)
moving on, firstly we need to create the database, but instead of creating a database using Phpmyadmin user interface. this time we use Laravel artisan to help us make a database. run the script below on your cmd:
php artisan make:model Entities/Student_data -m
after successfully run the script above, you will see Student_data.php under your app/Entities/ and the meaning of '-m' on the script above is 'telling Laravel to create migration file or database schema which we will use later on'.
now check your databases/migration/create_student_datas_table.php and copy this:
Schema::create('student_datas', function (Blueprint $table) {
    $table->bigIncrements('id');
    $table->string('name');
    $table->string('email');
    $table->integer('phone');
    $table->timestamps();
});
now it's time to migrate our data schema into our databases. to migrate the schema all you need to do is simply execute the following script:
php artisan migrate
moving on, we needed to add a few lines of codes on both app/controllers/HomeController.php, routes/web.php, resources/views/home/index.blade.php, app/Entities/Student_data.php
for web.php add
ROUTE::POST('/create','HomeController@store')->name('store');
for HomeController.php add
public function store(){
    $data = request()->all();
    Student_data::create([
        'name' => $data['user_name'],
        'email' => $data['user_email'],
        'phone' => $data['user_phone']
    ]);
return redirect('/');
}
and don't forget to import on your HomeController.php
use App\Entities\Student_data;
for index.blade.php add action and method inside the form
<form action="{{Route('store')}}" method="POST">
for student_data.php
protected $fillable = ['name','email','phone'];
Demo
now we reload the page of localhost:8000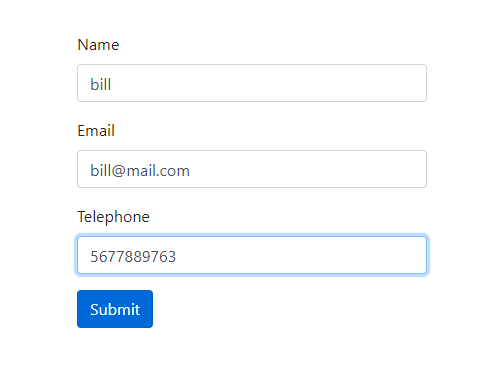
soon after we click the submit button. the data will be instantly saved into databases under student_data tables.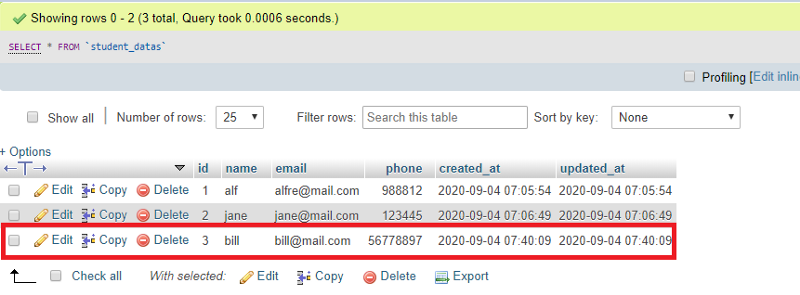
Code Explanation
this part I'm going to explain how do the codes run after we clicked the submit button.
when we clicked the submit button they actually send the value inside our form using the POST method (for those don't know what is post method, click here) and go to the route with name store which is this:
when the codes run the codes of the picture above. the codes go to HomeController and find a function called 'store' which is him: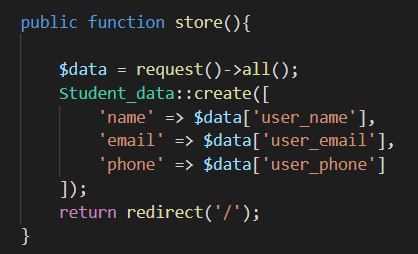
we use request()->all() to get the data of the form data and saved it on variable $data.
when storing the data into the database we use 'create' function. earlier we've set fillable on student_data, because of that when we storing the data. we need to assign the value one by one just like the image above.


 iThome鐵人賽