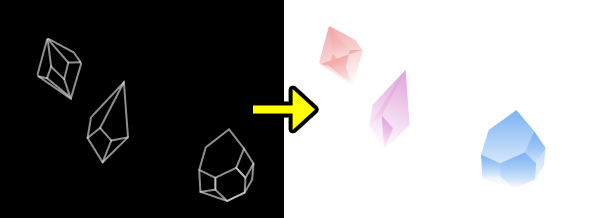
水晶顏色隨著心情不同而上色這個功能算是顏色APP的一大重點,當初在尋找圖片上色方法時花費了不少時間,所以統整了我搜尋到的兩種上色方式,希望能夠藉由這篇文章的分享讓往後有此功能需求的朋友們可以作為參考。
原始的水晶都為未上色狀態,使用了以下介紹的方法能讓水晶上色,可以是單色或是漸層。
參考出處:https://stackoverflow.com/questions/31803157/how-can-i-color-a-uiimage-in-swift/36591030
var imageView = UIImageView(image: UIImage(named: "你要放的圖片"))
//
imageView.setImageColor(color: UIColor.purple)
extension UIImageView {
    func setImageColor(color: UIColor) {
    let templateImage = self.image?.withRenderingMode(.alwaysTemplate)
    self.image = templateImage
    self.tintColor = color
  }
}
參考出處:https://stackoverflow.com/questions/8098130/how-can-i-tint-a-uiimage-with-gradient
var imageView = UIImageView(image: UIImage(named: "你要放的圖片"))
imageView.image = UIImage(named: "你要放的圖片")?.tintedWithLinearGradientColors(colorsArr: [cgcolor顏色陣列])

//漸層
extension UIImage {

func tintedWithLinearGradientColors(colorsArr: [CGColor]) -> UIImage {
    UIGraphicsBeginImageContextWithOptions(self.size, false, self.scale);
    guard let context = UIGraphicsGetCurrentContext() else {
        return UIImage()
    }
    context.translateBy(x: 0, y: self.size.height)
    context.scaleBy(x: 1, y: -1)

    context.setBlendMode(.normal)
    let rect = CGRect.init(x: 0, y: 0, width: size.width, height: size.height)

    // Create gradient
    let colors = colorsArr as CFArray
    let space = CGColorSpaceCreateDeviceRGB()
    let gradient = CGGradient(colorsSpace: space, colors: colors, locations: nil)
    // Apply gradient
    context.clip(to: rect, mask: self.cgImage!)
    context.drawLinearGradient(gradient!, start: CGPoint(x: 0, y: 0), end: CGPoint(x: 0, y: self.size.height), options: .drawsBeforeStartLocation)
    let gradientImage = UIGraphicsGetImageFromCurrentImageContext()
    UIGraphicsEndImageContext()
    return gradientImage!
}
}
因為考量到使用者可能會同時有多種情緒,故最後採用的是漸層上色,關於如何在使用者使用手機時抓取臉部資料進而判別情緒的方式會在之後的文章進行說明,至於我是如何將偵測到的顏色陣列傳送給上色的function呢?我是使用NotificationCenter.default.post的方式傳送結果進行水晶渲染上色的。
除了讓圖片上色之外我覺得若是能在上色時加上動畫能讓整個介面呈現更活潑生動,加上我們的app性質需要讓使用者養成紀錄的習慣,有了動畫互動也能更吸引使用者持續使用,沒做到這點算是這次製作app的小遺憾,還有努力的空間,往後開發app時要更加注重互動設計的部分!
