昨天稍微介紹了 LinearLayout 和 RelativeLayout,今天我想分享的Layout元件是:
讓物件可以依照表格般的排列
TableLayout是用TableRow區別每一列
常用屬性:
android:layout_span="";設定該元件所跨越的列数
android:collapseColumns="";將TableLayout里面指定的列隱藏,起始值為0
android:stretchColumns="";設置指定的列為可延伸的,填满剩下的多餘空白空間,起始值為0
android:shrinkColumns="";設置指定的列為可收缩的列,起始值為0
<?xml version="1.0" encoding="utf-8"?>
<TableLayout
    xmlns:android="http://schemas.android.com/apk/res/android"
    xmlns:app="http://schemas.android.com/apk/res-auto"
    xmlns:tools="http://schemas.android.com/tools"
    android:layout_width="match_parent"
    android:layout_height="match_parent"
    android:orientation="vertical">
    <TableLayout
        android:layout_width="wrap_content"
        android:layout_height="wrap_content"
        android:shrinkColumns="2"
        android:stretchColumns="0">
        <TableRow>

            <Button
                android:layout_height="wrap_content"
                android:layout_width="wrap_content"
                android:text="Button 1"/>
            <Button
                android:layout_width="wrap_content"
                android:layout_height="wrap_content"
                android:text="Button 2"/>
            <Button
                android:layout_height="wrap_content"
                android:layout_width="wrap_content"
                android:text="Bbutton 3"/>

        </TableRow>
        <TableRow>

            <Button
                android:layout_height="wrap_content"
                android:layout_width="wrap_content"
                android:text="Button 4"/>
            <Button
                android:layout_width="wrap_content"
                android:layout_height="wrap_content"
                android:text="Button 5"
                android:layout_span="2"/>
        </TableRow>

    </TableLayout>

    <TableLayout
        android:layout_width="wrap_content"
        android:layout_height="wrap_content"
        android:collapseColumns="0"
        android:stretchColumns="2">

        <TableRow>

            <Button
                android:layout_width="wrap_content"
                android:layout_height="wrap_content"
                android:text="Button 6"/>
            <Button
                android:layout_height="wrap_content"
                android:layout_width="wrap_content"
                android:text="Button 7"/>
            <Button
                android:layout_width="wrap_content"
                android:layout_height="wrap_content"
                android:text="Button 8"/>
        </TableRow>

    </TableLayout>
</TableLayout>
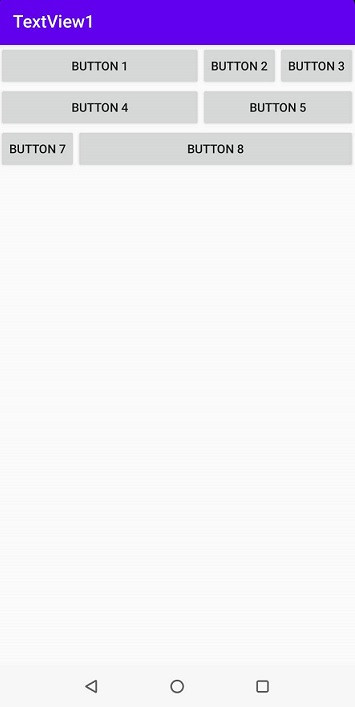
看見Button 1因為 android:stretchColumns="0"延伸
而Button 4因為和Button 1在同一個TableLayout所以也會跟著延伸
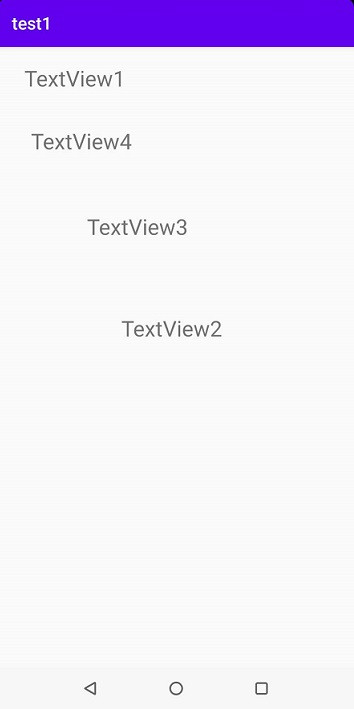
AbsoluteLayout是用X軸與Y軸排版
常見的排版方式
android:layout_x=""X軸尺寸px"
android:layout_y=""Y軸尺寸px"
(px是像素的縮寫)
<AbsoluteLayout xmlns:android="http://schemas.android.com/apk/res/android"
    xmlns:app="http://schemas.android.com/apk/res-auto"
    xmlns:tools="http://schemas.android.com/tools"
    android:layout_width="match_parent"
    android:layout_height="match_parent"
    tools:context=".MainActivity"
    android:orientation="vertical">
    <TextView
        android:id="@+id/tv1"
        android:layout_width="wrap_content"
        android:layout_height="wrap_content"
        android:text="TextView1"
        android:textSize="25sp"
        android:layout_x="80px"
        android:layout_y="50px"/>
        <TextView
            android:id="@+id/tv4"
            android:layout_width="wrap_content"
            android:layout_height="wrap_content"
            android:text="TextView4"
            android:textSize="25sp"
            android:layout_x="100px"
            android:layout_y="241px"/>
        <TextView
            android:id="@+id/tv2"
            android:layout_width="wrap_content"
            android:layout_height="wrap_content"
            android:text="TextView2"
            android:textSize="25sp"
            android:layout_x="374px"
            android:layout_y="810px"/>
        <TextView
            android:id="@+id/tv3"
            android:layout_width="wrap_content"
            android:layout_height="wrap_content"
            android:text="TextView3"
            android:textSize="25sp"
            android:layout_x="270px"
            android:layout_y="501px"/>
</AbsoluteLayout>
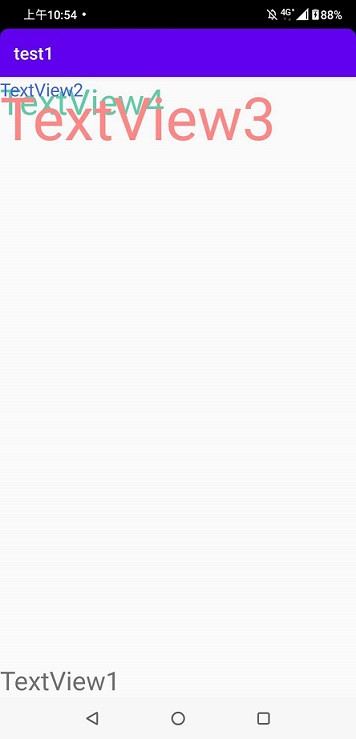
重疊顯示,依照前後的關係,最先出現元件會放在底部,最後的元件會在頂部
看範例
<FrameLayout xmlns:android="http://schemas.android.com/apk/res/android"
    xmlns:app="http://schemas.android.com/apk/res-auto"
    xmlns:tools="http://schemas.android.com/tools"
    android:layout_width="match_parent"
    android:layout_height="match_parent"
    tools:context=".MainActivity"
    android:orientation="vertical">
    <TextView
        android:id="@+id/tv1"
        android:layout_width="wrap_content"
        android:layout_height="wrap_content"
        android:text="TextView1"
        android:textSize="30sp"
        android:layout_gravity="bottom"/>
        <TextView
            android:id="@+id/tv4"
            android:layout_width="wrap_content"
            android:layout_height="wrap_content"
            android:text="TextView4"
            android:textSize="41sp"
            android:textColor="#66cdaa"/>
        <TextView
            android:id="@+id/tv2"
            android:layout_width="wrap_content"
            android:layout_height="wrap_content"
            android:text="TextView2"
            android:textSize="21sp"
            android:textColor="#4169e1" />
        <TextView
            android:id="@+id/tv3"
            android:layout_width="wrap_content"
            android:layout_height="wrap_content"
            android:text="TextView3"
            android:textSize="69sp"
            android:textColor="#ff8888"/>
</FrameLayout>
今天就先介紹的這,明天我會在介紹下一個layout


 iThome鐵人賽