在LINE的訊息格式當中,
有提供對於開發者而言相當具有彈性的訊息格式,
因為太有彈性了,所以就叫做彈性訊息(Flex Message)
首先來看一下官方對於彈性訊息的介紹,
FlexMessage提供了多元性的訊息組合,官方提供的範例如下:
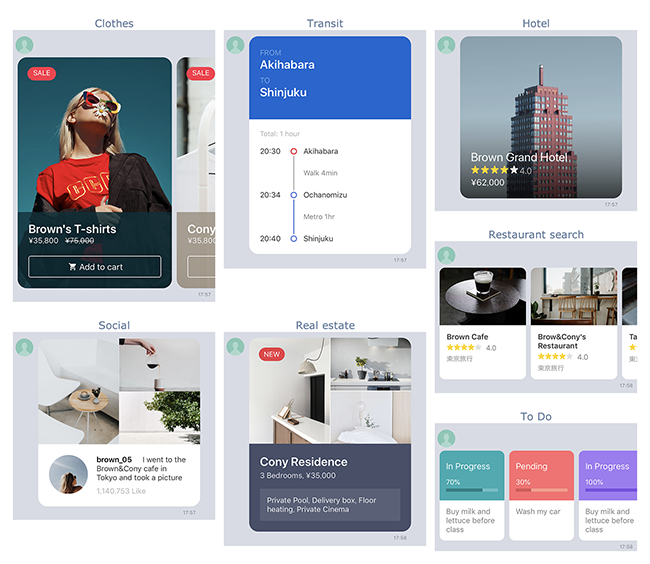
上圖是官方提供在Flex Message Simulator的範本,
Flex Message Simulator是一個可以透過介面化操作,
進行Flex Message設計的一個輔助網頁,
這讓圖文訊息在設計與呈現上便利許多,
以下是Flex Message的訊息架構,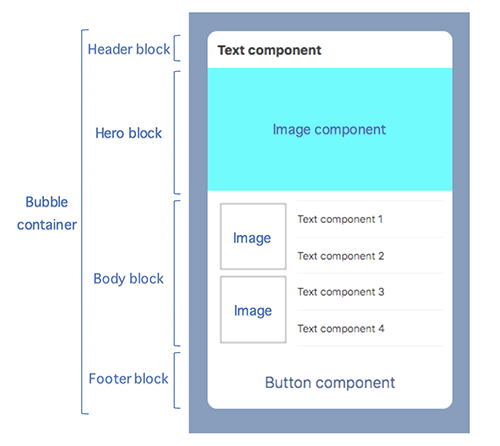
這個架構看似複雜,但其實是完全可以依照自己的需求做調整或區塊的增減,
header設定上方的標題內容,
hero設定圖片內容,
body設定主要內容,
footer設定底部內容,
也就是說,上面的架構中每個區塊並不是完全必須的,
從Flex Message Simulator當中操作就可以發現,
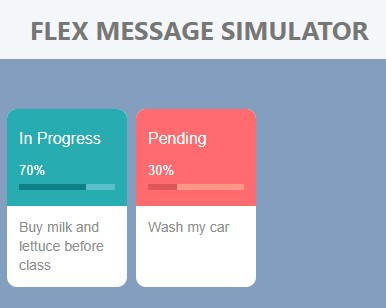
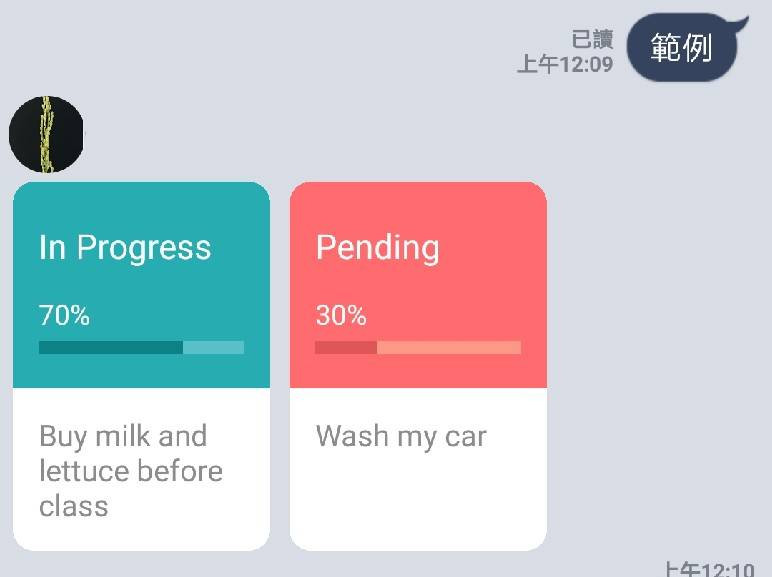
譬如說如果在Flex Message Simulator中設計下面這樣的Flex Message,
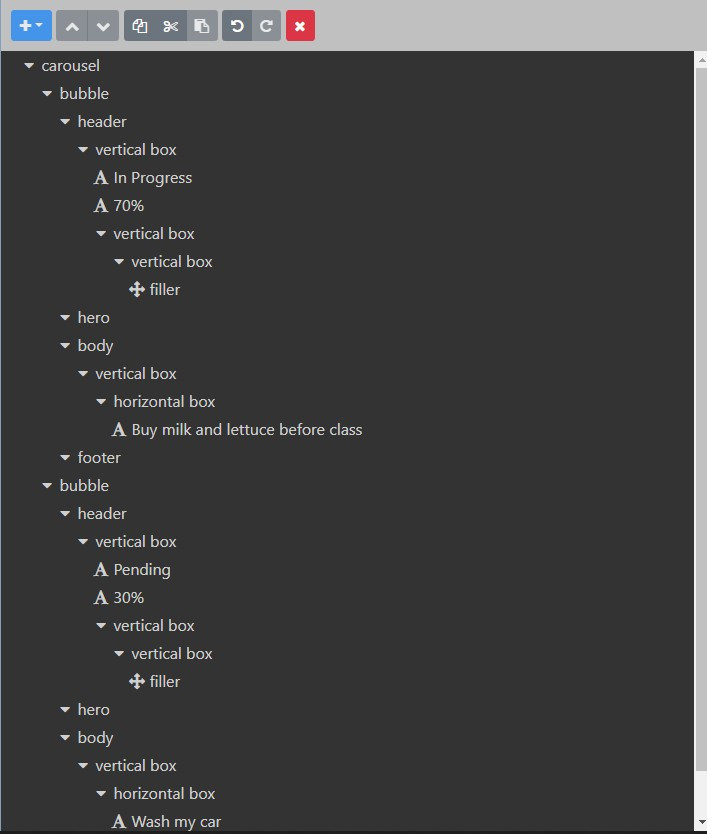
編輯畫面中可看到這個訊息的樹狀圖組成,
可看出,第一層是一個carousel,下面有若干個Bubble,
每個Bubble就是一個訊息模塊,
每個模塊訊息都可以客製化設計,
不像TemplateSendMessage必須每一個模塊架構都一樣,
真的是相當有彈性,
如果在Flex Message Simulator完成設計後,
則可以點擊右上角</>view as JSON,
看看剛剛設計的Flex Message如何以JSON格式組成,
上面範例的JSON如下:
{
  "type": "carousel",
  "contents": [
    {
      "type": "bubble",
      "size": "nano",
      "header": {
        "type": "box",
        "layout": "vertical",
        "contents": [
          {
            "type": "text",
            "text": "In Progress",
            "color": "#ffffff",
            "align": "start",
            "size": "md",
            "gravity": "center"
          },
          {
            "type": "text",
            "text": "70%",
            "color": "#ffffff",
            "align": "start",
            "size": "xs",
            "gravity": "center",
            "margin": "lg"
          },
          {
            "type": "box",
            "layout": "vertical",
            "contents": [
              {
                "type": "box",
                "layout": "vertical",
                "contents": [
                  {
                    "type": "filler"
                  }
                ],
                "width": "70%",
                "backgroundColor": "#0D8186",
                "height": "6px"
              }
            ],
            "backgroundColor": "#9FD8E36E",
            "height": "6px",
            "margin": "sm"
          }
        ],
        "backgroundColor": "#27ACB2",
        "paddingTop": "19px",
        "paddingAll": "12px",
        "paddingBottom": "16px"
      },
      "body": {
        "type": "box",
        "layout": "vertical",
        "contents": [
          {
            "type": "box",
            "layout": "horizontal",
            "contents": [
              {
                "type": "text",
                "text": "Buy milk and lettuce before class",
                "color": "#8C8C8C",
                "size": "sm",
                "wrap": true
              }
            ],
            "flex": 1
          }
        ],
        "spacing": "md",
        "paddingAll": "12px"
      },
      "styles": {
        "footer": {
          "separator": false
        }
      }
    },
    {
      "type": "bubble",
      "size": "nano",
      "header": {
        "type": "box",
        "layout": "vertical",
        "contents": [
          {
            "type": "text",
            "text": "Pending",
            "color": "#ffffff",
            "align": "start",
            "size": "md",
            "gravity": "center"
          },
          {
            "type": "text",
            "text": "30%",
            "color": "#ffffff",
            "align": "start",
            "size": "xs",
            "gravity": "center",
            "margin": "lg"
          },
          {
            "type": "box",
            "layout": "vertical",
            "contents": [
              {
                "type": "box",
                "layout": "vertical",
                "contents": [
                  {
                    "type": "filler"
                  }
                ],
                "width": "30%",
                "backgroundColor": "#DE5658",
                "height": "6px"
              }
            ],
            "backgroundColor": "#FAD2A76E",
            "height": "6px",
            "margin": "sm"
          }
        ],
        "backgroundColor": "#FF6B6E",
        "paddingTop": "19px",
        "paddingAll": "12px",
        "paddingBottom": "16px"
      },
      "body": {
        "type": "box",
        "layout": "vertical",
        "contents": [
          {
            "type": "box",
            "layout": "horizontal",
            "contents": [
              {
                "type": "text",
                "text": "Wash my car",
                "color": "#8C8C8C",
                "size": "sm",
                "wrap": true
              }
            ],
            "flex": 1
          }
        ],
        "spacing": "md",
        "paddingAll": "12px"
      },
      "styles": {
        "footer": {
          "separator": false
        }
      }
    }
  ]
}
要在python的程式碼當中直接應用這一段JSON,
方法是設一個新的變數,並將這整段貼上去,
依照預FlexSendMessage(alt_text='未點開時呈現的標題',contents='新增的變數')
這樣就可以了,
但是在python編碼中,
要注意需要將原來JSON裡面的true、false都改成True、False,
範例如下:
#Flex_Msg.py
def flex_example():
    #將JSON設定為變數content,並以FlexSendMessage()包成Flex Message
    content = {   "type": "carousel",
                  "contents": [
                    {
                      "type": "bubble",
                      "size": "nano",
                      "header": {
                        "type": "box",
                        "layout": "vertical",
                        "contents": [
                          {
                            "type": "text",
                            "text": "In Progress",
                            "color": "#ffffff",
                            "align": "start",
                            "size": "md",
                            "gravity": "center"
                          },
                          {
                            "type": "text",
                            "text": "70%",
                            "color": "#ffffff",
                            "align": "start",
                            "size": "xs",
                            "gravity": "center",
                            "margin": "lg"
                          },
                          {
                            "type": "box",
                            "layout": "vertical",
                            "contents": [
                              {
                                "type": "box",
                                "layout": "vertical",
                                "contents": [
                                  {
                                    "type": "filler"
                                  }
                                ],
                                "width": "70%",
                                "backgroundColor": "#0D8186",
                                "height": "6px"
                              }
                            ],
                            "backgroundColor": "#9FD8E36E",
                            "height": "6px",
                            "margin": "sm"
                          }
                        ],
                        "backgroundColor": "#27ACB2",
                        "paddingTop": "19px",
                        "paddingAll": "12px",
                        "paddingBottom": "16px"
                      },
                      "body": {
                        "type": "box",
                        "layout": "vertical",
                        "contents": [
                          {
                            "type": "box",
                            "layout": "horizontal",
                            "contents": [
                              {
                                "type": "text",
                                "text": "Buy milk and lettuce before class",
                                "color": "#8C8C8C",
                                "size": "sm",
                                "wrap": True
                              }
                            ],
                            "flex": 1
                          }
                        ],
                        "spacing": "md",
                        "paddingAll": "12px"
                      },
                      "styles": {
                        "footer": {
                          "separator": False
                        }
                      }
                    },
                    {
                      "type": "bubble",
                      "size": "nano",
                      "header": {
                        "type": "box",
                        "layout": "vertical",
                        "contents": [
                          {
                            "type": "text",
                            "text": "Pending",
                            "color": "#ffffff",
                            "align": "start",
                            "size": "md",
                            "gravity": "center"
                          },
                          {
                            "type": "text",
                            "text": "30%",
                            "color": "#ffffff",
                            "align": "start",
                            "size": "xs",
                            "gravity": "center",
                            "margin": "lg"
                          },
                          {
                            "type": "box",
                            "layout": "vertical",
                            "contents": [
                              {
                                "type": "box",
                                "layout": "vertical",
                                "contents": [
                                  {
                                    "type": "filler"
                                  }
                                ],
                                "width": "30%",
                                "backgroundColor": "#DE5658",
                                "height": "6px"
                              }
                            ],
                            "backgroundColor": "#FAD2A76E",
                            "height": "6px",
                            "margin": "sm"
                          }
                        ],
                        "backgroundColor": "#FF6B6E",
                        "paddingTop": "19px",
                        "paddingAll": "12px",
                        "paddingBottom": "16px"
                      },
                      "body": {
                        "type": "box",
                        "layout": "vertical",
                        "contents": [
                          {
                            "type": "box",
                            "layout": "horizontal",
                            "contents": [
                              {
                                "type": "text",
                                "text": "Wash my car",
                                "color": "#8C8C8C",
                                "size": "sm",
                                "wrap": True
                              }
                            ],
                            "flex": 1
                          }
                        ],
                        "spacing": "md",
                        "paddingAll": "12px"
                      },
                      "styles": {
                        "footer": {
                          "separator": False
                        }
                      }
                    }
                  ]
                }
    message=FlexSendMessage(alt_text='FlexMessage範例',contents=content)
    return message
這樣一來就可以將Flex Message傳送出去了,
建議把Flex Message全部都放在一個專門的檔案裡面,
才不會影響到主程式的修編,
今天大概就簡單介紹Flex Message,
接下來會針對Flex Message的進階用法做介紹喔。
