上一篇談到了,
如何運用Flex Message Simulator來設計FlexMessage,
這篇先祭出一個來自社群大大提供的泰國Flex範例,
裡面有許多很不錯的範本,(感謝Evan Lin大大分享)
在製作Flex Message的時候,
我自己遇到一些情況,
是需要隨著資料的筆數決定Flex Message的數量,
或者調整欄位的刪減,
由Flex Message Designer複製過去的JSON,
在python當中能夠以dictionary形式進行編輯,
從上一篇的範例當中可以看到,Flex Message的JSON當中,
若是carousel type,是以一個一個bubble組成的,
每個bubble都被放在contents這個key的value中,
並以list形式組成,
因此我們可以做一個組合bubble的函數,
再把每個bubble放進list當中,傳到carousel的contents,
這樣就能夠依照資料的筆數來調整bubble的數量囉,
一開始可以先建立一個基礎的carousel,只有一個bubble,
實際做法如下(以上一篇的carousel為例):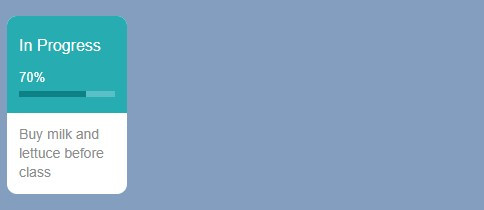
其JSON內容如下:
{
  "type": "carousel",
  "contents": [
    {
      "type": "bubble",
      "size": "nano",
      "header": {
        "type": "box",
        "layout": "vertical",
        "contents": [
          {
            "type": "text",
            "text": "In Progress",
            "color": "#ffffff",
            "align": "start",
            "size": "md",
            "gravity": "center"
          },
          {
            "type": "text",
            "text": "70%",
            "color": "#ffffff",
            "align": "start",
            "size": "xs",
            "gravity": "center",
            "margin": "lg"
          },
          {
            "type": "box",
            "layout": "vertical",
            "contents": [
              {
                "type": "box",
                "layout": "vertical",
                "contents": [
                  {
                    "type": "filler"
                  }
                ],
                "width": "70%",
                "backgroundColor": "#0D8186",
                "height": "6px"
              }
            ],
            "backgroundColor": "#9FD8E36E",
            "height": "6px",
            "margin": "sm"
          }
        ],
        "backgroundColor": "#27ACB2",
        "paddingTop": "19px",
        "paddingAll": "12px",
        "paddingBottom": "16px"
      },
      "body": {
        "type": "box",
        "layout": "vertical",
        "contents": [
          {
            "type": "box",
            "layout": "horizontal",
            "contents": [
              {
                "type": "text",
                "text": "Buy milk and lettuce before class",
                "color": "#8C8C8C",
                "size": "sm",
                "wrap": True
              }
            ],
            "flex": 1
          }
        ],
        "spacing": "md",
        "paddingAll": "12px"
      },
      "styles": {
        "footer": {
          "separator": False
        }
      }
    }
  ]
}
先不看各種格式設定的參數,
可以看到carousel組成其實就是
{
 "type":"carousel",
 "contents":['由bubble組成的list']
}
由於上面的範例是有進度條的Flex Message carousel,
因此在這邊假設我們是用這個來呈現工作進度的資料,
我們首先建立一個Jobs的資料表,用來存放工作名稱、工作進度及工作內容描述,
#models.py

class Jobs(models.Model):
    uid = models.CharField(max_length=50,null=False,default='')                 #user_id
    name = models.CharField(max_length=255,blank=True,null=False)               #LINE名字
    job_name = models.CharField(max_length=255,blank=True,null=False)           #工作名稱
    percentage = models.IntegerField(blank=True)                                #完成進度
    description = models.CharField(max_length=100,blank=True,null=False)        #工作內容描述
    mdt = models.DateTimeField(auto_now=True)                                   #物件儲存的日期時間

    def __str__(self):
        return self.uid
將資料表訊息新增到admin.py
#admin.py

class Jobs_Admin(admin.ModelAdmin):
    list_display = ('id','uid','name','job_name','percentage','description','mdt')
admin.site.register(Jobs,Jobs_Admin)
更新資料表
$ python manage.py makemigrations
$ python manage.py migrate
接下來,可以建立一個檔案,讓bubble的建立被獨立出來,
專門製作相同格式的bubble,首先先建立一個叫做content的dict(),
再建立一個空的list,函數如下:
#Flex_msg.py
from linebot import LineBotApi, WebhookParser
from linebot.exceptions import InvalidSignatureError, LineBotApiError
from linebot.models import *

from IT_help.models import *


def jobs_progress(uid):
    contents=dict()
    contents['type']='carousel'
    bubbles=[]
    datas = Jobs.objects.filter(uid=uid)
    for data in datas:
        label = data.job_name
        percentage = data.percentage
        text = data.description
        bubble= {   "type": "bubble",
                    "size": "nano",
                    "header": {
                        "type": "box",
                        "layout": "vertical",
                        "contents": [
                        {
                            "type": "text",
                            "text": label,
                            "color": "#ffffff",
                            "align": "start",
                            "size": "md",
                            "gravity": "center"
                        },
                        {
                            "type": "text",
                            "text": str(percentage)+"%",
                            "color": "#ffffff",
                            "align": "start",
                            "size": "xs",
                            "gravity": "center",
                            "margin": "lg"
                        },
                        {
                            "type": "box",
                            "layout": "vertical",
                            "contents": [
                            {
                                "type": "box",
                                "layout": "vertical",
                                "contents": [
                                {
                                    "type": "filler"
                                }
                                ],
                                "width": str(percentage)+"%",
                                "backgroundColor": "#0D8186",
                                "height": "6px"
                            }
                            ],
                            "backgroundColor": "#9FD8E36E",
                            "height": "6px",
                            "margin": "sm"
                        }
                        ],
                        "backgroundColor": "#27ACB2",
                        "paddingTop": "19px",
                        "paddingAll": "12px",
                        "paddingBottom": "16px"
                    },
                    "body": {
                        "type": "box",
                        "layout": "vertical",
                        "contents": [
                        {
                            "type": "box",
                            "layout": "horizontal",
                            "contents": [
                            {
                                "type": "text",
                                "text": text,
                                "color": "#8C8C8C",
                                "size": "sm",
                                "wrap": True
                            }
                            ],
                            "flex": 1
                        }
                        ],
                        "spacing": "md",
                        "paddingAll": "12px"
                    },
                    "styles": {
                        "footer": {
                        "separator": False
                        }
                    }
                }
        bubbles.append(bubble)
    contents['contents']=bubbles
    message=FlexSendMessage(alt_text='工作進度',contents=contents)
    return message
上面這個函數是將標題(label)、進度(percentage)及文字(text)分開,
並由引數datas中的data拆解出來,每個data就是特定用戶的Jobs資料表內容,
所以叫出資料的方法就是用data.job_name,data.percentage,data.description呼叫,
再將bubbles list丟到content當中,一個組成Flex Message,
這樣就可以使用jobs_progress(uid)來呼叫工作進度資料囉,
但首先還需要設定建立資料的部分,最簡單的方式,
就是設定以逗點形式將要放進資料表的內容隔開,然後傳到line bot,
再將字串內容以逗點分隔切成list,並依序放進Jobs當中,
#views.py
message=[]
uid=event.source.user_id
profile=line_bot_api.get_profile(uid)
name=profile.display_name


if event.message.type=='text':
    mtext=event.message.text
    if 'jobs' in mtext:
        job = mtext.split(',')
        Jobs.objects.create(uid=uid,
                            name=name,
                            job_name=job[1],
                            percentage=job[2],
                            description=job[3])
        message.append(TextSendMessage(text='收到的工作內容為:'+str(job)))
        message.append(TextSendMessage(text='建立工作內容完成'))
        line_bot_api.reply_message(event.reply_token,message)
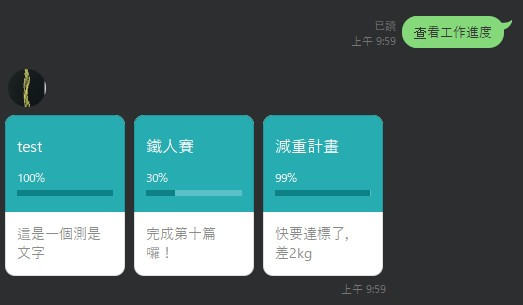
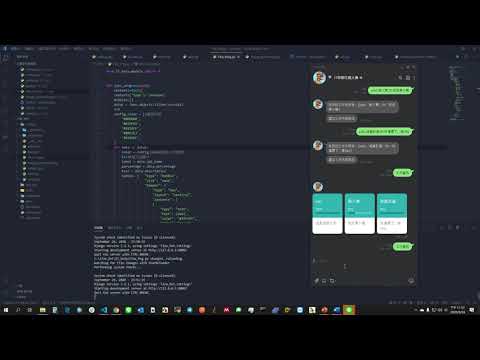
順利完成的話就開始建立工作資料內容囉~
這邊設定是以jobs當作寫入工作資料的關鍵字,
範例如下:

也要記得要查看後台資料庫,資料是否有順利進去,

為了要查詢工作進度,需要再views.py當中添加查詢的設定,
這時候就要運用剛剛建立的函數了,
#views.py
from Flex_msg import *

elif "工作查詢" in mtext:
    message.append(jobs_progress(uid))
    line_bot_api.reply_message(event.reply_token,message)
實際運作看看吧!
當然如果想要更換規格參數,譬如顏色的話,
也可以建立一個config list來依序更動囉,
先去google搜尋色碼表,
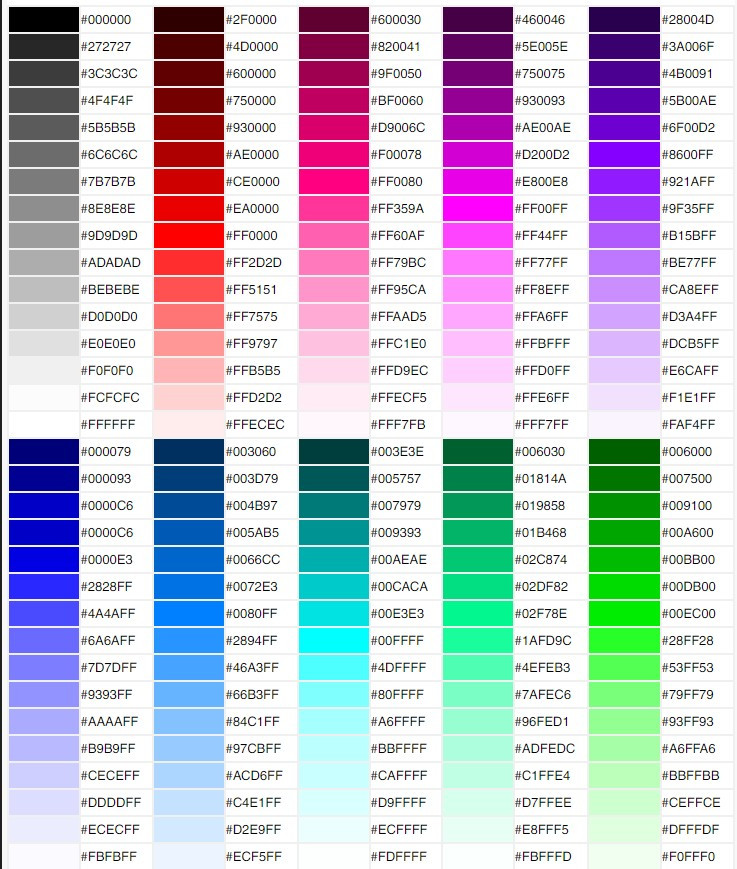
再添加config_color的list,並設變數i加入到迴圈中
def jobs_progress(uid):
    contents=dict()
    contents['type']='carousel'
    bubbles=[]
    datas = Jobs.objects.filter(uid=uid)
    i=0
    config_color = [#顏色列表
        '#00DB00',
        '#02DF82',
        '#921AFF',
        '#00E3E3',
        '#921AFF',
    ]
    for data in datas:
        color = config_color[i]#以i取顏色
        i+=1#每次迴圈+1
        label = data.job_name
        percentage = data.percentage
        text = data.description
        bubble= {   "type": "bubble",
                    ...
                    {
                        "backgroundColor": color,#將顏色更改為自定義顏色,要找一下位置
完成結果
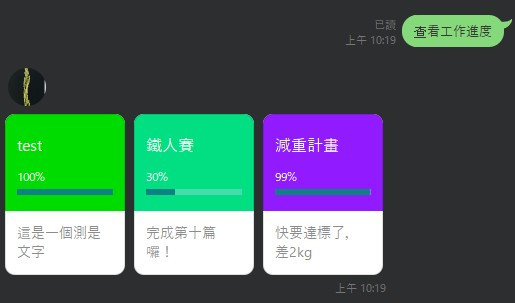
接下來就只剩要如何拯救自己的美感了
註1:Flex Message好處是,在carousel中可根據每一個bubble獨立做一個樣式出來,所以也是同樣的方式,只要最後能夠組合成一個Flex Message就行囉