今天廢話不多說,這篇繼續為小夥伴們介紹一些Vue的常用指令。
這兩個標籤都是在tag內插入內容,我們分別介紹各自的區別
v-text,就是把綁定的變數內容直接顯示在tag內。
<template>
  <div v-text="titleMsg"></div>
  <p>I Love Vue 第{{Nday}}天</p>
  <div  @click="Nday_function2">
    <button class ='circle-rainbow-btn1' @click.stop="Nday_function" >飛向未來</button>
  </div>
  <div>
    <input id="hight"  @change="checHight" />
    <span>{{checkMsg}}</span>
  </div>

  <img alt="Vue logo" src="./assets/logo.png">
  <HelloWorld msg="Welcome to Your Vue.js App"/>
</template>
script:
<script>
import HelloWorld from './components/HelloWorld.vue'

export default {
  name: 'App',
  components: {
    HelloWorld
  },
  data:function () {
    return {
      Nday: 0,
      checkMsg : '',
      count:0,
      titleMsg:"<div>我是titleMsg的內容</div>",
    }
  },
  methods: {
    Nday_function: function (event) {
      alert(event.target.tagName+': 我是Button')
      this.Nday += 1
    },
    Nday_function2: function (event) {
      alert(event.target.tagName + '我是DIV')
      this.Nday += 1
    },
    checHight:function(){
      this.count ++ ;
      this.checkMsg = "已經被修改:" + this.count
    }
  }
}
</script>

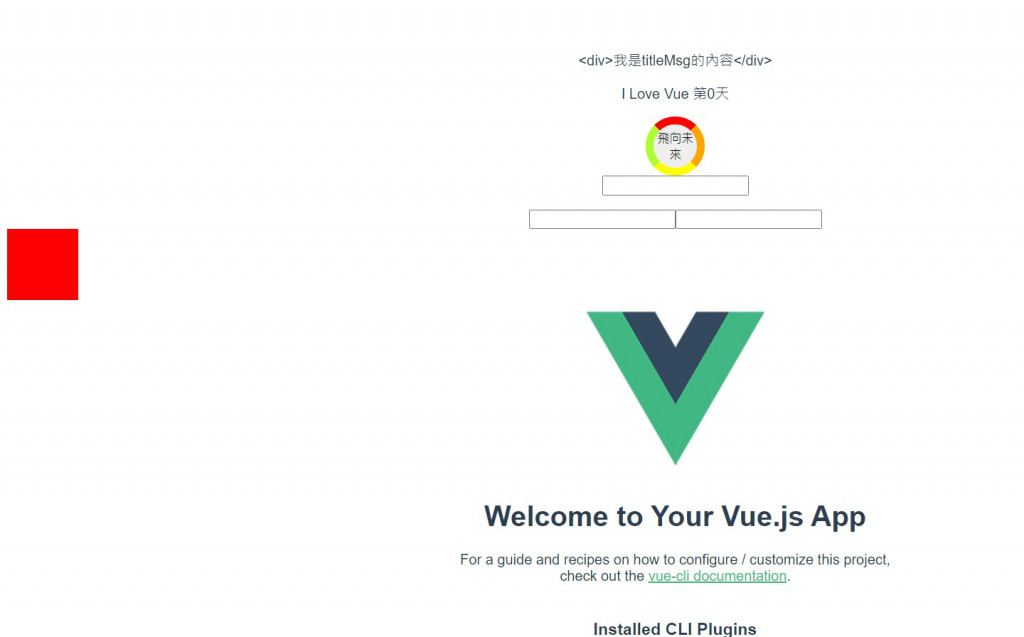
titleMsg的內容(<div>沒有轉成html的語法)。好奇的小夥伴可能會問那如果Tag裡面原本有內容會怎麼樣?
<template>
  <div v-text="titleMsg">我是原本的內容</div>
  <p>I Love Vue 第{{Nday}}天</p>
  <div  @click="Nday_function2">
    <button class ='circle-rainbow-btn1' @click.stop="Nday_function" >飛向未來</button>
  </div>
  <div>
    <input id="hight"  @change="checHight" />
    <span>{{checkMsg}}</span>
  </div>

  <img alt="Vue logo" src="./assets/logo.png">
  <HelloWorld msg="Welcome to Your Vue.js App"/>
</template>
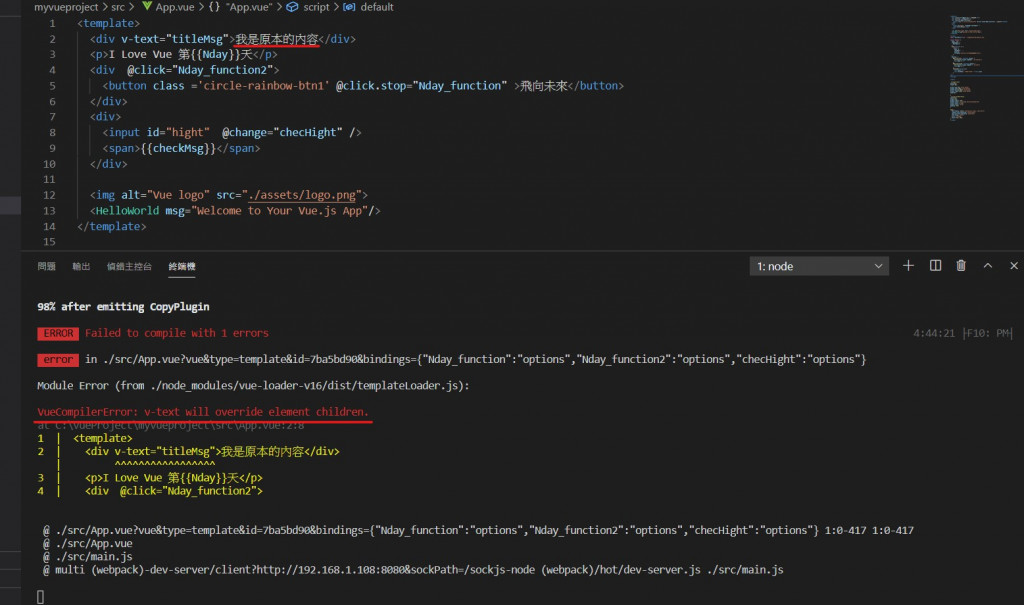
又跳出錯誤.....
雖然這在html上是個正確的語法,不過在VueCompiler則會很明確地告訴你,
內部的內容會被v-text替換掉。(意思就是叫你不要多此一舉,脫褲子放屁。)
介紹完了v-text 有沒有小夥伴想起甚麼很類似的東西啊?
給點小提示: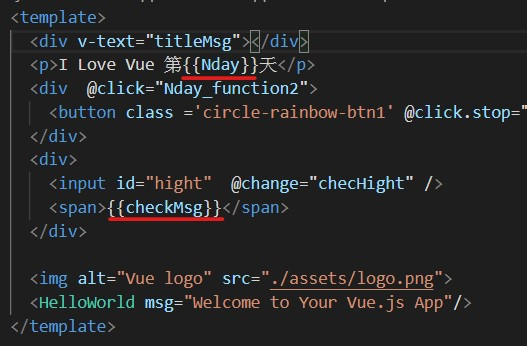
沒錯,我們先前所使用的{{變數}} 大括號,他與v-text一樣也是能完整呈現變數的內容,
({{變數}} 這還有一些其他用法,待小夥伴們去開發囉。)
<div >{{titleMsg}}</div>
也能看到一樣的結果。
說到v-model就不得不提Vue的特色-資料雙向綁定(Two-way Binding),
雙向綁定簡單來說就是畫面與資料(變數) 同步修改。
(這邊直接省略雙向綁定的原理介紹)
  <div>
    <input  v-model="TwoWayBinding" />
    <input  v-model="TwoWayBinding" />
  </div>
script的data加入新的變數TwoWayBinding :
data:function () {
    return {
      Nday: 0,
      checkMsg : '',
      count:0,
      titleMsg:"<div>我是titleMsg的內容</div>",
      TwoWayBinding:"",
    }
  }

v-model幫我們將Tag的數值與TwoWayBinding綁定,TwoWayBinding的內容。還記得上一篇 介紹到的@change嗎?
我們可以用 watch 加上 v-model的方式 達到類似的效果。
<template>
  <div >{{titleMsg}}</div>
  <p>I Love Vue 第{{Nday}}天</p>
  <div  @click="Nday_function2">
    <button class ='circle-rainbow-btn1' @click.stop="Nday_function" >飛向未來</button>
  </div>
  <div>

  <div id="watch-example">
  <input v-model="watchMsg" />
  <p>{{ watchMsgAnser }}</p>
</div>
    <input  v-model="TwoWayBinding" />
    <input  v-model="TwoWayBinding" />
  </div>


  <img alt="Vue logo" src="./assets/logo.png">
  <HelloWorld msg="Welcome to Your Vue.js App"/>
</template>
將昨天的 @change改成 v-model的寫法
script:
<script>
import HelloWorld from './components/HelloWorld.vue'

export default {
  name: 'App',
  components: {
    HelloWorld
  },
  data:function () {
    return {
      Nday: 0,
      checkMsg : '',
      count:0,
      titleMsg:"<div>我是titleMsg的內容</div>",
      TwoWayBinding:"",
      watchMsg:"",
      watchMsgAnser:"",
    }
  },
  watch: {
      watchMsg:function(newValue, OldValue) {
        this.count ++ ;
          this.watchMsgAnser = `new:${newValue} old:${OldValue} 已經被修改:${this.count}`
      }
    },
  methods: {
    Nday_function: function (event) {
      alert(event.target.tagName+': 我是Button')
      this.Nday += 1
    },
    Nday_function2: function (event) {
      alert(event.target.tagName + '我是DIV')
      this.Nday += 1
    },
    checHight:function(){
      this.count ++ ;
      this.checkMsg = "已經被修改:" + this.count
    }
  },

}
</script>
加上watch 和宣告需要用到的變數watchMsg & watchMsgAnser

v-model是用來綁定一般數據資料,而我們的v-bind則是針對屬性來做資料綁定。
有時我們會不想將固定的屬性寫死在template上面,
這時候我們就能夠依靠v-bind這屬性來動態修改我們的屬性。
我們來做一個小範例:
<template>
  <div >{{titleMsg}}</div>
  <p>I Love Vue 第{{Nday}}天</p>
  <div  @click="Nday_function2">
    <button class ='circle-rainbow-btn1' @click.stop="Nday_function" >飛向未來</button>
  </div>
  <div>

  <div id="watch-example">
  <input v-model="watchMsg" />
  <p>{{ watchMsgAnser }}</p>
 </div>
    <input  v-model="TwoWayBinding" />
    <input  v-model="TwoWayBinding" />
  </div>
  <div id="bind-example" v-bind:class="myClass"></div>

   <img alt="Vue logo" src="./assets/logo.png">

  <HelloWorld msg="Welcome to Your Vue.js App"/>
</template>
加入一個新的div 並讓他跟myClass做綁定
(與 v-on家族一樣可以縮寫,這邊的 v-bind:class 可以縮寫成:class)
myClass 並賦予它一個值 red
<script>
import HelloWorld from './components/HelloWorld.vue'

export default {
  name: 'App',
  components: {
    HelloWorld
  },
  data:function () {
    return {
      Nday: 0,
      checkMsg : '',
      count:0,
      titleMsg:"<div>我是titleMsg的內容</div>",
      TwoWayBinding:"",
      watchMsg:"",
      watchMsgAnser:"",
      myClass:"red",
    }
  },
  watch: {
      watchMsg:function(newValue, OldValue) {
        this.count ++ ;
          this.watchMsgAnser = `new:${newValue} old:${OldValue} 已經被修改:${this.count}`
      }
    },
  methods: {
    Nday_function: function (event) {
      alert(event.target.tagName+': 我是Button')
      this.Nday += 1
    },
    Nday_function2: function (event) {
      alert(event.target.tagName + '我是DIV')
      this.Nday += 1
    },
    checHight:function(){
      this.count ++ ;
      this.checkMsg = "已經被修改:" + this.count
    }
  },

}
</script>
.red的規則<style>
.red{
width:5em;
height: 5em;
background-color: red;
}
.triangle-btn{
width:0px;
height:0px;
border-top:10px solid white;
border-left:100px solid white;
border-bottom:100px solid pink;
border-right:100px solid white;
padding:0
}
.circle-rainbow-btn1{
width:5em;
height:5em;
border-radius: 50%;
border-color: red orange yellow greenyellow;
border-width: 0.7em;
border-style: solid;
padding: 0em;
}
#app {
font-family: Avenir, Helvetica, Arial, sans-serif;
-webkit-font-smoothing: antialiased;
-moz-osx-font-smoothing: grayscale;
text-align: center;
color: #2c3e50;
margin-top: 60px;
}
</style>
今天一樣幫小夥伴們出一個小作業,
做一個文字方塊(input)放在div裡面,每當文字修改的時候就改變div的顏色。
下一篇 我們會介紹條件式的指令 和 迴圈指令
