大家好,今天我要分享使用shape的方法,shape的中文意思為外型,在Android中可以使用此方法做外型的設定,將設定好的外型套用在UI設計的元件上,能夠讓整個介面變的好看。
這次我會把之前做的登入的畫面,把設定好的外型套用上去。
Android Studio 菜鳥筆記本-Day 11-元件介紹-Editview
原圖:
首先請在drawable資料夾右鍵新增shapetextview.xml
<?xml version="1.0" encoding="utf-8"?>
<selector xmlns:android="http://schemas.android.com/apk/res/android">
    <item>
        <shape android:shape="rectangle">//使用的外型為矩形
            <stroke android:width="3dp" android:color="@color/black"/>//邊線寬度為3dp,邊線顏色黑色
            <solid android:color="@color/lightblue" />//邊線內部的顏色為淺藍色
            //設定左上和左下的圓角
            <corners android:topLeftRadius="20dp" android:bottomLeftRadius="20dp" />
        </shape>
    </item>
</selector>
用android:background="@drawable/shapetextview"將兩個Textview套用此外型
<TextView
                android:id="@+id/te1"
                android:layout_width="100dp"
                android:layout_height="match_parent"
                android:gravity="center"
                android:background="@drawable/shapetextview"
                android:text="帳號"
                android:textColor="@color/white"
                android:textSize="20sp" />
<TextView
                android:id="@+id/te2"
                android:layout_width="100dp"
                android:layout_height="match_parent"
                android:gravity="center"
                android:background="@drawable/shapetextview"
                android:text="密碼"
                android:textColor="@color/white"
                android:textSize="20sp" />
順便做shapeEditview的外型
<?xml version="1.0" encoding="utf-8"?>
<shape xmlns:android="http://schemas.android.com/apk/res/android"
    android:shape="rectangle">
    <stroke android:width="2dp" android:color="@color/gray" />
    <size android:width="200dp" android:height="40dp"/>
    <padding android:left="5dp"/>//文字與左邊邊框的間距5dp
</shape>
將兩個Editview套用shapeEditview外型
  <EditText
                android:id="@+id/useraccount"
                android:layout_width="200dp"
                android:layout_height="match_parent"
                android:background="@drawable/shapeeditview"
                android:textSize="20sp" />
 <EditText
                android:id="@+id/userpassword"
                android:layout_width="200dp"
                android:layout_height="match_parent"
                android:hint="不能超過15個字"
                android:background="@drawable/shapeeditview"
                android:textSize="20sp"
                android:inputType="textPassword"
                android:maxLength="15"
                android:ems="15"/>
結果圖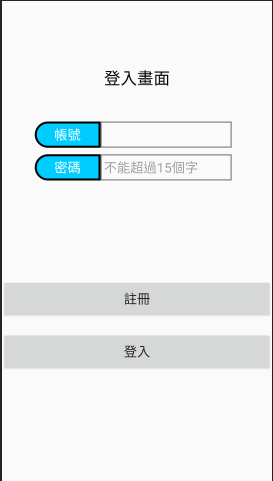
應該變得比原來的好看多了(還是這是我的錯覺)
咳咳...相信大家都清楚shape的用法了,希望這對你們設計外型有幫助。
謝謝大家。


 iThome鐵人賽