究竟什麼是資料結構?
資料結構講求的是以資料儲存的方式來提昇程式執行的效率
比方說陣列就是一個很基本常見的資料結構,用來提昇你遍歷所有相同型別資料的儲存方式
另外還有
因為篇幅的關係,我們不會介紹所有的資料結構,只介紹最常用的幾種
link list最小的單位稱為node 節點
內部儲存兩個資料,一個是值,另外一個則是下一個節點的記憶體位置
因此如果你想要運用link list,就必須要了解指標的概念
整體而言資料會長得如下圖的樣子

link list雖然跟陣列一樣是儲存相同型別並且一連串的資料,但本質上還是有差別
陣列適合用來儲存讀的機率>寫的機率的一連串資料
這是由於陣列具有index可以讓你快速的查到某一個位置的資料
而link list是由一連串的只向下一個位置的節點所組成,因此要查詢到某個次序的節點相對困難
相反的,link list在需要增加與減少次數較為頻繁的情況下效能會比較好
這時由於陣列存放好後,若是你需要將陣列最前頭或最後頭增加資料時就會需要整批移動已經存放好的陣列
假設你需要原本既有的陣列前面加上一個新的資料

這時候就會需要逐一的移動所有陣列上元素的位置
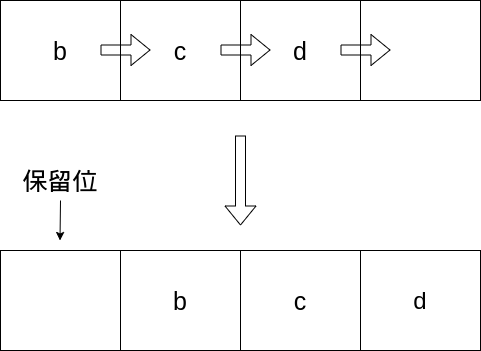
直到保留為被空出後,才能塞入新的資料
但是如果使用node就沒有這個問題
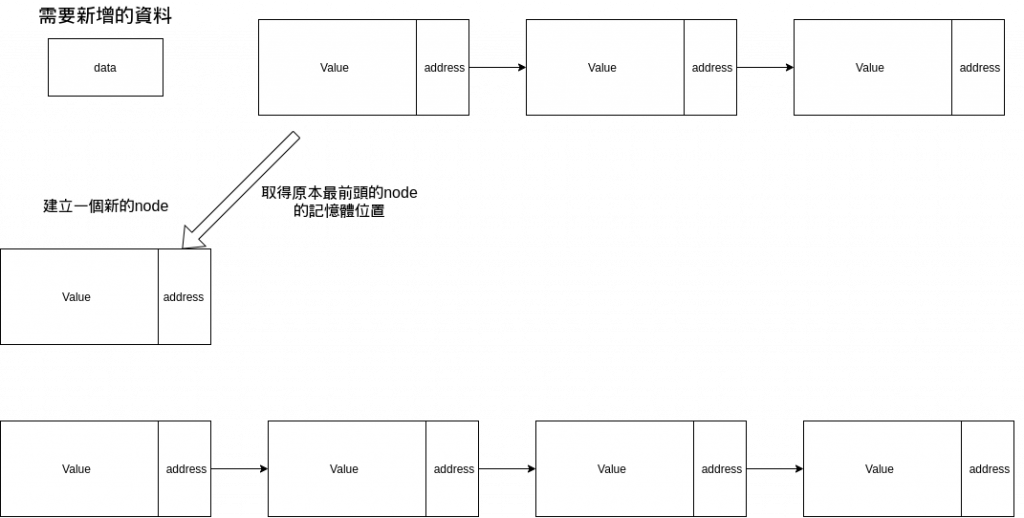
如此一來便可以在完全不移動元素的狀態下新增了新的元素
我們往下看到queue會更有感覺
FIFO
Queue最大的特性就是first in first out
先進來queue的會最先離開
結構上大致上長這樣

最常用於需要特定排序的工作,比方說CPU或印表機的排程
如果要舉一個日常的例子:
比方說你今天想要決定所有人的順序,抽籤抽出第一人後就放進queue,
之後依序將所有人抽出,最後產生的queue就會是抽籤後決定的順序
就是運用了queue的添加只能從最末尾,而移除只能從最前端的特性
以下我們來實作他吧
先做出兩個結構體(其他語言可以使用class,只是golang沒有class所以使用struct)
type node struct {
	value interface{}
	next  *node
}

type Queue struct {
	head   *node
	rear   *node
	length int
}
先從最基本的構造node開始說起
node具有兩個資料,一個是真正的儲存資料value,這裡使用golang的interface作為動態型別
next則是一個指標,指向下一個node的位置
Queue表示的是整個queue的結構,這裡你需要頭跟尾的指標,你才能針對頭跟尾去做移除跟添加的動作
同時由於串列並沒有index跟len()的方法讓我們知道queue的元素數量,因此我們需要一個length的屬性來作為紀錄
queue至少需要幾個方法
func (q *Queue) Empty() bool {
	return q.length == 0 //使用內建的length屬性來判斷是否為空
}

func (q *Queue) Push(value interface{}) {
	newnode := &node{value, nil} //先為使用者的輸入值建立node
	if q.Empty() { //如果原本是空的則將頭尾指向同一個node
		q.head = newnode
		q.rear = newnode
	} else {
		q.rear.next = newnode //否則將原本node的尾巴指向新的node
		q.rear = newnode //並且將queue的尾巴指向新的node
	}
	q.length++ //減少length的值
}

func (q *Queue) Peek() interface{} {
	if q.Empty() { //若為空則回傳nil
		return nil
	}
	return q.head.value //否則回傳尾巴的值
}

func (q *Queue) Get() interface{} {
	if q.Empty() { //若為空則回傳nil
		return nil
	}
	temp := q.head //暫時性的將原本的頭取出
	defer func() { temp = nil }() //這邊設定Get結束時要將取出的資料初始化
    if temp.next == nil { //如果下一個node為空(也就是現在會取出最後一個) 則將head及rear初始化
		q.head = nil
		q.rear = nil
	} else {
		q.head = q.head.next //否則移動頭指標
	}
	q.length-- //減少length的值

	return temp.value
}

func (q *Queue) Prt() { //這邊是多餘的方法,用來印出所有的元素
	if !q.Empty() {
		temp := q.head
		fmt.Print(temp.value)
		for temp.next != nil { //如果下一個元素不為空則印出下一個元素
			fmt.Print(temp.next.value)
			temp = temp.next
		}
	}
	fmt.Println()
}
如此一來就建立完成了,你可以使用下面的程式碼來玩queue
q := Queue{}
for i := 7; i < 20; i = i + 2 {
	q.Push(i)
}
q.Prt() // 7 9 11 13 15 17 19
fmt.Println(q.Peek()) // 7
fmt.Println(q.Get()) // 7
fmt.Println(q.Get()) // 9
fmt.Println(q.Peek()) // 11
q.Prt() // 11 13 15 17 19
LIFO
Stack最大的特性就是last in first out
最後進來的最先離開
結構上大致上長這樣
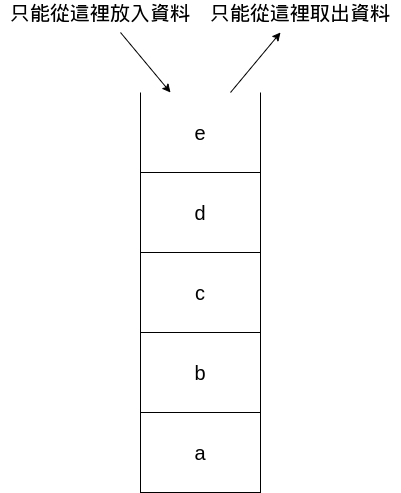
常用於紀錄區域變數
舉個日常點的日子就像是瀏覽器的上一頁功能,你唯一需要的就是最後放進stack的資料
因此你不會按了上一頁卻跑到上上一頁去
或是你寫一個撲克牌牌堆,依序疊好後只能從最上面一張抽牌,這時候使用stack會比傳統的陣列效率要好
以下我們來實作他吧
同樣的,先做出兩個結構體,代表整筆資料的stack以及最小單位的node
type stack struct {
	top    *node
	height int
}

type node struct {
	value interface{}
	below *node
}
stack只需要有top的指標即可,因為不管是放入還是取出都是同一個位置
接著我們需要設計以下幾種操作stack的方法
以下我們來實作他們吧
func (this *stack) Push(input interface{}) {
	this.top = &node{input, this.top} //將原本的top指向新建立的node,此node的below為原本的top
	this.height++
}

func (this *stack) Empty() bool {
	return this.height == 0
}

func (this *stack) Pop() interface{} {
	if this.Empty() {
		return nil
	}
	temp := this.top //取出top
	this.top = this.top.below //移動top的指標
	this.height-- //修改height屬性
	return temp.value
}

func (this *stack) Peek() interface{} {
	if this.Empty() {
		return nil
	}
	return this.top.value
}

func (this *stack) Prt() {
	if !this.Empty() {
		temp := this.top
		for temp.below != nil {
			fmt.Print(temp.value," ")
			temp = temp.below
		}
		fmt.Print(temp.value," ")
	}
	fmt.Println()
}
之後就可以在下面的程式碼中測試Stack了
func main() {
q := stack{}
for i := 7; i < 20; i = i + 2 {
	q.Push(i)
}
q.Prt()               // 19 17 15 13 11 9 7
fmt.Println(q.Peek()) // 19
fmt.Println(q.Pop())  // 19
fmt.Println(q.Pop())  // 17
fmt.Println(q.Peek()) // 15
q.Prt()               // 15 13 11 9 7
可以看到印出及取出的順序都跟queue相反
相較於stack及queue這兩個接近array的結構,tree比較特別
結構如下
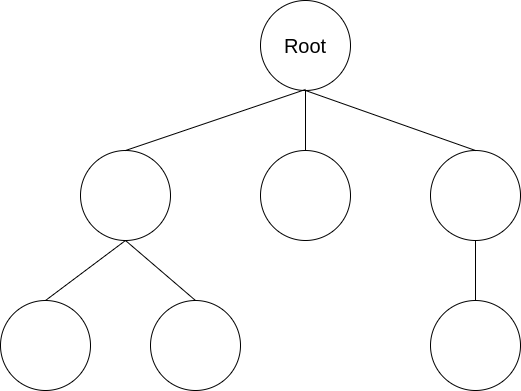
如同族譜一樣不斷的往下延伸
反過來說每個節點都可以往上找自己的parent
沒有父元素的節點又稱為root
我們今天要學的是比較特別的tree
Binary tree 二元樹
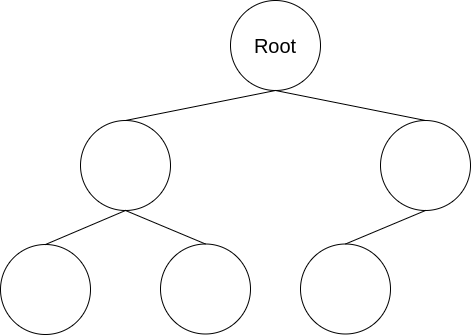
與原本的tree較為不同是binary tree只有最多兩個children
同時另外一項特徵是左邊的child跟右邊的child表達不同的含意
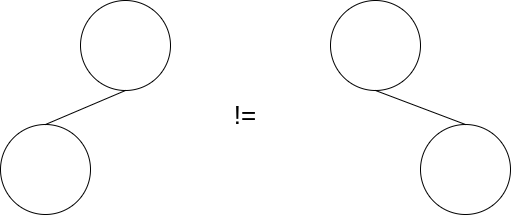
依照這個特性,我們可以將代表不同意思的資料放入左邊或右邊的節點
舉例來說:排序
我們設定好root之後,將之後要添加的資料依照比root小或大放入root的左邊或右邊
最終當我們需要找最小或最大值時就只需要找到整個tree的最左下角或最右下角即可
舉例來說,當你今天要為一個tree增加一個新的節點時
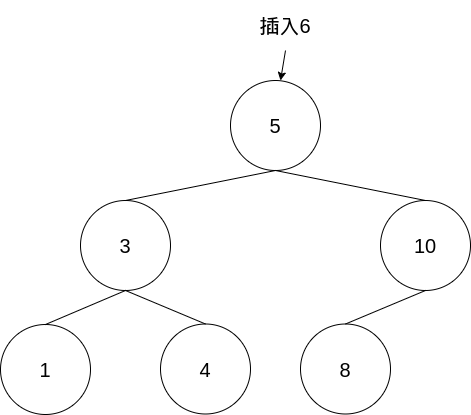
就依序去比對每個節點的大小,最終來到有空出的位置時就可以將資料插入
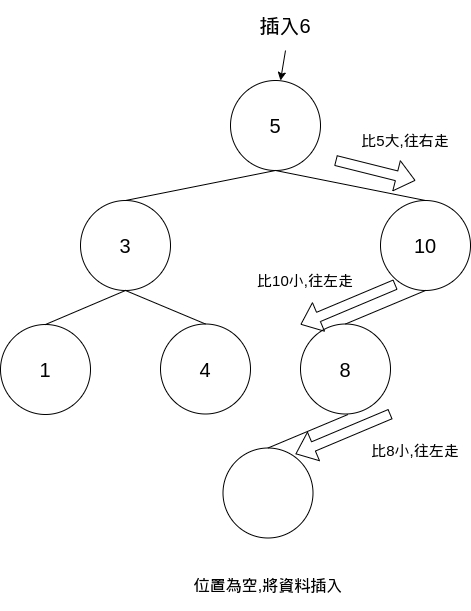
最終變成
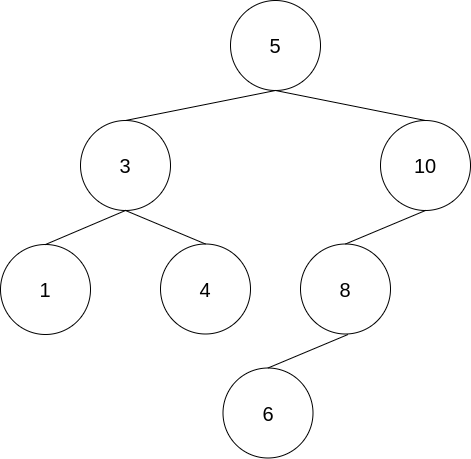
如果你需要找最小值,就一路往root的左側找,當你發現節點的左側沒有值時,就是最小值
最大值同理
以下讓我們來實作他吧
type TreeNode struct {
	val   int
	left  *TreeNode
	right *TreeNode
}
由於我們是需要比較元素的大小,因此我們的資料型別必須是數值,這邊我們採用int
之後左右邊各會是一個node
使用binary需要以下幾種方法
在tree的排序中,常見的有Inorder,preorder,postorder三種

依照我們的用途,左側放置比節點小的數值,右側放置比節點大的數值
要做排序需要使用In-order
如果對排序有興趣可以看這裡
方法的實作如下
func (t *TreeNode) Insert(value int) *TreeNode { //這裡的實作有很多種,這邊僅示範一種
	if t == nil {
		return &TreeNode{value, nil, nil} //若tree當前為空則建立並返回新root
	}

	if t.val >= value { //若輸入值小於等於root則插入在左邊
		if t.left == nil {
			t.left = &TreeNode{value, nil, nil}
		}else{
			t.left = t.left.Insert(value) //這裡要注意使用了遞迴的概念
		}
		return t
	}

	if t.val < value {
		if t.right == nil {
			t.right = &TreeNode{value, nil, nil}
		}else{
			t.right = t.right.Insert(value)
		}
		return t
	}
	return nil
}

func (t *TreeNode) FindMin() int { //這裡使用了遞迴的概念找到最左側的值
	if t.left == nil {
		return t.val
	}
	return t.left.FindMin()
}

func (t *TreeNode) FindMax() int { //這裡使用了遞迴的概念找到最右側的值
	if t.right == nil {
		return t.val
	}
	return t.right.FindMax()
}

func (t *TreeNode) PrintInorder() {
	if t == nil {
		return
	}

	t.left.PrintInorder() // 遞迴先印出左側再印出右側
	fmt.Print(t.val)
	t.right.PrintInorder()
}
設計insert的方法有很多種
以下是直接對物件進行修改的方式
func (t *TreeNode) Insert(value int) error {
	if t == nil {
		return errors.New("Tree is nil")
	}

	if t.val >= value {
		if t.left == nil {
			t.left = &TreeNode{val: value}
			return nil
		}
		return t.left.Insert(value)
	}

	if t.val < value {
		if t.right == nil {
			t.right = &TreeNode{val: value}
			return nil
		}
		return t.right.Insert(value)
	}
	return nil
}
常見的還有另外設計tree的方式
type BinaryNode struct {
	left  *BinaryNode
	right *BinaryNode
	data  int
}

type BinaryTree struct { //Tree只紀錄root的資料
	root *BinaryNode
}

func (t *BinaryTree) insert(data int) *BinaryTree {
	if t.root == nil { //若root為空則修改root的值
		t.root = &BinaryNode{data: data, left: nil, right: nil}
	} else {
		t.root.insert(data) //否則則對root進行插入
	}
	return t
}

func (n *BinaryNode) insert(data int) {
	if n == nil {
		return
	} else if data <= n.data {
		if n.left == nil {
			n.left = &BinaryNode{data: data, left: nil, right: nil}
		} else {
			n.left.insert(data)
		}
	} else {
		if n.right == nil {
			n.right = &BinaryNode{data: data, left: nil, right: nil}
		} else {
			n.right.insert(data)
		}
	}
}
之後可以使用下面的方式測試tree了
func main() {
    deck := randCard(10)
    fmt.Println(deck) //[0 6 4 7 2 9 5 8 3 1] 隨機陣列

	var tree *TreeNode
	for i := 0; i < len(deck); i++ {
		tree = tree.Insert(deck[i])
	}
	fmt.Println(tree.FindMax()) // 9
    fmt.Println(tree.FindMin()) // 0
    tree.PrintInorder() // 0123456789
}

func randCard(num int) (pile []int) { //這個是隨機產生陣列的方法,直接照抄即可,有興趣再去研究內部的程式
	rand := rand.New(rand.NewSource(time.Now().UnixNano()))
	for len(pile) < num {
		r := rand.Intn((num))
		check := false
		for i := range pile {
			if pile[i] == r {
				check = true
				break
			}
		}

		if !check {
			pile = append(pile, r)
		}
	}
	return
}
tree還有其他種方法可以添加(比方說刪除之類的)
不過我們今天就先介紹到這邊
我們今天介紹了三種資料結構的實作
跟一般常見的程式碼不同,資料結構比較像是在研究演算法之類的,用來加速程式執行的效率
如果你沒有效能的需求,那麼資料結構只需要稍微知道即可,有空時再回來翻翻
整體而言算是有趣的課題,因為不同演算法在不同情況下可能會有不同的效率
你可以嘗試為你的程式碼計時(使用程式碼記,不要真的拿碼表)
看看什麼演算法在什麼情況下可以達到更好的效率

如果有任何寫不清楚或是觀念沒有很明白的話請留言告知我
會盡快補上
如果有任何寫錯的地方也麻煩留言告知我
會盡快修正
感謝各位