同步發表到驢形筆記
每一個語言都有他要解決的問題,這邊使用typescrip是因為潮可以更好的管理程式碼的架構。並提高程式的自動檢查功能,接著開始吧
上篇會著重在講解typescrip如何用webpack設定,下篇會說明程式方面要怎麼做更改
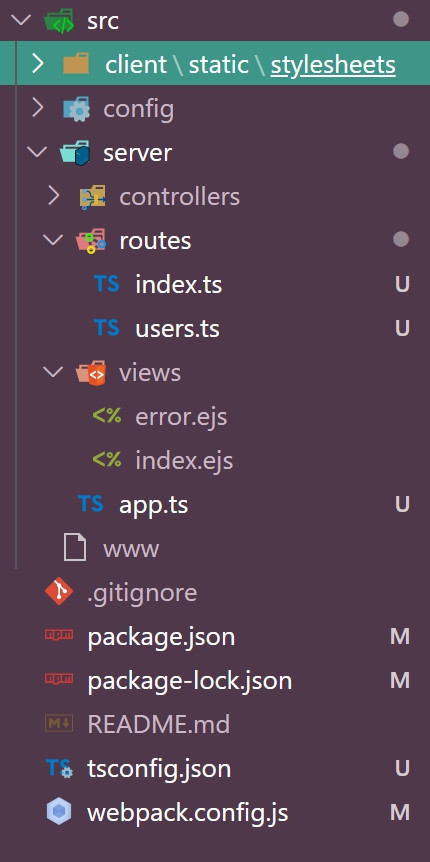
首先把所有.js檔都變成.ts檔像這樣

可能注意到了多出一個檔案,會慢慢說明。首先更改設定檔"webpack.config.js"
webpack.config.js
/* webpack.config.js : Webpack 的設定檔 */
const path = require('path');
const nodeExternals = require('webpack-node-externals');
const CopyPlugin = require('copy-webpack-plugin');
const serverConfig = {
略
  module: {   //設定你的檔案選項
    rules: [
      {
        test: /\.tsx?$/,
        use: 'ts-loader',
        exclude: /node_modules/,
      },
    ],
  },
略
  resolve: {
    extensions: ['.ts', '.js'],
  },
}
module.exports = [serverConfig];
接著新增對typescript的編譯設定檔"tsconfig.json"!他是用來定義typescript如何進行編譯的說明文件,詳細都可以前往官方網站查詢
tsconfig.json
{
  "compilerOptions": {
    "target": "es5",                          /* Specify ECMAScript target version: 'ES3' (default), 'ES5', 'ES2015', 'ES2016', 'ES2017', 'ES2018', 'ES2019', 'ES2020', or 'ESNEXT'. */
    "module": "commonjs",                     /* Specify module code generation: 'none', 'commonjs', 'amd', 'system', 'umd', 'es2015', 'es2020', or 'ESNext'. */
    "lib": [],                             /* Specify library files to be included in the compilation. */
    "sourceMap": false,                     /* Generates corresponding '.map' file. */
    "noEmitOnError" : false,
    "strict": true,                           /* Enable all strict type-checking options. */
    "noImplicitAny": false,                 /* Raise error on expressions and declarations with an implied 'any' type. */
    "strictNullChecks": true,              /* Enable strict null checks. */
    "esModuleInterop": true,
    "resolveJsonModule": true,
    "forceConsistentCasingInFileNames": true,  /* Disallow inconsistently-cased references to the same file. */
    "baseUrl": "."
  }
}
在webpack設定檔中我們引用module模組,然後設定哪些檔案要用什麼方式去讀取。這邊是ts檔然後利用ts-loader編譯,ts-loader會再去利用typescript進行編譯。所以要安裝以下三個套件
npm i ts-loader --save-d
這邊建議各位每安裝一個就執行"npm run webpack"來看看會跳出什麼錯誤,提升自己看錯誤的功力!可以自己試試看直到可以正常跑出"npm run webpack"為止
接著安裝typescript
npm i typescript --save-d
然後繼續安裝定義檔
npm i @types/node --save-d
這邊解釋一下"定義",因為在typescript中,沒有被定義的變數就無法使用。可以理解成沒有被事先宣告就不能呼叫該變數,解釋如下
var path = require('path');
這邊我們定義了path這個變數是要去引入"path"的模組,但是"require"並沒有被事先定義。所以typescrip會認為他不能使用(當然也可以改typescript的編譯設定,但這邊不討論),所以我們必須要去引入typescript針對node所釋出的定義檔案。這樣"require"就能被定義了,就能夠正常使用了!
這樣正常編譯完成就可以使用了!下一篇會在webpack系列全部結束後才會開始,接著繼續架設webpack轉譯vue3的環境!
