
大部分的系統都會有帳戶機制,其中涉及的部分不外乎就是註冊、登入與驗證,這部分內容較多,我會拆成上下兩篇,這篇會先實作註冊帳號的部分。
不曉得大家還記不記得前面有一張圖裡面有一個 ? Route,那正是驗證機制所需要的路由,我們叫它 Auth Route,又因為一個應用可能會有多種驗證機制,舉例來說:可以用本地帳戶、Google 或 Facebook 進行登入,所以這裡可以再將路由切細一點,切出一個 LocalAuthRoute 來實作本地帳戶,如下圖: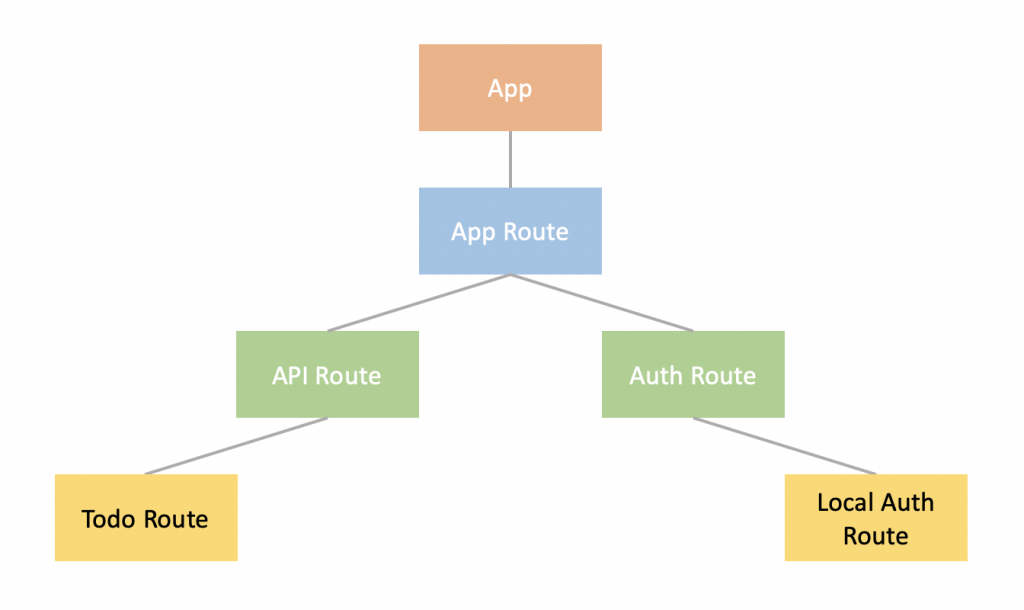
實作本地帳戶驗證機制一定會依賴資料庫,所以我們來規劃 Schema 與製作 Model。下方為 local-auth.model.ts 的程式碼:
import { model, Schema } from 'mongoose';
import { CoreDocument } from '../types/model.type';
import { EmailValidator } from '../validators';

const LocalAuthSchema = new Schema(
  {
    username: {
      type: String,
      required: true,
      minlength: 3,
      maxlength: 12
    },
    password: {
      salt: {
        type: String,
        required: true
      },
      hash: {
        type: String,
        required: true
      }
    },
    email: {
      type: String,
      required: true,
      validate: {
        validator: EmailValidator
      }
    }
  }
);

export interface LocalAuthDocument extends CoreDocument {
  username: string;
  password: {
    salt: string;
    hash: string;
  };
  email: string;
}

export const LocalAuthModel = model<LocalAuthDocument>('User', LocalAuthSchema);
可以看到 password 的欄位並不是直接儲存的,而是有 salt 與 hash 兩個欄位,原因是密碼屬於較敏感的資訊,必須加密再儲存進資料庫當中,而 salt 就是替密碼加鹽,能夠大幅提升被攻破的難度!
在設計完 LocalAuthModel 後,就來新增 LocalAuthRepository 吧!新增一個 local-auth.repository.ts 並實作 addUser 與 getUser 方法:
import crypto from 'crypto';
import { LocalAuthModel, LocalAuthDocument } from '../models/local-auth.model';

export class LocalAuthRepository {

  public async addUser(
    username: string,
    password: string,
    email: string
  ): Promise<LocalAuthDocument> {
    const { salt, hash } = this.hashPassword(password);
    const user = new LocalAuthModel({
      username,
      password: { salt, hash },
      email
    });
    const document = await user.save();
    return document;
  }

  public async getUser(
    options: { username?: string, email?: string }
  ): Promise<LocalAuthDocument | null> {
    const params = Object.keys(options)
                   .filter(key => !!(options as any)[key])
                   .map(key => {
                     return { [key]: (options as any)[key] };
                   });
    const getCondition = () => {
      if ( params.length > 1 ) {
        return {
          $or: params
        };
      }
      return params[0];
    };
    const user = await LocalAuthModel.findOne(getCondition());
    return user;
  }

  public hashPassword(
    password: string,
    salt = crypto.randomBytes(16).toString('hex')
  ): { salt: string, hash: string } {
    const hash = crypto.pbkdf2Sync(password, salt, 1000, 64, 'sha256').toString('hex');
    return { salt, hash };
  }

}
可以看到 addUser 方法有使用到 hashPassword,這就是替密碼加鹽,我的實作方法是沒有指定 salt 的情況下會是隨機字串,並把傳入的 password 與 salt 用 sha256 進行迭代,最後再傳回結果。另外,getUser有 username 與 email 兩種查詢方式,這樣就能更有彈性地找出使用者資訊。
整理一下資料夾結構,並將路由相關的檔案也一併列上來:
├── src
|   ├── index.ts
|   ├── app.ts
|   ├── app.routing.ts
|   ├── + bases
|   ├── + common/resonse
|   ├── + exceptions
|   ├── main
|   |   ├── + api
|   |   └── auth
|   |       ├── auth.routing.ts               //本篇新增
|   |       └── local
|   |           ├── local-auth.service.ts     //本篇新增
|   |           ├── local-auth.controller.ts  //本篇新增
|   |           └── local-auth.routing.ts     //本篇新增
|   ├── models
|   |   ├── local-auth.model.ts               //本篇新增
|   |   └── todo.model.ts
|   ├── repositories
|   |   ├── local-auth.repository.ts          //本篇新增
|   |   └── todo.repository.ts                //本篇新增
|   ├── + dtos
|   ├── + types
|   ├── + environments
|   ├── + database
|   └── + validators
├── package.json
└── tsconfig.json
下方為 local-auth.service.ts 的程式碼:
import { LocalAuthRepository } from '../../../repositories/local-auth.repository';

import { HttpStatus } from '../../../types/response.type';

export class LocalAuthService {

  private readonly localAuthRepo = new LocalAuthRepository();

  public async addUser(username: string, password: string, email: string) {
    const isUsed = await this.localAuthRepo.getUser({ username, email });
    if ( isUsed ) {
      const error = new Error('使用者名稱或電子信箱已被使用');
      (error as any).status = HttpStatus.CONFLICT;
      throw error;
    }
    const user = await this.localAuthRepo.addUser(username, password, email);
    return user;
  }

}
下方 local-auth.controller.ts 的程式碼:
import { Request } from 'express';

import { ControllerBase } from '../../../bases/controller.base';

import { LocalAuthService } from './local-auth.service';

import { ResponseObject } from '../../../common/response/response.object';

import { HttpStatus } from '../../../types/response.type';


export class LocalAuthController extends ControllerBase {

  protected readonly localAuthSvc = new LocalAuthService();

  public async signup(req: Request): Promise<ResponseObject> {
    const { username, password, email } = req.body;
    const user = await this.localAuthSvc.addUser(username, password, email);
    return this.formatResponse(user, HttpStatus.CREATED);
  }

}
下方為 local-auth.routing.ts 的程式碼:
import express from 'express';

import { RouteBase } from '../../../bases/route.base';
import { LocalAuthController } from './local-auth.controller';

export class LocalAuthRoute extends RouteBase {

  protected controller!: LocalAuthController;

  protected initial(): void {
    this.controller = new LocalAuthController();
    super.initial();
  }

  protected registerRoute(): void {
    this.router.post('/signup',
      express.json(),
      this.responseHandler(this.controller.signup)
    );
  }

}
使用 Postman 進行帳號註冊: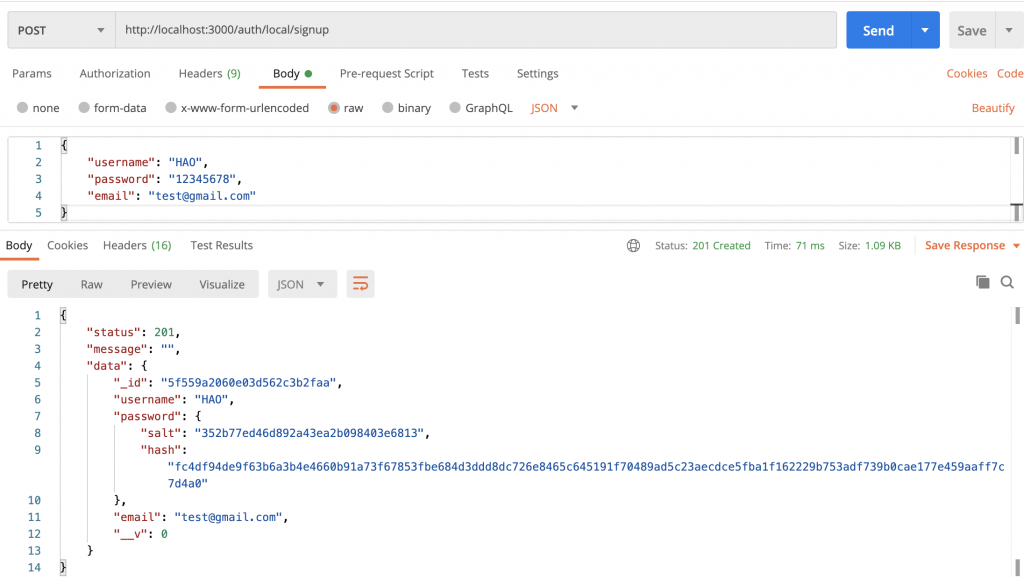
可以看到 User 的資料表示成功!
本篇實作了註冊帳戶的部分,下篇會開始實作登入與驗證機制,並實現 token 的機制,敬請期待!
