一、回想第一次UI元件的學習
二、學習與摸索UI方式
三、頁面常用元件
四、總結
回想在第一次學習CSS Framework的時候
最讓我頭痛的,就是UI元件的學習
那時候常常會覺得,是不是要先把所有UI元件的用法一項一項摸熟後,才有能力做專案
實際開始做工作的專案後,才發現這是很沒有效率,而且是欺騙自己的想法
一方面,工作上這麼多時間等我們摸熟所有的UI元件以及元件的用法
另一方面,我們不會用到所有的東西
以下是我個人在比較沒有時間慢慢學的情況下,
比較有效率的學習與摸索UI方式:
在之前學生時期作專題,和目前工作專案的過程中
我依照專案的相關需求,大略從文件中整理並分類會用到的UI元件
分類的目的,是當我們遇到需求時,可以很快速的聯想與查找資料
(1) 版型常用
我們在第17天~第20天介紹的QLayout、QPage、QToolbar、QList、QMenu......等等
(2) 頁面常用
QBreadcrumb、QCarousel、QStepper、QTabs+QTab-Panels、QCard
(3) 圖文資訊
QImg、QParallax、QIcon、QAvatar、QVideo
(4) 通知訊息
QBadge、QBanner、Notify Plugin
(5) 表單與按鈕
Form Components、QButton、QDialog
(6) 表格
QMarkup-Table、QTable、QPagination
假設在工作上遇到一個需求:
「有一個訂單系統的清單,包含多筆訂單
每一筆訂單在不同的狀態下,可以允許不同的操作
每一筆訂單包含多個操作,例如【查看】、【編輯】、【取消】、【刪除】
每一個按鈕都有不同的樣式和ICON,
當目前的訂單狀態不允許做某個操作時,那一個操作的按鈕需要被關閉」
這時候我自己在前面分類好的UI當中,看到QBtn可以用
我就會從官方文件範例和API,來尋找QBtn該用什麼方式完成下面的事情:
https://quasar.dev/vue-components/button#Other-options
好的CSS Framework文件,UI元件的每一個範例,都會有程式碼跟結果的對照
例如Quasar的官方文件,點擊左上角,會看到上方的程式碼與下方的結果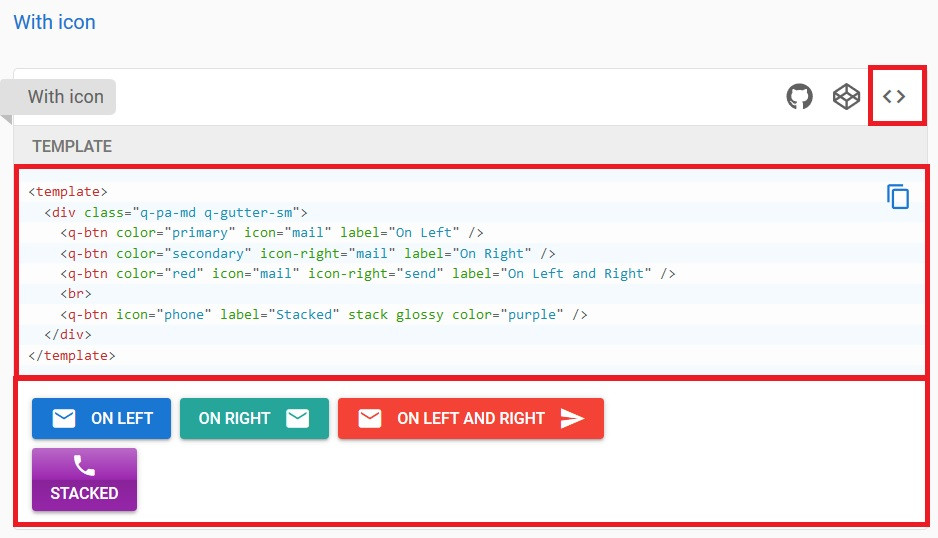
如果想要進一步了解某個參數,就可以滑到下方的API
例如,我想了解stack的參數是什麼,可以允許什麼資料類型
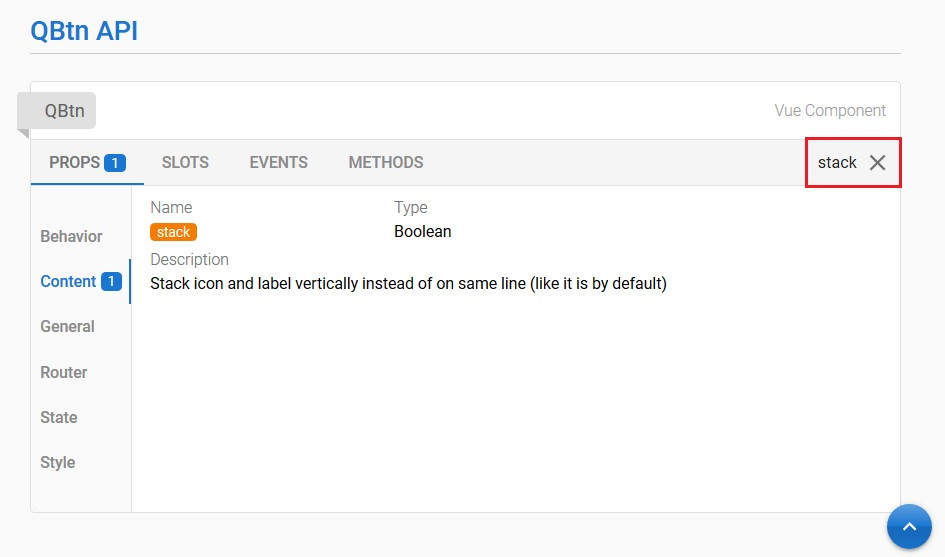
1. 常用的外觀屬性參數
如何修改框架元件預設的文字、背景、大小樣式
有的元件可以從屬性當中修改,有的元件是套用CSS
像是QCarousel的寬高、樣式
Quasar大多數元件包含四個屬性:
有的元件沒有上述的屬性,可以透過CSS或其他元件當作替代方案
2. 自定義與細節的部分
像是Quasar的Notify,提供了四種常用的通知類型
文件裡面也有提到,如何定義屬於自己的Notify類型
像是QCarousel的左右箭頭、導覽示意圖的方向與樣式、自動播放、全螢幕
Quasar大部分的元件的內容除了可以使用元件提供的屬性,例如label、icon
也可以透過Slot,在UI元件裡面存放其它元素內容
<q-carousel-slide :name="3" img-src="https://cdn.quasar.dev/img/parallax2.jpg">
    ...
</q-carousel-slide>
3. 功能的部分
有的元件需要搭配Javascript處理一些功能性的需求
文件裡面通常會寫到,怎麼定義與使用元件的某個功能
例如QSelect清單篩選的功能
Playground的重點,就是確保你改壞了也沒差
我自己會另外開一個測試用的Playground筆記專案拿來測試
之後遇到類似的UI需求,直接翻之前的筆記專案程式碼
總之千萬不要拿實際工作的產品專案!
大部分的CSS Framework 官方都會有Playground
以Quasar為例:
使用右上角的Tools 裡面有三個Playground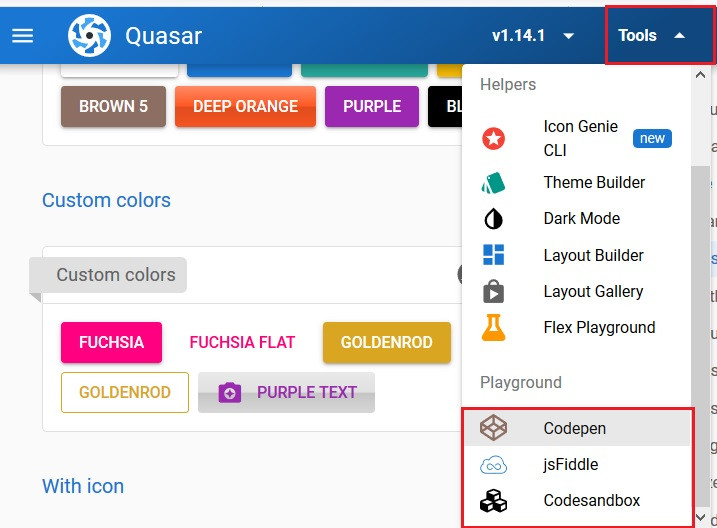
或者打開每個範例右上角的Code Pen Playground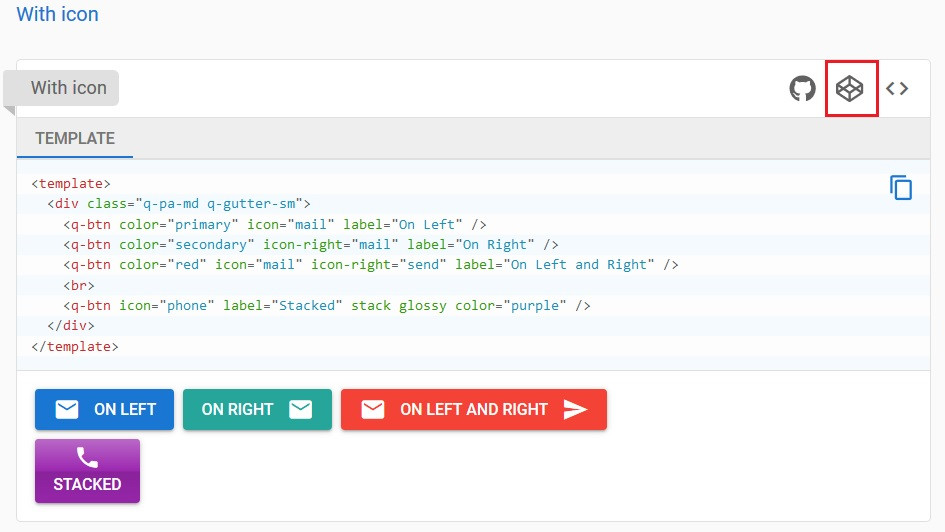
讓使用者知道目前所在的頁面
The QBreadcrumbs component is used as a navigational aid in UI. It allows users to keep track of their location within programs, documents, or websites.
https://quasar.dev/vue-components/breadcrumbs
程式碼示意:

<div class="fullscreen bg-grey-3">
    <q-card class="q-pa-md q-ma-md">
      <q-breadcrumbs active-color="grey-9" class="text-blue-8">
        <template v-slot:separator>
          <q-icon
            size="1.5em"
            name="chevron_right"
            color="grey-9"
          ></q-icon>
        </template>

        <q-breadcrumbs-el label="第一層" icon="home"></q-breadcrumbs-el>
        <q-breadcrumbs-el label="第二層" icon="widgets"></q-breadcrumbs-el>
        <q-breadcrumbs-el label="第三層" icon="navigation"></q-breadcrumbs-el>
      </q-breadcrumbs>
    </q-card>
</div>
1.最後一層以外的顏色:active-color="grey-9"
<!-- active-color="grey-9" -->
<q-breadcrumbs active-color="grey-9" class="text-blue-8">
2.最後一層的顏色:class="text-blue-8"
<!-- class="text-blue-8" -->
<q-breadcrumbs active-color="grey-9" class="text-blue-8">
3.每一個元件前面的ICON:template v-slot:separator
<!-- class="text-blue-8 -->
<q-breadcrumbs active-color="grey-9" class="text-blue-8">
    <template v-slot:separator>
      <q-icon
        size="1.5em"
        name="chevron_right"
        color="grey-9"
      ></q-icon>
    </template>
</q-breadcrumbs>
經常用於首頁的幻燈片元件
The QCarousel component allows you to display more information with less real estate, using slides. Useful for creating Wizards or an image gallery too.
https://quasar.dev/vue-components/carousel
程式碼示意:
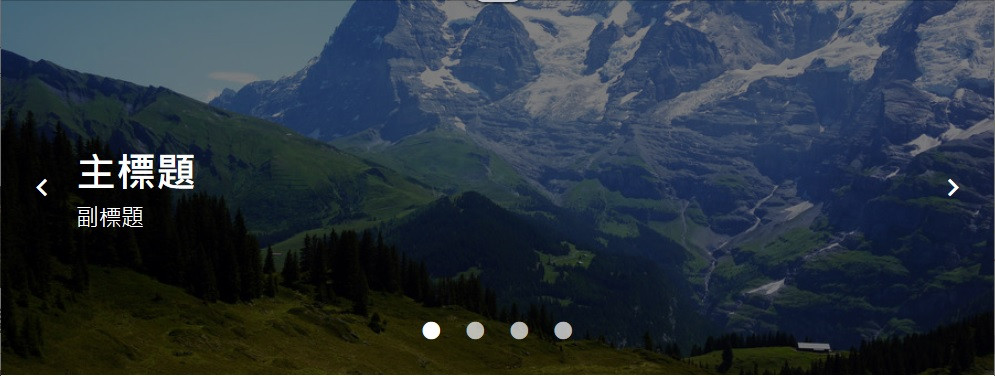
<template>
    <div>
        <q-carousel
          animated
          v-model="slide"
          arrows
          navigation
          infinite
          autoplay
          height="300px"
        >
          <q-carousel-slide :name="1" img-src="https://cdn.quasar.dev/img/mountains.jpg">
            <div class="full-height flex items-center content">
              <div class="">
                <div class="title">
                  主標題
                </div>
                <div class="sub_title">
                  副標題
                </div>
              </div>
            </div>
          </q-carousel-slide>
          <q-carousel-slide :name="2" img-src="https://cdn.quasar.dev/img/parallax1.jpg">
            <div class="full-height flex items-center content">
              <div class="">
                <div class="title">
                  主標題
                </div>
                <div class="sub_title">
                  副標題
                </div>
              </div>
            </div>
          </q-carousel-slide>
          <q-carousel-slide :name="3" img-src="https://cdn.quasar.dev/img/parallax2.jpg">
    <div class="full-height flex items-center content">
              <div class="">
                <div class="title">
                  主標題
                </div>
                <div class="sub_title">
                  副標題
                </div>
              </div>
            </div></q-carousel-slide>
          <q-carousel-slide :name="4" img-src="https://cdn.quasar.dev/img/quasar.jpg">
            <div class="full-height flex items-center content">
              <div class="">
                <div class="title">
                  主標題
                </div>
                <div class="sub_title">
                  副標題
                </div>
              </div>
            </div>
          </q-carousel-slide>
        </q-carousel>
    </div>
</template>

<script>
export default {
  data () {
    return {
      slide: 1
    }
  }
}
</script>

<style lang="scss" scoped>
.q-carousel__slide {
    padding: 0;
}

.content {
  padding: 0 60px;
  background-color: rgba(0,0,0,0.5);
  color: white;
}

.title {
  font-size: 32px;
  font-weight: bold;
}

.sub_title {
  font-size: 18px;
}
</style>
用於將某個操作流程分為N個步驟
每一個步驟放在QStep元件
所有步驟的按鈕操作可以定義在<template v-slot:navigation>當中
Steppers display progress through a sequence of logical and numbered steps.
https://quasar.dev/vue-components/stepper
程式碼示意:
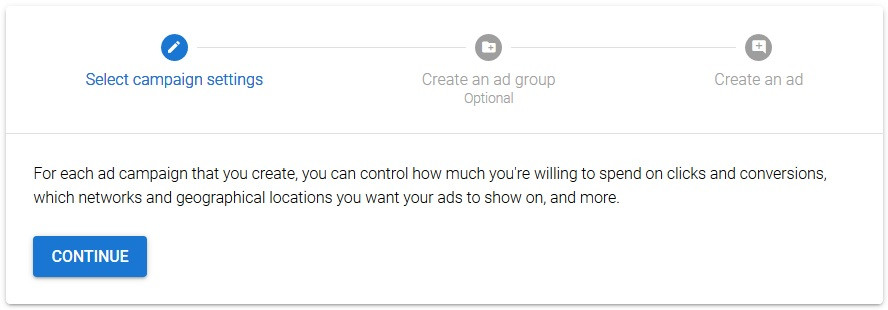
<template>
  <div class="q-pa-md">
    <q-stepper
      v-model="step"
      ref="stepper"
      alternative-labels
      color="primary"
      animated
    >
      <q-step
        :name="1"
        title="Select campaign settings"
        icon="settings"
        :done="step > 1"
      >
        For each ad campaign that you create, you can control how much you're willing to
        spend on clicks and conversions, which networks and geographical locations you want
        your ads to show on, and more.
      </q-step>

      <q-step
        :name="2"
        title="Create an ad group"
        caption="Optional"
        icon="create_new_folder"
        :done="step > 2"
      >
        An ad group contains one or more ads which target a shared set of keywords.
      </q-step>

      <q-step
        :name="3"
        title="Create an ad"
        icon="add_comment"
      >
        Try out different ad text to see what brings in the most customers, and learn how to
        enhance your ads using features like ad extensions. If you run into any problems with
        your ads, find out how to tell if they're running and how to resolve approval issues.
      </q-step>

      <template v-slot:navigation>
        <q-stepper-navigation>
          <q-btn @click="$refs.stepper.next()" color="primary" :label="step === 3 ? 'Finish' : 'Continue'" />
          <q-btn v-if="step > 1" flat color="primary" @click="$refs.stepper.previous()" label="Back" class="q-ml-sm" />
        </q-stepper-navigation>
      </template>
    </q-stepper>
  </div>
</template>

<script>
export default {
  data () {
    return {
      step: 1
    }
  }
}
</script>
將資訊分類的頁籤元件
QTabs包含所有的頁籤 (QTab)
QTab-Panels包含所有頁籤的內容 (QTabPanel)
Tabs are a way of displaying more information using less window real estate. This page describes the tab selection part through QTabs, QTab and QRouteTab.
Works great along with QTabPanels, a component which refers strictly to the panels (tab content) themselves.
https://quasar.dev/vue-components/tabs
按下QTab後,會顯示對應的QTab-Panel
程式碼示意:

<template>
  <div class="q-pa-md">
    <div class="q-gutter-y-md" style="max-width: 600px">
      <q-card>
        <q-tabs
          v-model="tab"
          dense
          class="text-grey"
          active-color="primary"
          indicator-color="primary"
          align="justify"
          narrow-indicator
        >
          <q-tab name="mails" icon="mail" label="Mails"></q-tab>
          <q-tab name="alarms" icon="alarm" label="Alarms"></q-tab>
          <q-tab name="movies" icon="movie" label="Movies"></q-tab>
        </q-tabs>

        <q-separator></q-separator>

        <q-tab-panels v-model="tab" animated>
          <q-tab-panel name="mails">
            <div class="text-h6">Mails</div>
            Lorem ipsum dolor sit amet consectetur adipisicing elit.
          </q-tab-panel>

          <q-tab-panel name="alarms">
            <div class="text-h6">Alarms</div>
            Lorem ipsum dolor sit amet consectetur adipisicing elit.
          </q-tab-panel>

          <q-tab-panel name="movies">
            <div class="text-h6">Movies</div>
            Lorem ipsum dolor sit amet consectetur adipisicing elit.
          </q-tab-panel>
        </q-tab-panels>
      </q-card>
    </div>
  </div>
</template>

<script>
export default {
  data () {
    return {
      tab: 'mails'
    }
  }
}
</script>
用於將內容切分成不同的區塊
The QCard component is a great way to display important pieces of grouped content.
https://quasar.dev/vue-components/card
程式碼示意:
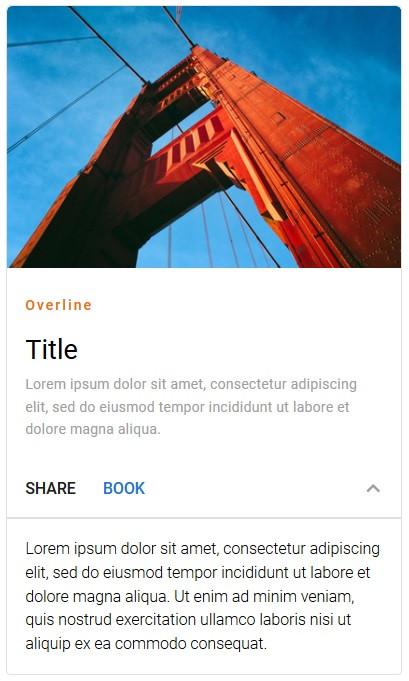
<template>
  <div class="q-pa-md row items-start q-gutter-md">
    <q-card class="my-card" flat bordered>
      <q-img
        src="https://cdn.quasar.dev/img/parallax2.jpg"
      />

      <q-card-section>
        <div class="text-overline text-orange-9">Overline</div>
        <div class="text-h5 q-mt-sm q-mb-xs">Title</div>
        <div class="text-caption text-grey">
          Lorem ipsum dolor sit amet, consectetur adipiscing elit, sed do eiusmod tempor incididunt ut labore et dolore magna aliqua.
        </div>
      </q-card-section>

      <q-card-actions>
        <q-btn flat color="dark" label="Share" />
        <q-btn flat color="primary" label="Book" />

        <q-space />

        <q-btn
          color="grey"
          round
          flat
          dense
          :icon="expanded ? 'keyboard_arrow_up' : 'keyboard_arrow_down'"
          @click="expanded = !expanded"
        />
      </q-card-actions>

      <q-slide-transition>
        <div v-show="expanded">
          <q-separator />
          <q-card-section class="text-subitle2">
            {{ lorem }}
          </q-card-section>
        </div>
      </q-slide-transition>
    </q-card>
  </div>
</template>

<script>
export default {
  data () {
    return {
      expanded: false,
      lorem: 'Lorem ipsum dolor sit amet, consectetur adipiscing elit, sed do eiusmod tempor incididunt ut labore et dolore magna aliqua. Ut enim ad minim veniam, quis nostrud exercitation ullamco laboris nisi ut aliquip ex ea commodo consequat.'
    }
  }
}
</script>

<style lang="scss" scoped>
.my-card {
  width: 100%
  max-width: 350px
}
</style>
每一個CSS Framework提供的元件和使用方式都不一樣
在學習的過程中,除了熟悉工具本身之外
最重要的是,掌握那些工具所伴隨的常見應用情境和需求
如同在某個社群看到的:
建議在學習元件的時候,可以找一個~兩個網站邊模仿邊學習
像是下方的延伸閱讀,Bootstrap官方的Theme網站,裡面的種類就蠻齊全的
很多東西都可以套用在學習其它CSS Framework上
接下來的幾天,會陸續透過官方或自己的範例
介紹Quasar當中比較常用的元件
Bootstrap Themes
我如何自學 UI/UX 介面設計?
