其實官方網站在設定流程方面寫得很完整,
雖然 Google Actions 申請畫面稍微有改版,
但對於整體流程來說還不至於影響太大,
看得懂的朋友不妨直接看英文的說明:
https://www.home-assistant.io/integrations/google_assistant/
如果妳跟筆者一樣英文破爛那就跟著教學做吧!
Actions on Google console: https://console.actions.google.com/
New Project 設定一個妳喜歡的名稱,選擇 Chinese (Traditional) 與 Taiwan
Smart Home 並點擊 Start Building
Build your Action 再點擊 Add Action(s)
Fulfillment URL 填入 HA 的 API 網址 https://{妳的HA網址:連接埠}/api/google_assistant
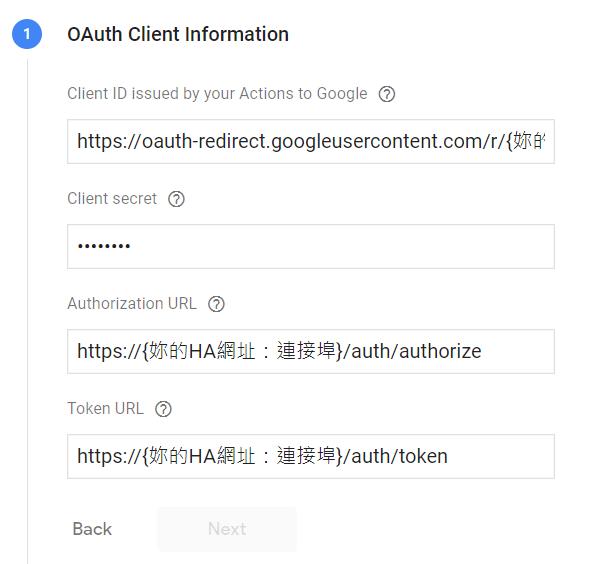
Save 以儲存Account linking 進入設定頁面OAuth Client Information 設定
Client ID 填入 https://oauth-redirect.googleusercontent.com/r/{妳的Project ID} , Project ID 可以在右上角三個點的選單內,點選 Project settings 後的頁面內找到。Client secret 隨便填寫,因為 HA 用不到這個參數Authorization URL 填入 https://{妳的HA網址:連接埠}/auth/authorize
Token URL 填入 https://{妳的HA網址:連接埠}/auth/token
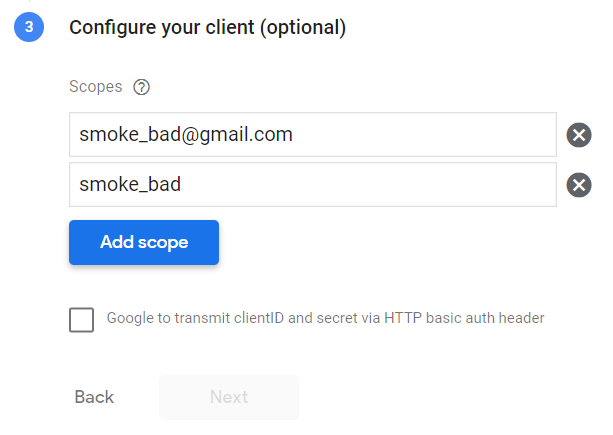
Configure your client
Scopes 填入妳的 email
Add scope 後再填入妳的 name
Google to transmit clientID and secret via HTTP basic auth header
Develop 頁面Test 按鈕以產生 Test App
Test 頁面,點選 Settings 按鈕,啟用 On device testing 選項接下來需要在 configuration.yaml 內新增 google_assistant 設定,
以下是官方提供的範例設定:
# Example configuration.yaml entry
google_assistant:
  project_id: YOUR_PROJECT_ID
  service_account: !include SERVICE_ACCOUNT.JSON
  report_state: true
  exposed_domains:
    - switch
    - light
  entity_config:
    switch.kitchen:
      name: CUSTOM_NAME_FOR_GOOGLE_ASSISTANT
      aliases:
        - BRIGHT_LIGHTS
        - ENTRY_LIGHTS
    light.living_room:
      expose: false
      room: LIVING_ROOM
詳細參數可以參考官方手冊:
https://www.home-assistant.io/integrations/google_assistant/#configuration
Google Home App
+ 新增裝置,點選 設定裝置 ,選擇 Google 的合作夥伴 ,找到一個服務叫做 [test] 妳的APP名稱
這篇教學算是比較進階的整合設定,
如果覺得太困難也可以選擇跳過這篇,
但如果能把 Google Home 整合進來,
就可以方便地在寶寶快睡著時 OK Google 燈光調暗一點 !
您好:
之前照官方文件設定,一直失敗,也反覆確認過步驟,應該沒有出問題。上網查了一下,發現成功的人,似乎在 actions console中的test畫面 -> settings -> Account linking中會顯示連結帳號,我的則是顯示沒有帳號連結,詳如下圖連結:
https://drive.google.com/file/d/1U1zyhu7nAG4An3fXZK19U_sNRG5dd58o/view?usp=sharing
但在google詢找原因時,發現有人提到需要google developer帳號可能使帳號連結成,想跟您確認一下這點,請問您在設定google actions的project時,是否使用google developer帳號?
謝謝
我的專案有顯示連結帳號,我不確定 Google Developer 帳號是什麼,不過我目前是使用 Google Cloud Platform 的免費方案,我也還沒有超額或付過費用。
了解,謝謝

 iThome鐵人賽