ButterKnife可以讓我們在宣告元件時之後不用再打findViewById這行。如果元件不多時可能影響不大,但如果是在設計一個大型APP時,ButterKnife就可以幫我們省下許多宣告元件的時間,也可以讓程式碼更加美化。
首先,在gradle加入以下library dependencyimplementation 'com.jakewharton:butterknife:10.2.1'annotationProcessor 'com.jakewharton:butterknife-compiler:10.2.1'
以及
    compileOptions {
        sourceCompatibility JavaVersion.VERSION_1_8
        targetCompatibility JavaVersion.VERSION_1_8
    }
之後按下Sync Now,完成以後就可以開始XML的設計了
我們需要安裝一個跟ButterKnife配套的插件,File-> Settings...-> Plugins-> 搜尋ButterKnife Zelezny安裝後並重新啟動。
來到設計XML的部分,這次只要簡易示範ButterKnife的功能,所以我們就簡單設計一個TextView和Button就好了
<?xml version="1.0" encoding="utf-8"?>
<RelativeLayout
    xmlns:android="http://schemas.android.com/apk/res/android"
    android:layout_width="match_parent"
    android:layout_height="match_parent" >

    <TextView
        android:id="@+id/text"
        android:layout_width="match_parent"
        android:layout_height="wrap_content"
        android:gravity="center"
        android:text="HELLO"/>
    <Button
        android:id="@+id/button"
        android:layout_width="wrap_content"
        android:layout_height="wrap_content"
        android:text="按鈕"
        android:layout_below="@+id/text"/>
</RelativeLayout>
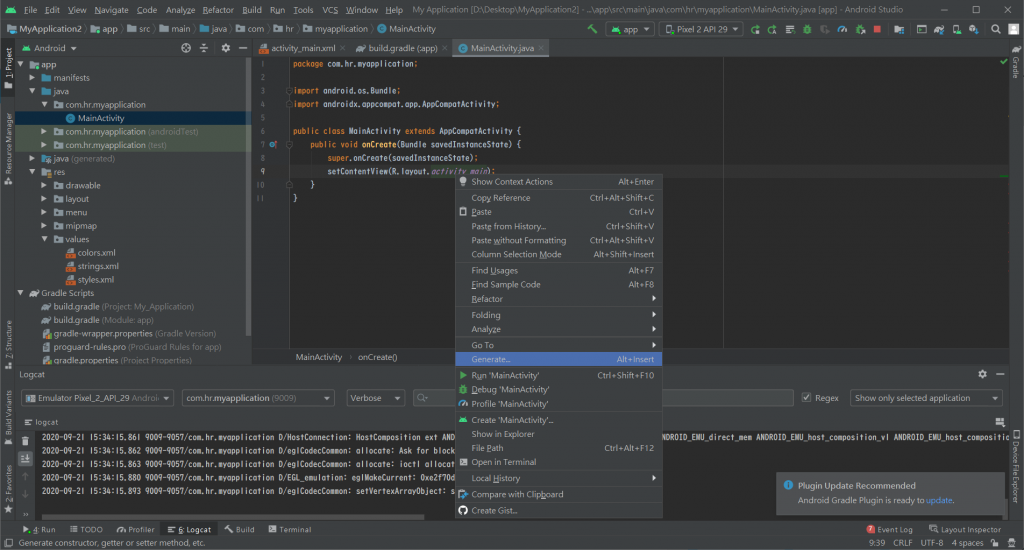
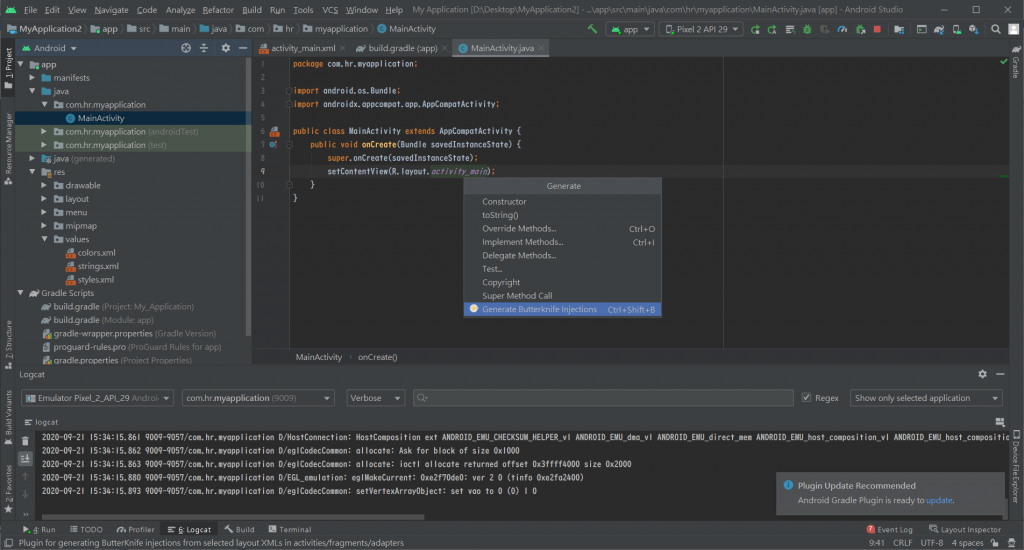
接著來到主頁面的部分,來示範一下如何使用ButterKnife,R.layout.activity_main右鍵 -> Generate... -> Generate ButterKnife injections,下面附上圖解的順序

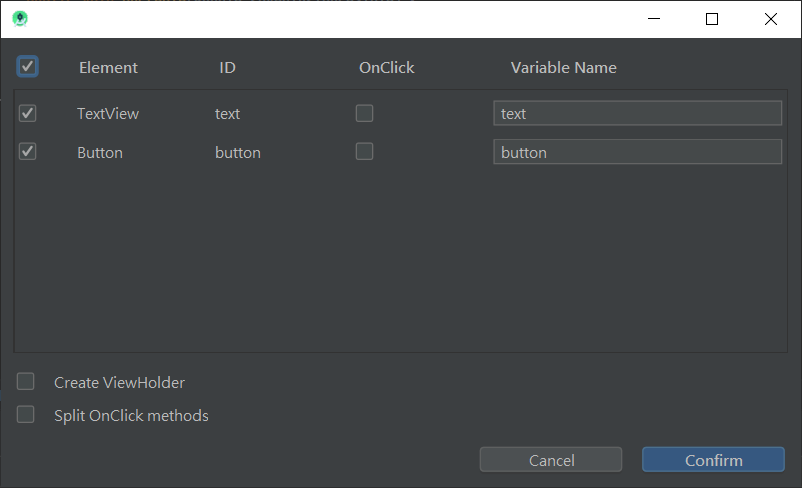
接著就會看到這個視窗,在需要的元件前打勾它就會自動宣告,最後一格Variable Name是變數名稱,中間onClick是用來決定是否要觸發點擊事件。

按下OK會跳出兩段程式碼
這一段相當於之前用的findViewById
@BindView(R.id.text)
TextView text;
@BindView(R.id.button)
Button button;
而這一段則是按扭的觸發事件,如果有多按鈕要觸發則可直接在@OnClick({R.id.button})中的R.id.button後面加,後在樹入物件id,例如:@OnClick({R.id.button,R.id.text})
@OnClick({R.id.button})
public void onViewClicked(View view) {
    switch (view.getId()) {
        case R.id.button:
            break;
    }
}
完整程式碼:
public class MainActivity extends AppCompatActivity {
    @BindView(R.id.text)
    TextView text;
    @BindView(R.id.button)
    Button button;

    public void onCreate(Bundle savedInstanceState) {
        super.onCreate(savedInstanceState);
        setContentView(R.layout.activity_main);
        ButterKnife.bind(this);
    }

    @OnClick({R.id.button})
    public void onViewClicked(View view) {
        switch (view.getId()) {
            case R.id.button:
                text.setText("點到按鈕了");
                break;
        }
    }
}

