利用 Angualr 框架開發單一應用程式 (Single-Page Application, SPA) 時,會利用路由機制實作頁面之間的切換。接下來幾篇,會利用 Angular 路由機制來實作待辦事項頁面的切換。
為了實作需求,利用 Angular CLI 建立一待辦事項頁面,由於此頁面會利用路由機制來載入元件,因此在終端機中執行 ng g c task/task-page --skip-selector 指令,以取消元件選擇器的設定,並將 app.component.html 中的頁面程式移至 task-page.component.html。
<app-page-container>
  <app-page-title pageTitle="待辦事項清單"></app-page-title>
  <app-task-list></app-task-list>
</app-page-container>
因為 TaskPageComponent 主要職責是待辦事項的清單顯示,所以上面程式也移除了待辦事項表單的標籤;又由於此時會使用到
<app-page-container>標籤,因此還需要在 TaskModule 中匯入 UiModule 模組。
實作之前先利用 Angular CLI 在 AppModule 模組下建立作為首頁的頁面 - MainPage;而在 app.component.html 中,會使用 <router-outlet> 元件來定義頁面所需要顯示的位置。
<router-outlet></router-outlet>
接著,在 app-routing.module.ts 來定義路由,此會是一 Routes 型別的物件陣列,定義網址路徑與元件之間的關係。例如,可以定義在 main 路徑時載入 MainPageComponent。
const routes: Routes = [
  { path: 'main', component: MainPageComponent },
];

@NgModule({
  imports: [RouterModule.forRoot(routes)],
  exports: [RouterModule],
})
export class AppRoutingModule {}
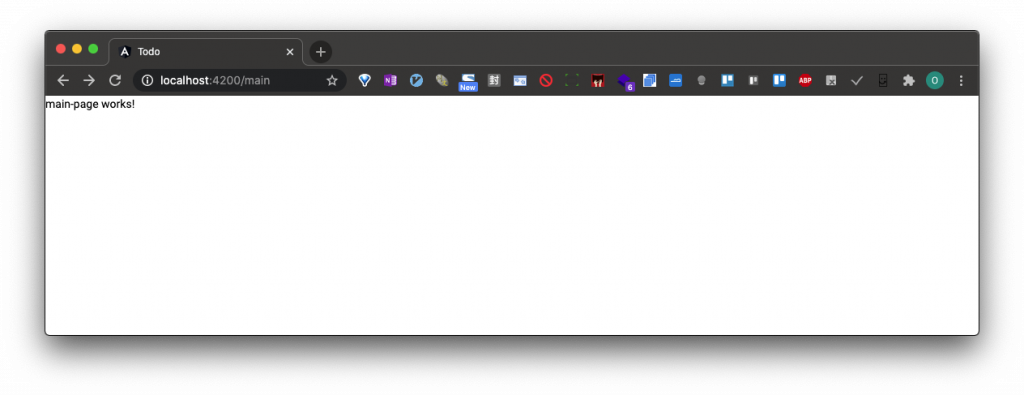
依上面路徑定義方式,可以在瀏覽器中輸入 http://localhost:4200/main 網址來載入頁面,Angular 會從 '/' 後面的路徑與路由定義進行比較,進而載入對象的頁面元件,或拋出找不到路由的例外訊息。
在路由定義中,除了定義路徑與元件之間,還可以利用 redirectTo 屬性定義在特定路徑下轉址到其他路徑中,例如,若要在載入 http://localhost:4200/ 時也載入 MainPageComponent 頁面,就可以加入下面路徑定義。
const routes: Routes = [
  { path: '', pathMatch: 'full', redirectTo: 'main' },
  { path: 'main', component: MainPageComponent },
];
在一般的網頁中,會利用 <a> 標籤的 href 屬性來切換頁面,而在 Angular 應用程式中,則會使用 routerLink 指令來進行頁面的切換。
因此,可以先在 app-routing.module.ts 中加入待辦事項頁面的路由定義,並在 app.component.html 加入頁面導覽列,在此導覽列利用 routerLink 指令來設定要切換的頁面,此指令可以接受字串或陣列。
const routes: Routes = [
  { path: '', pathMatch: 'full', redirectTo: 'main' },
  { path: 'main', component: MainPageComponent },
  { path: 'task-list', component: TaskPageComponent },
];
<nav>
  <a [routerLink]="['main']">首頁</a>
  <a [routerLink]="'task-list'">待辦事項</a>
</nav>
<router-outlet></router-outlet>
同樣式,在 app.component.css 中加入導覽列樣式。
nav {
padding: 10px;
}
nav a {
margin-right: 10px;
border: solid 1px #999;
display: inline-block;
font-size: 12pt;
padding: 10px;
min-width: 80px;
text-align: center;
}
nav a:link,
nav a:visited,
nav a:hover,
nav a:active {
color: black;
text-decoration: none;
}
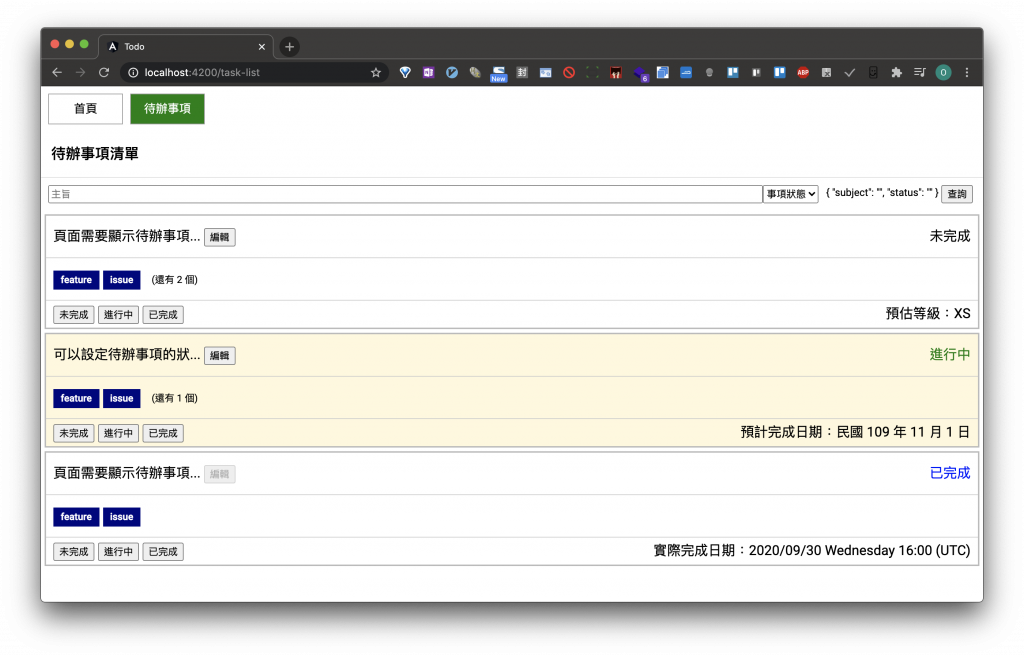
nav a.active {
background-color: green;
color: white;
}
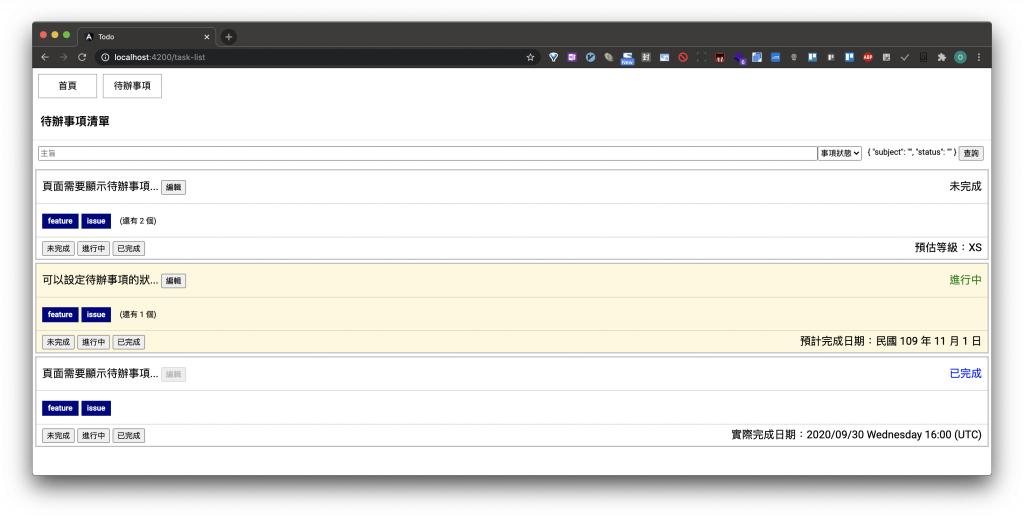
Angular 也提供了 routerLinkActive 指令來指定的樣式類型名稱,讓導覽器的顯示會依當下路由路徑套用不同樣式。
<nav>
  <a [routerLink]="['main']" routerLinkActive="active">首頁</a>
  <a [routerLink]="'task-list'" routerLinkActive="active">待辦事項</a>
</nav>
<router-outlet></router-outlet>
除了利用 routerLink 設定要前往的頁面路徑外,Angular 還提供了 Router 服務元件來設定路由的切換。首先,在 app-routing.module.ts 中再加入待辦事項表單的路由設定。
const routes: Routes = [
  { path: '', pathMatch: 'full', redirectTo: 'main' },
  { path: 'main', component: MainPageComponent },
  { path: 'task-list', component: TaskPageComponent },
  { path: 'task-form', component: TaskFormComponent },
];
接著,在 task-list.component.html 加入新增按鈕,讓使用者可以透過此按鈕切換至待辦事項的表單頁面中,並在 task-list.component.css 加入所需的樣式。
<div class="toolbar">
  <button type="button" (click)="onAdd()">新增</button>
</div>
<form class="search" #form="ngForm" (submit)="onSearch(form)"></form>
最後,在 task-list.component.ts 中注入 Router 服務,並利用此服務元件的 navigate() 方法來切換至表單頁面,此方法會傳入路徑的陣列;或者是利用 navigateByUrl() 方法傳入路徑字串來切換。
export class TaskListComponent implements OnInit {
  constructor(private router: Router, private taskService: TaskRemoteService) {}

  onAdd(): void {
    this.router.navigate(['task-form']);
    // this.router.navigateByUrl('/task-form');
  }
}
這一篇利用 Angular 的路由機制,來實作待辦事項清單與表單的頁面切換;而下一篇則將會實作編輯按鈕功能,來了解如何利用路由機制傳遞資料。