Action Cable 毫無疑問地在 Rails的發展史上立下了ㄧ個重要的里程碑,它將 WebSocket 網路傳輸協定整合在 Rails 框架中,以 Pub/Sub 模式讓開發者得以實現即時更新的功能。
預計 Model 之間的關係會是這樣: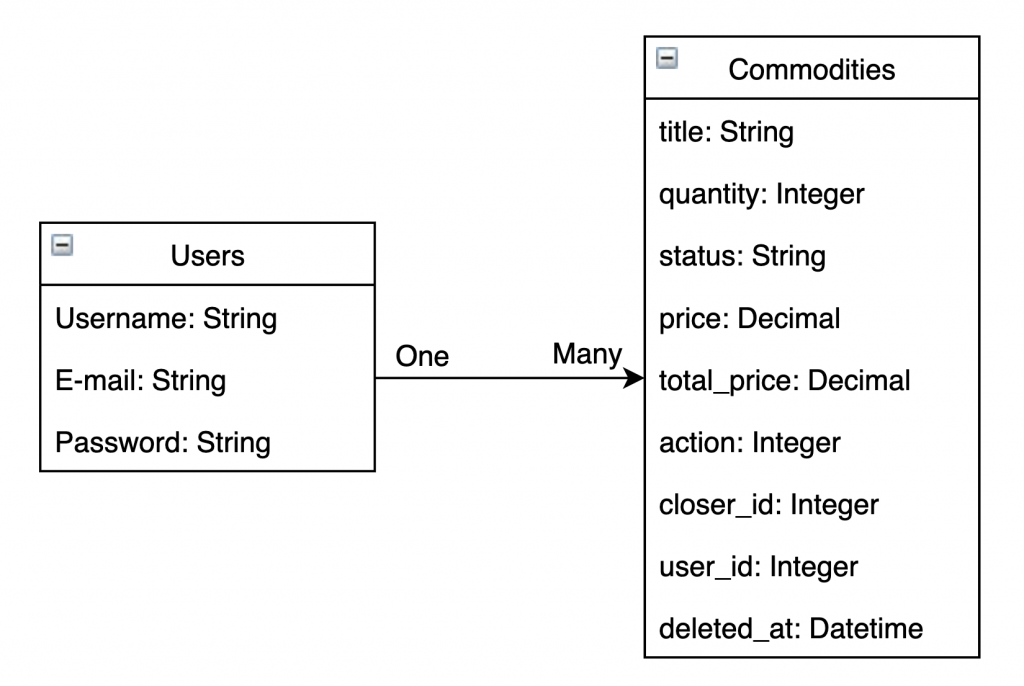
參考:快速實作使用者驗證機制
Branch: "feature/Step_1_User_Authentication"
Branch: "feature/Step_2_Commodity"
參考:實作開發模式 Action Mailer 寄信功能 with Sidekiq
Branch: "feature/Step_3_Action_Mailer"
Branch: "feature/Step_4_Action_Cable"
Branch: "feature/Step_5_Deploy_to_Heroku"
完成後的 Demo
這裡要先設定伺服器與客戶端的連接的認證方式。
" 連接是客戶端-服務器通信的基礎。每當服務器接受一個WebSocket,就會實例化一個連接對象。所有頻道訂閱(channel subscription)都是在繼承連接對象的基礎上創建的。連接本身並不處理身份驗證和授權之外的任何應用邏輯。WebSocket 連接的客戶端被稱為連接用戶(connection consumer)。每當用戶新打開一個瀏覽器標籤、窗口或設備,對應地都會新建一個用戶-連接對(consumer-connection pair)。" from Action Cable 概覽
# app/channels/application_cable/connection.rb
module ApplicationCable
  class Connection < ActionCable::Connection::Base
    identified_by :current_user
    def connect
      self.current_user = find_verified_user
    end
    private
    def find_verified_user
      verified_user =  User.find_by(id: cookies.signed['user.id'])
      if verified_user && cookies.signed['user.expires_at'] > Time.now
        verified_user
      else
        reject_unauthorized_connection
      end
    end
  end
end
這裡 Channel 的概念與 Rails MVC 的 Controller 相近。在預設情況下,Rails 將以 ApplicationCable::Channel為所有頻道的上層,如果有共用的方法或是邏輯就可以放在這裡。
# app/channels/application_cable/channel.rb
module ApplicationCable
  class Channel < ActionCable::Channel::Base
  end
end
接著建立交易平台的頻道,在終端機輸入:rails generate channel board
# app/channels/board_channel.rb
class BoardChannel < ApplicationCable::Channel
  def subscribed
    stream_from "board",
  end
  def unsubscribed
    # Any cleanup needed when channel is unsubscribed
  end
end
頻道建立完成後,登入後的會員就可以訂閱交易平台的頻道,成為頻道訂閱者(subscriber)便可以收到發布的消息。
" 廣播是指發布/訂閱的鏈接,也就是說,當頻道訂閱者使用流接收某個廣播時,發布者發布的內容會被直接發送給訂閱者。
廣播也是時間相關的在線隊列。如果用戶未使用流(即未訂閱頻道),稍後就無法接收到廣播 " from Action Cable 概覽
這次所實作的交易平台在三種情況下需要透過『廣播』,讓訂閱者可即時更新平台上的內容:
因此需要在 Commodity controller 裡的 create 、destroy 及 deal action 廣播
def create
  @commodity = Commodity.new(commodity_params)
  @commodity.user_id = current_user.id

  if @commodity.save
    SendCommodityWorker.perform_async(@commodity.id)
    redirect_to commodities_path, notice: "新增成功"
  else
    render :new
  end
end
--------------------------------------------------------------------
def destroy
  if @commodity.may_cancel?
    RemoveCommodityWorker.perform_async(@commodity.id)
    @commodity.destroy
    @commodity.cancel!
    redirect_to commodities_path, notice: "取消成功"
  else
    redirect_to commodities_path, notice: "此委託單已成交"
  end
end
--------------------------------------------------------------------
def deal
  @commodity = Commodity.find_by(id: params[:id])
  if @commodity && @commodity.trade!
    @commodity.closer_id = current_user.id
    @commodity.save
    RemoveCommodityWorker.perform_async(@commodity.id)
    # 寄給結單使用者
    MailWorker.perform_async(@commodity.closer_id)
    # 寄給掛單委託者
    MailWorker.perform_async(@commodity.user_id)
    # 寄給系統管理員
    MailAdminWorker.perform_async(1, @commodity.user_id,
    @commodity.closer_id)
    redirect_to commodities_path, notice: "下單成功"
  else
    redirect_to commodities_path, notice: "下單失敗"
  end
end
接著建立兩個 worker 讓 sidekiq 處理背景任務:
# app/workers/send_commodity_worker.rb
class SendCommodityWorker
  include Sidekiq::Worker
  sidekiq_options queue: :default, retry: 3
  def perform(commodity_id)
    commodity = Commodity.find(commodity_id)
    html = CommoditiesController.render(
      partial: 'commodity',
      locals: { commodity: commodity }
      ).squish
    ActionCable.server.broadcast "board", html: html
  end
end

# ---------------------------------------------------------
# app/workers/remove_commodity_worker.rb
class RemoveCommodityWorker
  include Sidekiq::Worker
  sidekiq_options queue: :default, retry: 3
  def perform(commodity_id)
    commodity = Commodity.find(commodity_id)
    html = "commodity_#{commodity.id}"
    closed = CommoditiesController.render(
      partial: 'closed_commodity',
      locals: { commodity: commodity }
    ).squish
    ActionCable.server.broadcast "board", deal: html, closed: closed
  end
end
" 訂閱頻道的用戶,稱為訂閱者。用戶創建的連接稱為(頻道)訂閱。訂閱基於連接用戶(訂閱者)發送的標識符創建,收到的消息將被發送到這些訂閱。" from Action Cable 概覽
目前交易平台的設計是不允許訂閱者互相傳送訊息,因此不需要有另外的頻道。登入系統後的訂閱者都會收到相同的訊息:
# app > javascript > channels > board_channel.js
import consumer from "./consumer"
consumer.subscriptions.create("BoardChannel", {
  // Called when the subscription is ready for use on the server
  connected() {
    console.log("Connected to Board channel")
  },
  // Called when incoming data on the websocket for this channel
  received(data) {
   const commodityContainer = document.getElementById('commodities')
   const closed_commodityContainer =
   document.getElementById('closed_commodities')
   const commodityRecords =
   document.getElementsByClassName(data.deal)
   // data['deal'] is equal to data.deal
   // if the "deal" key can't be found in data hash, javascript will
   // return "undefined"
   // it means the create action is required, and vice versa
   if (data['deal']!= undefined) {
     var i = 0;
     do {
       commodityRecords[i].innerText='';
       i += 1;
     } while (i < commodityRecords.length);
     closed_commodityContainer.innerHTML = data.closed +
     closed_commodityContainer.innerHTML;
   }
   else
     commodityContainer.innerHTML = data.html +
     commodityContainer.innerHTML;
  }
});
以上面的程式碼為例:我們用 connected() 方法在 Chrome Console 看出是否有出現 " Connected to Board Channel",有出現的話就代表成功連到 Board channel。
另一個 received(data) 方法則是代表當資料從頻道取得後,要作如何的操作。在這裡可以在 HTML 的 tr 元素裡綁住新增的『商品委託單ID』,再以 class 的方式來選取該筆新增的資料。
 " <tr class='commodity_28'>
   <td>28</td>
   <td>買進</td>
   <td>台積電</td>
   <td>5</td>
   <td>$100.0</td>
   <td>$500.0</td>
   <td>
     <a data-confirm="確認要賣出嗎?" class="btn btn-outline-primary"
      rel="nofollow" data-method="post" href="/commodities/28/deal">
      賣出
     </a>
   </td>
   </tr> "
確認有抓下來該筆資料後,可用 data.html + commodityContainer.innerHTML 把新增的資料加在原有資料表裏的最上方。
Branch: "feature/Step_5_Deploy_to_Heroku"
這邊是完成後的 Demo
Action Cable Overview
Action Cable 概覽
Ruby on Rails 中的 Sidekiq 的介紹與應用
Demo 壞了 ?
很抱歉,由於本月我在Heroku上的免費時段已用完,所以要等到11月才能恢復正常了。
謝謝通知
ok thanks ?


 iThome鐵人賽