
Sidekiq 是ㄧ個功能齊全並且能夠快速處理背景任務的Ruby架構。它搭配Redis(key-value 的記憶體資料庫) ,提升性能及整合 Rails 的應用程式,例如處理大量耗時的計算、寄送電子信件、或是定期的報表製作。
接下來需要先了解以下主題:
實作之前準備:
Rails 有提供內建的 Action Mailer 功能,所以只要在終端機輸入以下指令:
rails generate mailer UserMailer
之後修改預設的 from@example.com 為寄件人的 E-mail。
# app/mailers/application_mailer.rb
class ApplicationMailer < ActionMailer::Base
  default from: 'from@example.com'
  layout 'mailer'
end

# app/mailers/user_mailer.rb
class UserMailer < ApplicationMailer
end
Mailer 也有類似像 Controller 的 action, 也會依照慣例對應到 view。在 UserMailer 中我們新增 “ welcome_email “ action, 從 params 中取得該使用者的 E-mail後,再寄出信件。
# app/mailers/user_mailer.rb
class UserMailer < ApplicationMailer
  default from: 'postmaster@chienhao.tw'

  def welcome_email
    @user = params[:user]
    @url = 'https://taskmanager0117.herokuapp.com/login'
    mail(to: @user.email, subject: "Welcome to Task Manager")
  end
end
新增歡迎信件的樣板
# app/views/user_mailer/welcome_email.html.erb
<!DOCTYPE html>
<html>
  <head>
    <meta content='text/html; charset=UTF-8' http-equiv='Content-Type' />
  </head>
  <body>
    <h1>Welcome to Task Manager, <%= @user.username %></h1>
    <p>
      You have signed up to taskmanager0117.herokuapp.com,
      your username is: <%= @user.email%><br>
    </p>
    <p>
      To login to the site, just follow this link: <%= @url %>.
    </p>
    <p>
      Thanks for joining and have a great day!
    </p>
  </body>
</html>
當使用者註冊成為會員時,就會收到來自系統的歡迎信件。因此在 UserController 的 create action時就要呼叫 UserMailer 執行寄信動作。
# app/controllers/users_controller.rb
def create
  @user = User.new(user_params)
  if @user.save
    UserMailer.with(user: @user).welcome_email.deliver_later
    redirect_to root_path, notice: "#{@user.username} 已註冊成功!"
  else
    @error_message = @user.errors.full_messages.to_sentence
    render :new
  end
end
從 gandi 取得 SMTP 以及帳號、密碼資訊之後,再修改 development.rb 的設定檔,便可以利用 gandi 的 SMTP 伺服器寄信。 當然帳號及密碼都是需要利用環境變數存放,可以試試 figaro 來設定你自己的環境變數。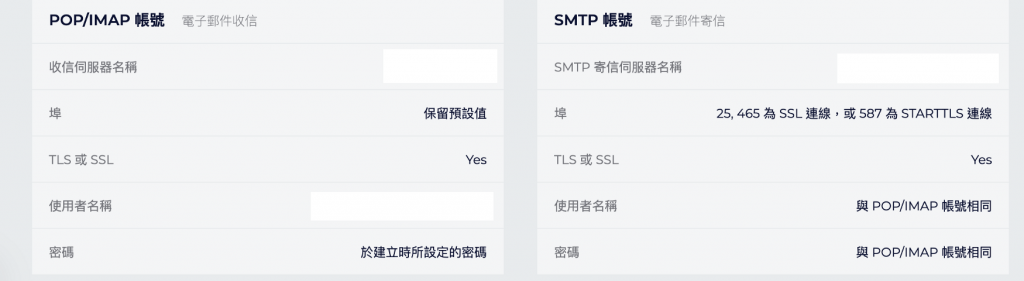
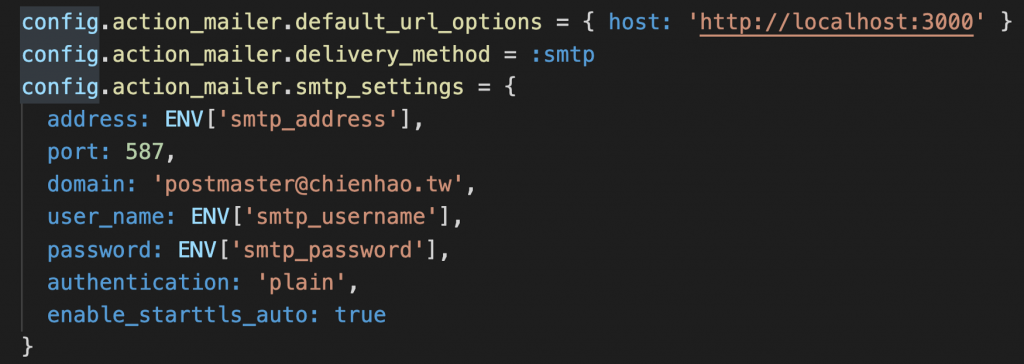
順利的話,以上設定完成後就可以寄信件出去了!!
首先在 Gemfile 裡新增 Sidekiq,然後記得要 bundle
gem 'sidekiq',‘~> 6.0’, ‘>= 6.0.6’
接著你可以在不同環境(development.rb / production.rb) 做以下設定,或是直接設定在 application.rb 都可以
config.active_job.queue_adapter = :sidekiq
如同先前所說 Sidekiq 是搭配 Redis 來做存取背景任務,所以要在終端機內輸入以下指令來安裝 Redis
brew install redis
成功完成安裝 Sidekiq 後,便可以開始新增 一個 worker 來處理信件的寄送。
# app/workers/mail_worker.rb
class MailWorker
  include Sidekiq::Worker
  sidekiq_options queue: :default, retry: 3
def perform(user_id)
    user = User.find(user_id)
    if user
      UserMailer.welcome_email(user).deliver_later
    else
      errors.add(:base, '找不到使用者')
      throw(:abort)
    end
  end
end
注意:你的 perform 方法內的引數必須是簡單的屬性且能夠被 JSON 所支援,例如:字串、整數或是布林值。複雜的 Ruby 物件是不被允許的,比較好的作法就是將 user_id 傳進去方法裡,再取得所需要的 User 物件
修改 Users Controller 內的 create action
# app/controllers/users_controller.rb
def create
  @user = User.new(user_params)
if @user.save
    MailWorker.perform_async(@user.id)
    redirect_to root_path, notice: "#{@user.username} 已註冊成功!"
  else
    @error_message = @user.errors.full_messages.to_sentence
    render :new
  end
end

###  注意:perform 是實體方法,而 perform_async 類別方法
在 UserMailer 的 welcome_email 方法將取得 User 物件, 並從參數中取得該使用者的 E-mail後,便可以寄出信件。
# app/mailers/user_mailer.rb
class UserMailer < ApplicationMailer
  default from: 'postmaster@chienhao.tw'
def welcome_email(user_object)
    @user = user_object
    @url = 'https://taskmanager0117.herokuapp.com/login'
mail(to: @user.email, subject: "Welcome to Task Manager")
  end
end
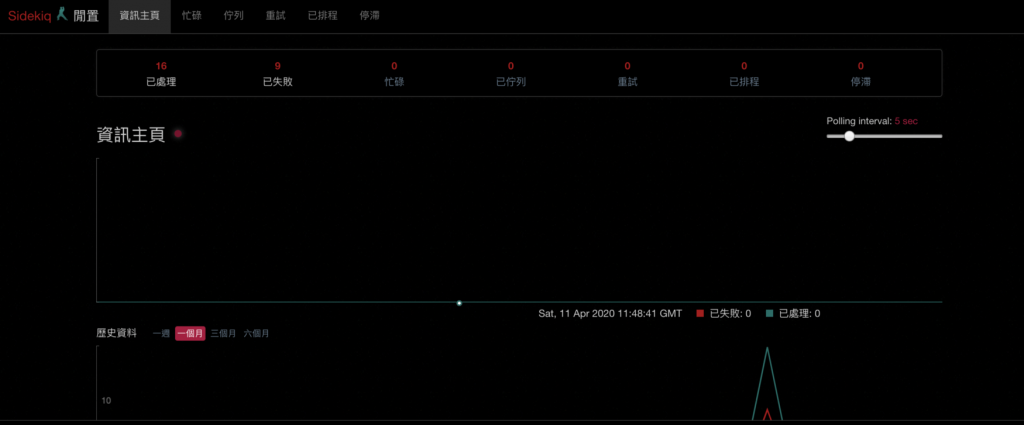
Sidekiq 提供Web UI 介面可以看出目前有哪些任務在執行,在routes.rb加入
# config/routes.rb
require 'sidekiq/web'
mount Sidekiq::Web => '/sidekiq'
這邊要注意的是 mount 並沒有提供權限控管,所以任何人都可以檢視 Web UI 介面。如果你是使用 Devise 會員系統,可以加上
authenticate :user, ->(user) { user.admin? } do
  mount Sidekiq::Web => '/sidekiq'
end
更多的詳細資料可以閱讀在 Sidekiq 的 Wiki-Monitoring
此步驟需要在終端機開啟
測試註冊一個會員後,是否有收到信件?以及在 http://localhost:3000/sidekiq 是否有看到 Web UI?
Action Mailer Basics - Ruby on Rails Guides
寄發信件 | 高見龍
mperham/sidekiq

 iThome鐵人賽