Hi 各位,今天不寫網頁,而要來做一個桌面應用程式啦!是不是很興奮呢?感覺好像不是只在 Web 這個圈圈了哈哈,具體我們會用 Electron 這個框架來包裝網頁,那就廢話不多說~GO!
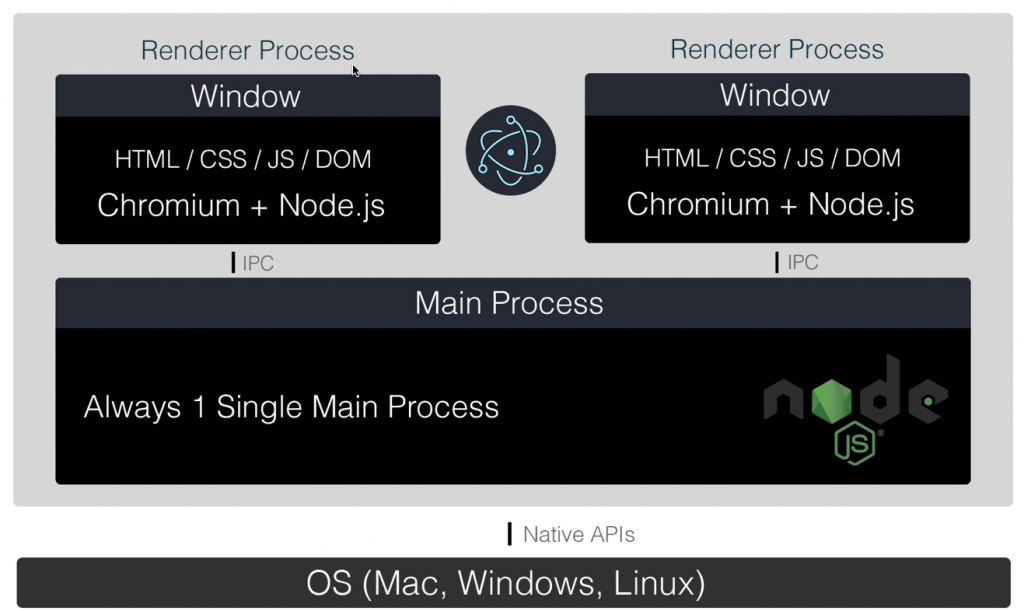
Electron 是一個將 JavaScript、HTML 與 CSS 等網頁技術轉換為桌面應用程式的框架,轉換後可於 Mac、Windows 以及 Linux 上運行,像是 VSCode、Slack 電腦版等等都是用它寫的,開始寫 Code 之前先了解一下他的架構
Chromium 是 Google 為了發展 Chrome 而開啟的開源專案,有點像是 Chrome 的先行測試版,Electron 將 Chromium 包入其中,好讓網頁能在其運行,大體架構像桌面應用程式內包著瀏覽器,實現了網頁跨平台開發,而其缺點就是打包成安裝檔時必須將 Chromium 包入,導致安裝檔偏大
桌面應用程式當然需要能與電腦系統做溝通,而這點通過 Node.js 實現,Electron 透過 Node.js 使用本地端的檔案與系統的操作
在 Electron 中僅有一個主進程 Main,在主進程中可使用 Node.js 操控系統端,而渲染進程 Renderer 的數量與開啟的視窗數量相同,僅有部分 Electron API 可在這使用,例如:shell、clipboard 等等,而 IPC(IPC,Inter-Process Communication)就是兩者溝通的橋樑,Electron 為了方便開發者實作,在 API 提供了 ipcMain 與 ipcRenderer,之後提到會再介紹
Electron 官方提供了一個專案 template 供開發者使用,以下就跟著步驟創建專案吧
$ git clone https://github.com/electron/electron-quick-start
$ cd electron-quick-start
$ npm install && npm start
建立專案之後會看到裡面的東西如下,我們一個一個來看裡面寫了什麼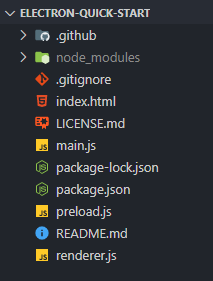
此檔案為專案的進入點,在這邊可以使用 Electron 與 Node.js 的功能
// main.js

const { app, BrowserWindow } = require('electron')
const path = require('path')

// 建立應用程式視窗的 function
function createWindow () {
  // 應用程式視窗設定
  const mainWindow = new BrowserWindow({
    width: 800,
    height: 600,
    webPreferences: {
      // 載入 preload.js
      preload: path.join(__dirname, 'preload.js')
    }
  })

  // 載入 index.html,亦可載入某個網址
  mainWindow.loadFile('index.html')
  // 打開開發者模式
  mainWindow.webContents.openDevTools()
}

// 完成初始化後執行此方法
app.whenReady().then(() => {
  createWindow()

  // 運用程式運行時,點擊工具列圖示時觸發(macOS)
  app.on('activate', function () {
    if (BrowserWindow.getAllWindows().length === 0) createWindow()
  })
})

// 關閉所有視窗時觸發,除 macOS 以外
app.on('window-all-closed', function () {
  // darwin 為 macOS 的作業系統
  if (process.platform !== 'darwin') app.quit()
})
此檔案在 main.js 中 new BrowserWindow 時載入,一樣可使用 Electron 與 Node.js 的功能,DOMContentLoaded 後可操控 DOM 元素,而這邊的範例就是將 Node.js 抓到的版本號覆寫到畫面的 DOM
window.addEventListener('DOMContentLoaded', () => {
  const replaceText = (selector, text) => {
    const element = document.getElementById(selector)
    if (element) element.innerText = text
  }

  for (const type of ['chrome', 'node', 'electron']) {
    replaceText(`${type}-version`, process.versions[type])
  }
})
這就是我們的畫面內容,最後載入的 renderer.js 即是我們一般網站載入的 JavaScript 檔案,所以在 renderer.js 內無法使用直接使用 Electron 與 Node.js 的功能,要透過一些其他的方法
<!DOCTYPE html>
<html>
  <head>
    <meta charset="UTF-8">
    <meta http-equiv="Content-Security-Policy" content="default-src 'self'; script-src 'self'">
    <meta http-equiv="X-Content-Security-Policy" content="default-src 'self'; script-src 'self'">
    <title>Hello World!</title>
  </head>
  <body>
    <h1>Hello World!</h1>
    We are using Node.js <span id="node-version"></span>,
    Chromium <span id="chrome-version"></span>,
    and Electron <span id="electron-version"></span>.

    <!-- 載入 renderer.js -->
    <script src="./renderer.js"></script>
  </body>
</html>
前面有說到 Electron 提供了 ipcMain 與 ipcRenderer 供開發者使用,接下來介紹一下如何實作
這是比較傳統的作法,使用 ipcMain.on 與 ipcRenderer.on 監聽事件,使用 event.reply 打回另一個事件,或是使用 send 主動發出事件,要留意的是主進程主動送出事件必須在建立視窗後使用 mainWindow.webContents.send
// main.js(主進程)

const { ipcMain } = require('electron')

// 監聽渲染進程打過來的 Event-A
ipcMain.on('Event-A', (event, arg) => {
  // 發一個 Event-B 到渲染進程
  event.reply('Event-B', params)
})

// 發送事件 Event-C
mainWindow.webContents.send('Event-C', params)
// preload.js(渲染進程)

const { ipcRenderer } = require('electron')

// 監聽主進程打過來的 Event-D
ipcRenderer.on('Event-D', (event, arg) => {
  // 發一個 Event-E 到主進程
  event.reply('Event-E', params)
})

// 發送事件 Event-F
ipcRenderer.send('Event-F', params)
同步的作法比較不建議使用,因為它會由渲染進程發出事件後進行等待回傳,等待期間不執行任何程式碼,回傳值後才會繼續往下跑,有可能造成進程堵塞,使用方法由渲染進程發出 ipcRenderer.sendSync 事件
// main.js(主進程)

const { ipcMain } = require('electron')

// 監聽渲染進程打過來的 Event-A
ipcMain.on('event-A', (event, arg) => {
  // 同步事件使用 returnValue 回傳值
  event.returnValue = params
})
// preload.js(渲染進程)

const { ipcRenderer } = require('electron')

// 發出事件並等待回傳
ipcRenderer.sendSync('Event-A', params)
非同步方法就是同平常寫網頁的 Promise 一樣,亦可使用 async 與 await 方法,而渲染進程需要使用 ipcRenderer.invoke 來做呼叫,主進程使用 ipcMain.handle 監聽
// main.js(主進程)

const { ipcMain } = require('electron')

// 監聽一個非同步事件 Event-A
ipcMain.handle('Event-A', async (event, arg) => {
  // await a Promise
  return params
})
// preload.js(渲染進程)

const { ipcRenderer } = require('electron')

// 發出一個非同步事件 Event-A
ipcRenderer.invoke('Event-A', 'parameter').then(res => {
  // do something...
})
了解了 IPC 的運用後我們來實作看看,假若現在需要做一個按鈕,按下去能將應用程式關閉,上面介紹 IPC 時都在 preload.js 內實作,但假若今天有多頁時,換頁時不可能再重新載入一次 preload.js,所以這邊使用另一個方法,將 ipcRenderer 寫到 window 內,那在各自頁面的 renderer.js 內就可以使用該功能了
<!-- index.html -->

<body>
  <button id="close">close</button>
  <script src="./renderer.js"></script>
</body>
// main.js

ipcMain.on('close', () => app.quit())
// preload.js

const { ipcRenderer } = require('electron')
window.ipcRenderer = ipcRenderer
// renderer.js

document.querySelector('#close').addEventListener('click', () => {
  ipcRenderer.send('close')
})
這邊要注意一下,不是每個功能都可以透過這種方法來使用,有些不允許渲染進程操作的 Electron API 方法還是會報錯的
打包我們使用 electron-builder 來處理,首先安裝套件
$ npm install electron-builder --save-dev
安裝之後在根目錄新增一個 icon.png,接著在 package.json 內新增打包設定
// package.json

{
  "name": "electron",
  "version": "1.0.0",
  "description": "description",
  "author": "Ares",
  "scripts": {
    "start": "electron .",
    // 打包免安裝檔
    "pack": "electron-builder --dir",
    // 打包安裝檔
    "dist": "electron-builder"
  },
  "build": {
    "appId": "your.id",
    "mac": {
      "category": "your.app.category.type"
    }
  }
}
最後執行指令就可以看到檔案在 dist 資料夾內囉
$ npm run pack
$ npm run dist
此篇大概了解了 Electron 的運作方式,基本上跟網頁的不同就是多出了主進程與渲染進程的概念,本來就會寫網頁的上手起來並不難,搭配其他一些 Electron API 能做更多的系統相關操作,不過那就留到之後再來介紹囉!
ElectronJS 的同志越來越多了 
有空一起交流 ElectronJS 
剛好工作上有用到~
你寫的文章也幫我很多
感謝大神
請問Electron就是Electron.js?
 Ares
Ares

 iThome鐵人賽