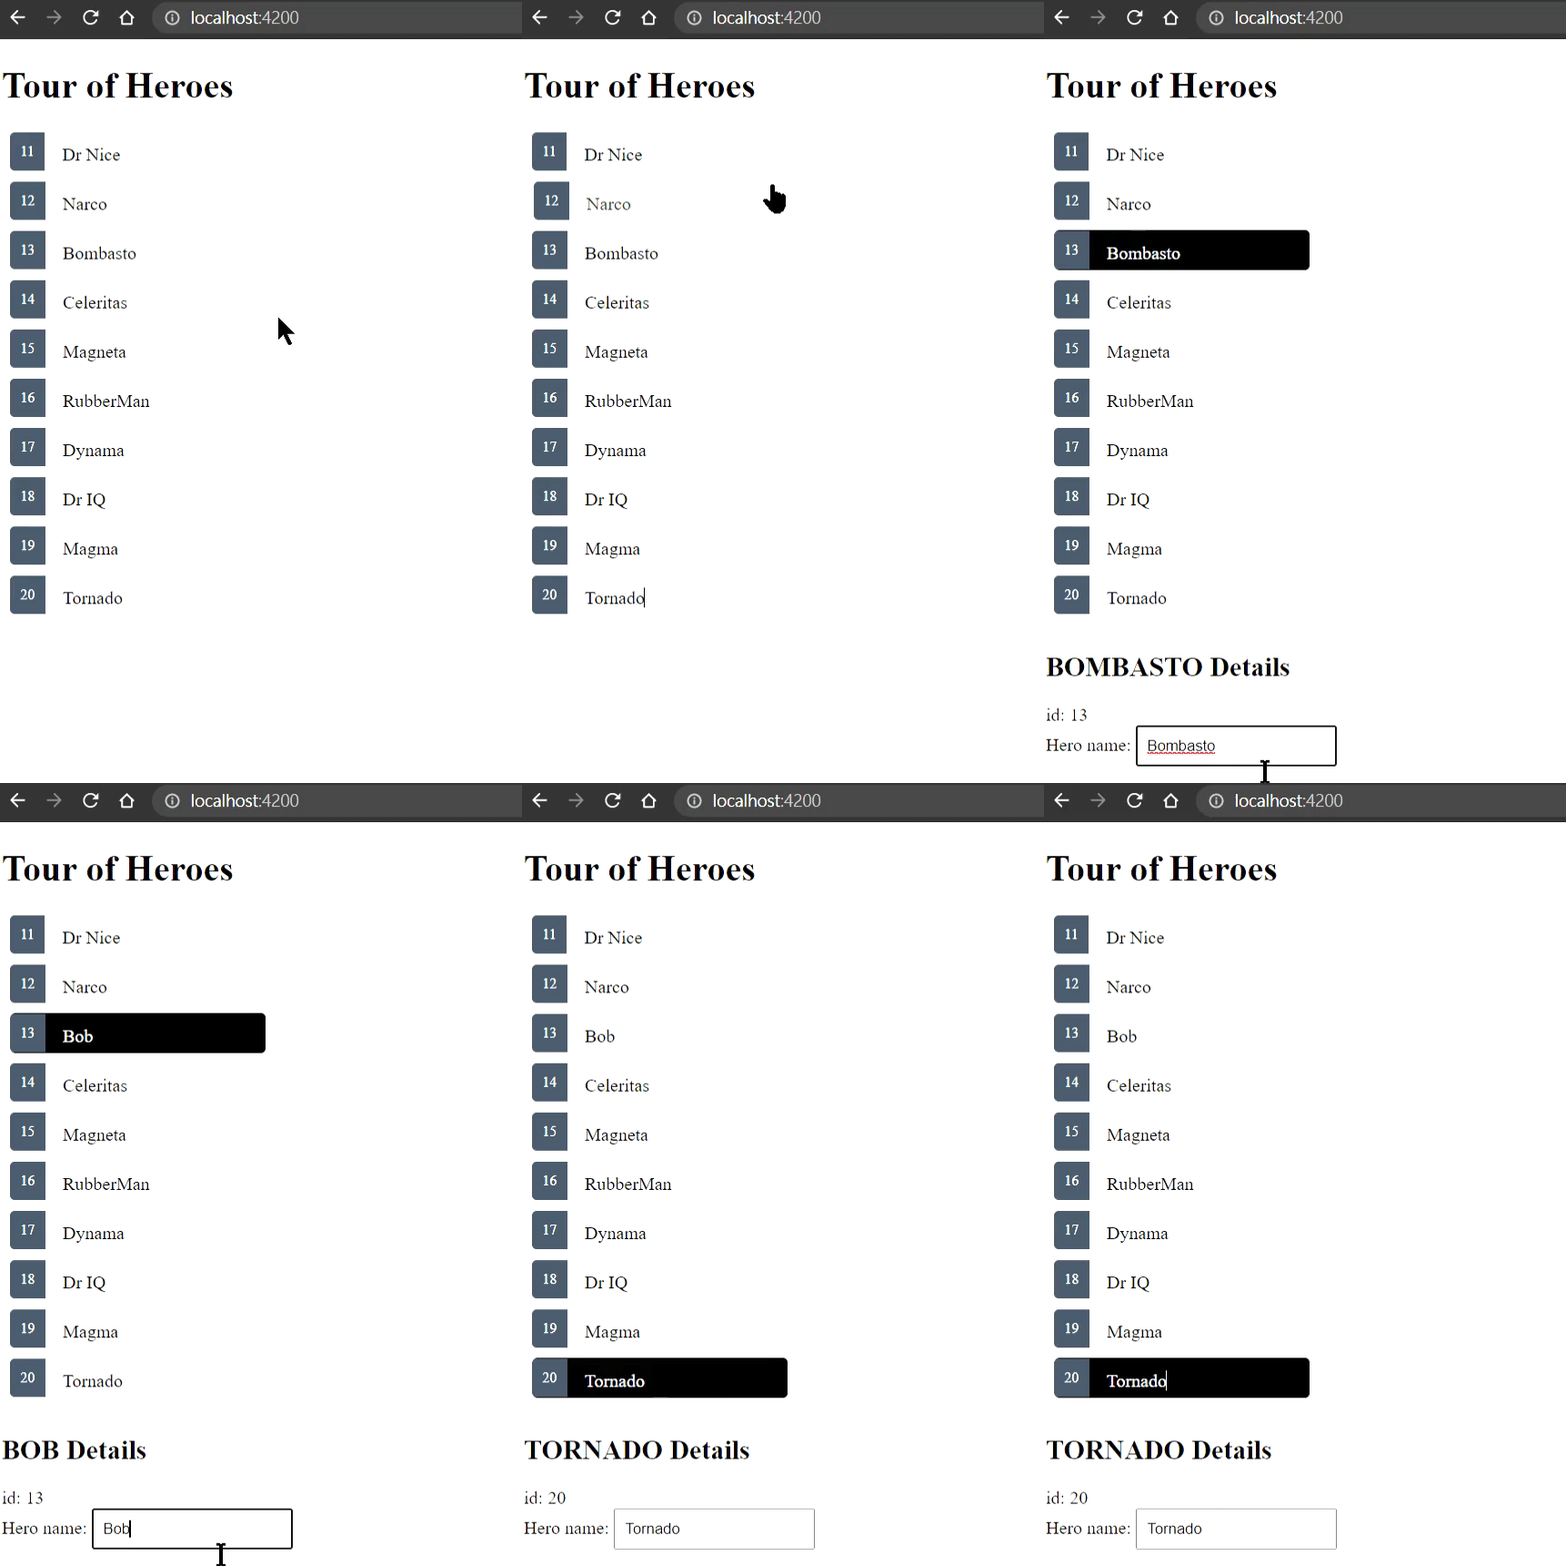
這篇內容是紀錄閱讀官方文件Display a selection list,文章主要內容是介紹如何創一個列表讓使用者可以點擊其中一個選項,並呈現出該被點擊英雄的詳細資料。
這邊的範例是延續本系列文章的 Day03 的專案內容。
step 1.
在這邊我們會創出一群英雄的靜態資料,來模仿我們從伺服器接使用者的資料進來。
我們在 src/app 的目錄底下創一個檔案叫 mock-heroes.ts,裡面儲存了所有英雄的資料。
--- mock.heroes.ts --
import { HERO } from './hero';

export const HEROES: HERO[] = [
  { id: 11, name: 'Dr Nice' },
  { id: 12, name: 'Narco' },
  { id: 13, name: 'Bombasto' },
  { id: 14, name: 'Celeritas' },
  { id: 15, name: 'Magneta' },
  { id: 16, name: 'RubberMan' },
  { id: 17, name: 'Dynama' },
  { id: 18, name: 'Dr IQ' },
  { id: 19, name: 'Magma' },
  { id: 20, name: 'Tornado' }
]
上面的資料內容,先 import 在 hero.ts 檔案中定義的 HERO interface 資料格式。
接著,創出一個叫 HEROES 的陣列而且該陣列的元素都依照 HERO 的資料格式來定義該英雄的屬性內容。
最後,再將這個創出來的陣列 export 出去,讓外部的檔案可以引入此檔案的內容。
step 2.
我們將這個英雄的資料接到 heroes 元件的 ts 檔案中,並將陣列資料指定到 heroes 元件的資料成員,並用 *ngFor 的語法來遍歷這個成員,將所有資料渲染到畫面中。
--- heroes.component.ts ---
import { HEROES } from '../mock-heroes.ts';

@Component({
  selector: 'app-heroes',
  templateUrl: './heroes.component.html',
  styleUrls: ['./heroes.component.css']
})
export class HeroesComponent implements OnInit {
	// ...
  heroes = HEROES // 將 HEROES 資料指定給 heroes 這個資料成員
}


--- heroes.component.html ---
<ul>
	<li *ngFor="let hero of heroes">
		<span class="badge">{{hero.id}}</span> {{hero.name}}
	</li>
</ul>
完成以上步驟之後,應該可以看到陣列的資料被渲染到畫面中囉。
這個部分是紀錄如何監聽物件的點擊事件並呈現被點擊英雄的詳細資料。
---hero.component.html ---
<ul>
	<li *ngFor="let hero of heroes" (click)="onSelect(hero)">
		<span class="badge">{{hero.id}}</span> {{hero.name}}
	</li>
</ul>
可以看到我們在 li 上監聽 click 事件且會去呼叫 onSelect 事件並將被點擊的英雄物件傳入 onSelect 事件。
在 Angular 中,綁定監聽事件是用括號(parentheses) 將監聽事件包起來,後面跟著要回呼的事件。跟 Vue 的寫法蠻像的 @click="onSelect(hero)"。
上面的部分,是寫如何在元件的 html 檔案上綁定點擊的監聽事件。
這邊就要在 hero.component.ts 中,定義 onSelect 函式內容
--- heroes.component.ts ---
@Component({
  selector: 'app-heroes',
  templateUrl: './heroes.component.html',
  styleUrls: ['./heroes.component.css']
})
export class HeroesComponent implements OnInit {
	// ...
  selectedHero?: Hero  // 限定 selectedHero 的資料型別要跟 Hero 一樣
  onSelect(hero:Hero): void{
    this.selectedHero =  hero
  }
}
這邊我們就要將被選擇英雄的詳細資料渲染到畫面上面了。
所以,我們要將 selectedHero 的資料加到 heroes 元件的 html 檔案中。
--- heroes.component.html ---
<div>
  <h2>{{selectedHero.name | uppercase}} Details</h2>
  <div><span>id: </span>{{selectedHero.id}}</div>
  <div>
    <label for="hero-name">Hero name: </label>
    <input id="hero-name" [(ngModel)]="selectedHero.name" placeholder="name">
  </div>
</div>
當你加上這些內容之後,重新整理你的網頁,應該會報錯
這個錯誤提示訊息是說明 selectedHero 這個物件可能是 undefined。
會造成這個狀況的原因是因為一開始進入網頁,我們還沒有點擊列表中的任何一個英雄,所以,selectedHero 沒有被設入任何資料,是一個undefined 的狀態,當然就會報錯囉。
所以,我們要在外層的 div 中加入 *ngIf 來判定是否 selectedHero 有資料,若有才˙渲染它的內容,以此方式來消除以上的錯誤。
<div *ngIf="selectedHero">  // 加入 *ngIf 的判定
  <h2>{{selectedHero.name | uppercase}} Details</h2>
  <div><span>id: </span>{{selectedHero.id}}</div>
  <div>
    <label for="hero-name">Hero name: </label>
    <input id="hero-name" [(ngModel)]="selectedHero.name" placeholder="name">
  </div>
</div>
這樣就沒有錯誤囉~~
Okay~~ 教完如何在元件上綁定監聽事件之後,終於來到之前所提到的為被點擊的英雄區塊加入特別的 css 樣式的部分。
在這個部分,就會講到要如何動態地加入 className 到 html DOM 上。
Angular 動態加入 className 的語法為: [class.some-css-class]="some-condition"
在方括號中的 class. 後面接的是你想要加入的 className,然後,some-condition 的部分是加入判斷式,所以,以上的語法意思為當滿足 some-condition 的判斷式,就會為此 DOM 加入 some-css-class 的 className。
所以,運用到我們的範例中的話,程式的內容如下
<li *ngFor="let hero of heroes" [class.selected]="hero === selectedHero" (click)="onSelect(hero)">
	<span class="badge">{{hero.id}}</span> {{hero.name}}
</li>
其語法意思為當 hero 和 selectedHero 相同的話,就為這個 li 加上 selected 的 className。
如此就可以達到我們想要的效果囉。
而有關 selected 的詳細的 css 樣式設定,在官方文件中就有寫了,我這邊就先不贅述了。
經過以上的操作之後,畫面上點選指定英雄之後,可以出現該英雄的詳細資料,並且可以透過 input 欄位來更改該英雄的名稱,像下面的 gif 呈現的結果
這邊做的總結,在本章中學到了
*ngIf 來防止當一進入網頁時,某些物件還未被設入資料所造成的錯誤[class.some-css-class]="some-condition" 來為 DOM 動態加入 className