
在上一張中介紹了 property binding 是用來將 Component 中的 property 綁定給 HTML Tag 的 property,還介紹了 event binding 是用來將 Component 中的 method 綁定給 HTML Tag 用來監聽畫面事件,而本章將持續介紹兩種 binding 方式。
Attribute binding 可以用來讓你在開發 Template 時直接設置 property 值,透過 attuibute 可以提高訪問性、動態設置畫面樣式與可以同時管理多個 CSS Class 或樣式。
在大部分的情況下,對於設置 HTML 元件屬性都建議你都使用 property binding 來做,但是有時候會遇到你可能要綁定某一個元件的某個屬性,但這個元件並沒有這個屬性,如果強制使用 property binding 則會出錯,這實際需要使用 attibute binding了,比如說 ARIA(WAI-ARIA) 或 SVG(Scalable Vector Graphic) 都是 purely attribute,代表他們既沒有元件的 property 也無法對他進行設置,這時就必須使用 attribute binding。
到這邊可能有滿多新手開始頭暈了,attribute 跟 property 不是都是屬性嗎?有什麼不一樣,這邊簡單來說 attributes 由 HTML 定義,所有出現在 HTML 標籤內的描述皆為 attributes ,而 DOM properties 則是 標準的 HTML attributes 經過瀏覽器解析後會產生相對應的 DOM properties,有興趣可以看看 這篇文章 裡面詳細的介紹了什麼是 HTML attribute 與 DOM Property 的區別。
要了解一個新的用法就必須先瞭解他的語法,而 attribure binding 的語法與 property binding 相似,但不是將 element property 放在括號之間,而是在 attuibute 前面加上一個前綴字 attr 後跟一個點(.),這樣就會把你輸入在後面的字串表達式解析成 attribute 值。
Note: 這邊的介紹可能都會使用英文介紹對應的專有名詞,畢竟 property 與 attribute 的中文都是屬性...
<p [attr.attribute-you-are-targeting]="expression"></p>
注意喔!如果將後面的字串表達式設置為 null 或 undefined 的話,Angular 會直接將這個屬性完全刪除。
舉個 attribute binding 的例子吧,常見的使用 attribute binding 的例子是 table 中的 colspan attribute,colspan 是用來改變一個單元的格子應該跨越多少格,所以如果使用 attribute binding 可以做到動態這是 table。
<!--  expression calculates colspan=2 -->
<tr><td [attr.colspan]="1 + 1">One-Two</td></tr>
這樣的設定可以使綁定的 <tr> 跨越兩列。
Note: 要注意,<tr> 元件擁有的是 colspan attribute,而如果是 property 的話則是 colSpan,大小寫要非常注意!
attribute 還有一個常用的用法,就是用於綁定 element 中的 CSS class,可以做到同時新增或刪除等管理多個 CSS class。
如果要綁定單個 CSS class 請使用 class 當作前綴後面跟上一個點(.)和 CSS class 的名稱,例如 [class.sale]="onSale",當訂的表達是為 true 時 Angular 會為這個 element 多添加一個 CSS class,反之則會被移除。
如果要同時綁定多個 CSS class 請使用 [class],例如:[class]="classExpression",插入的表達是可以是:
空格分隔的 CSS class 的名字attribute binding 也可以做到動態設置你的 element stype。
要創建單個的 style binding,請使用前綴字 style後跟一個點(.)和 CSS stype property,例如 [style.width]="width", Angular 將 property 設置為綁定表達式的值,通常是一個字串或著可以添加像 em 或 % 的單位擴展符。
Note: 可以使用破折號或駝峰命民法來編寫 style property 的名稱
<nav [style.background-color]="expression"></nav>

<nav [style.backgroundColor]="expression"></nav>
要綁定多個 style 請綁定到 [style] property,例如 [style]="styleExpression" 而 styleExpression 可以是以下之一:
"width: 100px; height: 100px; background-color: cornflowerblue;"
{width: '100px', height: '100px', backgroundColor: 'cornflowerblue'}
Note: 注意! [style] 不像 [class] 一樣支持綁定陣列喔!
可以將多個源頭的值綁定給單一 HTML element 的 CSS class 和 style,當同一個 CSS class 或 style property 有多個綁定時,Angular 會遵循一組優先規則解決衝突並確定哪些 CSS class 或 stype 最終被應用於 HTML element。
<div [class.foo]="hasFoo"> or <div [style.colo]="color">
<div [class]="classExpr"> or <div [style]="styleExpr"
<div class="foo"> or <div style="color: blue">
host: {'[class.foo]': 'hasFoo'} or host: {'[style.color]': 'color'}
host: {'[class]': 'classExpr'} or host: {'[style]': 'styleExpr'}
host: {'class': 'foo'} or host: {'style': 'color: blue'}
host: {'[class.foo]': 'hasFoo'} or host: {'[style.color]': 'color'}
host: {'[class]': 'classExpr'} or host: {'[style]': 'styleExpr'}
host: {'class': 'foo'} or host: {'style': 'color: blue'}
可以看到 CSS class 或 style 越具體其優先級就越高,綁定到特定 CSS class([class.foo])會優先於通用 [class] 的綁定,而通用 [class] 的綁定又會優先於特定樣式綁定([style.bar]),而他又會優先於通用 [style] 的綁定。
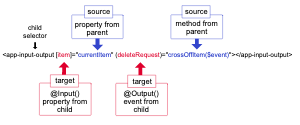
介紹完 attribute, class, style binding 後,接著要來介紹另一個非常常用的 binding 方法 Two-way binding,還記得在前幾天介紹的 @Input() 與 @Output() 嗎?在父層的 HTML 中如果要傳遞數據給子層,需要將父層的 property 利用 porperty binding 將它放入中括號 ( [ ] ) 中傳遞給子層,而父層要接受子層傳遞的數據時,需要利用 event binding 將子層的 EventEmitter 放括號中,當子層傳遞數據時觸發父層中綁定的 method
<app-childComponent [inputData]="inputData" (outputData)="onChildOutpu($event)"></app-childComponent>
所以如果同一個子層同時要有 @Input() 與 @Output() 那就會把他家的很長不太好看,所以 Angular 提供了 Two-way binding,將 property binding 與 event binding 整合再一起,語法是將方括號與圓括號組合再一起 [()]。
<app-sizer [(size)]="fontSizePx"></app-sizer>
要讓 Two-way binding 可以正常運作需要將 @Output() property 使用 inputChange 模式,其中 input 是 @Input() 的名稱,舉例來說當你的 @Input() 命名為 size 則要將 @Output() 命名為 sizeChange,讓我們舉個例吧
在 child.component.ts 中建立一個 @Input() 屬性 size 與 @Output() 屬性 sizeChange 並加入三個 method
import { Component, Input, Output, EventEmitter } from '@angular/core';

@Component({
  selector: 'app-child',
  templateUrl: './child.component.html',
  styleUrls: ['./child.component.css'],
})
export class ChildComponent {
  @Input() size!: number | string;                             // (1)
  @Output() sizeChange = new EventEmitter<number>();           // (2)
  constructor() {}

  dec() {                                                      // (3)
    this.resize(-1);
  }
  inc() {                                                      // (4)
    this.resize(+1);
  }

  resize(delta: number) {                                      // (5)
    this.size = Math.min(40, Math.max(8, +this.size + delta));
    this.sizeChange.emit(this.size);
  }
}
在 child.component.html 中新增兩個按鈕用於讓使用者增加或減少字體大小,和使用 text interpolation 將 size 插入到 template 中
<div>
  <button (click)="dec()" title="smaller">-</button>
  <button (click)="inc()" title="bigger">+</button>
  <label [style.font-size.px]="size">FontSize: {{size}}px</label>
</div>
在 parent.component.ts 中新增一個 property
import { Component } from '@angular/core';

@Component({
  selector: 'app-parent',
  templateUrl: './parent.component.html',
})
export class ParentComponent {
  frontSizePx = 16;
  constructor() { }
}
在 parent.component.html 中將 frontSizePx 使用 Two-way binding 綁定給子層
<app-child [(size)]="fontSizePx"></app-child>
<div [style.font-size.px]="fontSizePx">Resizable Text</div>

在畫面中可以看到,當我們點擊畫面中的 button 後,首先先讓子層向父層傳遞更改的大小,父層收到後再透過 @Input() 將變更的大小傳遞回子層讓子層可以顯示出 FontSize 的數值,這又就可以透過一個綁定就完成需要 @Input() 與 @Output() 的情況。
本章中介紹了什麼最後的兩種綁定模式,可以使用 attribute binding 對沒有 property 的 HTML 元件動態綁定,可以使用 class binding 對一個 HTML 元件綁定一個或多個 CSS class,可以使用 style binding 對一個 HTML 元件綁定一個或多個樣式,而 CSS class 與 style 的綁定優先級遵守越具體其優先級就越高的概念。
第二種介紹了 Two-way binding,如何透過一種綁定就達成 property binding 與 event binding,要注意的是如果要讓 Two-way binding 成功作用必須將 @Output() 麼名稱設定為 @Input() 的名稱加上Change。
下一篇將會介紹 Template variables,他可以讓你在 template 的任意一處使用被標記過的 HTML 元件的數據,詳細的內容就留到明天在介紹吧,那我們明天見。
