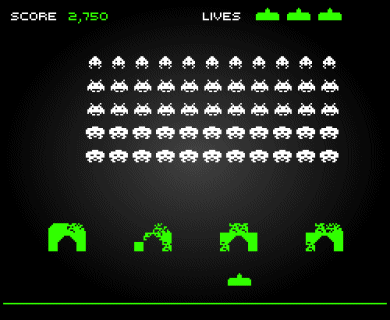
接下來我們要開始設計關卡,
小蜜蜂的關卡很單純,但是背後的心理卻很深奧。
不過卡比目前只需要完成基本的就行了,
也就是將 Enemy 的陣型排列出來。
首先我們要先調整一下畫面的大小,
這邊按照原作的大小比例下去調整。
-- src/main.ts
const app = new Application({
+ width: 224,
+ height: 256,
+ resolution: 3,
});
接著我們調整一下 Enemy,
我們需要這邊的 types 方便我們在其他腳本中使用。
-- src/characters/Enemy.ts
export type EnemyTypes = "squid" | "crab" | "octopus";
export type EnemyProps = {
  type: EnemyTypes;
  position: Vector;
};
接著根據原作,敵人的陣型會有 5 排,並且會以下的方式排列。

所以我們需要生成一個矩陣,
並透過這個矩陣產生相對應的 Enemy 以及提供其初始位置。
-- src/scenes/Game.ts
const grid = 16;

const points: EnemyProps[][] = [
  "squid",
  "crab",
  "crab",
  "octopus",
  "octopus",
].map((type, y) =>
  Array.from({ length: 11 }, (_, x) => ({
    type: type as EnemyTypes,
    position: { x: x * grid, y: y * grid },
  }))
);

function spawn(generate: typeof Enemy, points: EnemyProps[][]) {
  return points.map((row) => row.map(generate)).flat();
}
export default function Game(screen: Rectangle): Scene<Container> {
+ let instances: GameObject[] = [LaserCannon(screen), ...spawn(Enemy, points)];

  return {
    update(delta) {
      collisionDetect(instances.filter(canCollision).filter(canTransform));

      instances.forEach((instance) => {
        if (canControl(instance)) {
          instance.handleInput(getKeyPressed());
        }

        if (canShoot(instance) && instance.canShoot) {
          requestAnimationFrame(() => {
            instances = [...instances, instance.shoot()];
          });

          instance.canShoot = false;
        }

        if (instance.destroy) {
          requestAnimationFrame(() => {
            instances = instances.filter((_instance) => _instance !== instance);
          });

          return;
        }

        instance.update?.(delta);
      });
    },

    render(stage) {
      instances
        .filter(canRender)
        .forEach((instance) => render(stage, instance));
    },
  };
}
這樣 spawn 就完成了。

