請先確認 php.ini 的 pdo_pgsql extension 是否取消註解
並安裝 Postgresql 13.4 >>> 官方下載位置 <<<
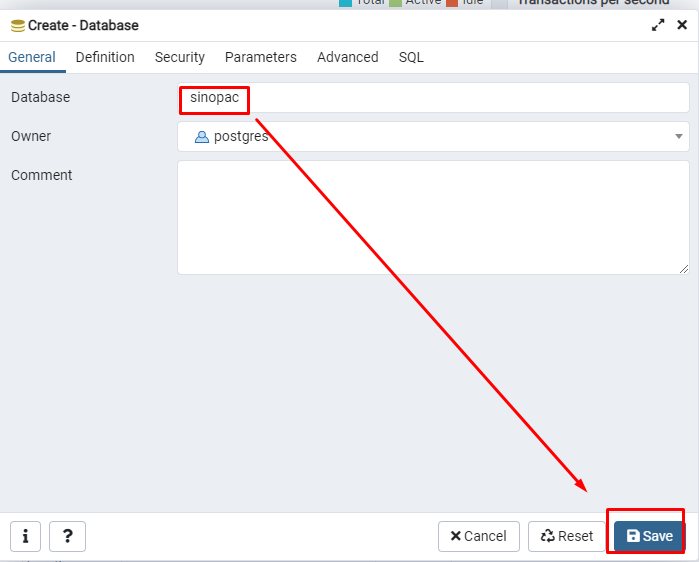
Database -> Create -> Database...,建立一個資料庫 sinopac,您也可以取自己喜歡的名稱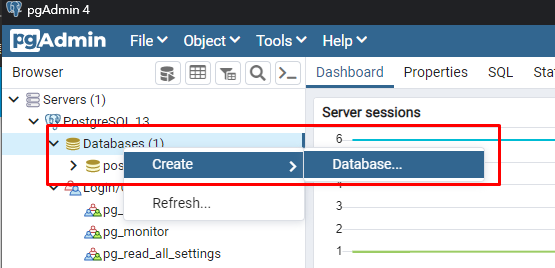
DB_CONNECTION=pgsql
DB_HOST=127.0.0.1
DB_PORT=5432
DB_DATABASE=sinopac
DB_USERNAME=postgres
DB_PASSWORD=postgres
# 連線正常會回應 Migration table created successfully.
$ php artisan migrate:install
先打個預防針,這裡的資料表結構是現在一邊打一邊想出來的,所以沒有專業的大神安排的好,單純對於這個API回應的訊息有地方可以放
一個原則,不要太複雜,10分鐘就想完的結構
建立 model 以及 migrate 檔案
$ php artisan make:model -m customer
$ php artisan make:model -m sale_order
修改 migrate 檔案,這裡定義 columns
// path: sinopac_api/database/migrations/[date]_create_customer_table.php
public function up()
{
    Schema::create('customers', function (Blueprint $table) {
        $table->id();
        $table->string('first_name', 50)->nullable(false);
        $table->string('last_name', 50);
        $table->timestamps();
    });
}

// path: sinopac_api/database/migrations/[date]_create_sale_orders_table.php
public function up()
{
    Schema::create('sale_orders', function (Blueprint $table) {
        $table->id();
        $table->foreignId('customer_id')->nullable(false);
        $table->string('order_no', 20)->nullable(false)->comment('訂單編號');
        $table->integer('total')->nullable(false)->comment('訂單總金額');
        $table->string('pay_type', 5)->nullable(false)->comment('付款方式');
        $table->dateTime('pay_datetime')->nullable(false)->comment('付款時間');
        $table->string('status', 10)->comment('訂單狀態');
        $table->date('expire_date')->comment('訂單過期日期');
        $table->string('mailing_address', 200)->nullable(false)->comment('寄送地址');
        $table->timestamps();
    });
}
執行 migrate 指令,完成後就能在資料庫看到 table
$ php artisan migrate
設定 model fillable (這一步在 migrate 前後做皆可),增加 fillable 屬性,這裡我的理解是 資料建立或更新 時,允許哪幾個欄位可以被更動
// path: sinopac_api/app/Models/customer.php
protected $fillable = [
    'first_name',
    'last_name',
];

// path: sinopac_api/app/Models/sale_order.php
protected $fillable = [
    'customer_id',
    'order_no',
    'total',
    'pay_type',
    'pay_datetime',
    'status',
    'expire_date',
    'mailing_address',
];
如果要整個 migrate 重跑,執行 fresh,會把所有 table drop,使用時請小心bash $ php artisan migrate:fresh
對於 migrate 還蠻不熟的,看了很多文章,也問了對於 laravel 有研究的同事,在這篇花了蠻大量的時間,
工作上雖有使用 laravel,不過對於 table 的操作都是下 SQL 語法,
這還真的是第一次完整使用 migrate ;D
如果有任何解釋或理解錯誤的部分,還望大神們不吝指教
明天預計會先把接收訊息的 api 寫好,明天見


 iThome鐵人賽