一、首先我們創立一個空的新專案,並且把裡面原本預設的MainActivity刪掉,並且創立另外兩個Activity,【SplashActivity】跟【AccountActivity】。
二、由於是開啟畫面,所以我們如果有ActionBar,會著實有點監介,所以我們要把它拿掉,我們先來到manifests來看。
<application
        android:allowBackup="true"
        android:icon="@mipmap/ic_launcher"
        android:label="@string/app_name"
        android:roundIcon="@mipmap/ic_launcher_round"
        android:supportsRtl="true"
        android:theme="@style/Theme.PetMatchingApp">
        <activity android:name=".ui.activity.AccountActivity">

        </activity>

        <activity android:name=".ui.activity.SplashActivity"
            android:theme="@style/Theme.AppCompat.NoActionBar">
            <intent-filter>
                <action android:name="android.intent.action.MAIN" />


            </intent-filter>
        </activity>
    </application>
★我們要確保 Splash的Activity下面有以下這一串,才代表按下app icon的,最先開啟的是SplashActivity。
<category android:name="android.intent.category.LAUNCHER" />
★加上Theme,確保沒有ActionBar,可以點進去看他的敘述,就是把ActionBar+title關掉
android:theme="@style/Theme.AppCompat.NoActionBar"
三、隱藏status欄位
接下來我們來到SplashActivity的onCreate新增以下判斷
@Suppress("DEPRECATION")
if(Build.VERSION.SDK_INT>= Build.VERSION_CODES.R){
val controller =window.insetsController
controller?.hide(WindowManager.LayoutParams.TYPE_STATUS_BAR)
}else{
    window.setFlags(WindowManager.LayoutParams.FLAG_FULLSCREEN,
    WindowManager.LayoutParams.FLAG_FULLSCREEN)
}
★由於FLAG_FULLSCREEN已經棄用了,所以我們在這邊加個判斷式,如果現在的使用者手機版本是大於等於 Api30的話,則我們用WindowInsetsController,來控制window的控制類,關於windows控制,除了可以調整狀態欄,還可以調整螢幕控制/軟鍵盤,詳細可以參考以下link
windowInsetsController文章:https://bbs.huaweicloud.com/blogs/detail/227893
window的其他參數:https://developer.android.com/reference/android/view/WindowManager.LayoutParams#fields
四、讓Splash飛一會
一樣,我們在SplashActivity裡面的onCreate,新增以下
  Handler(Looper.getMainLooper()).postDelayed(
            {
                startActivity(Intent(this@SplashActivity,AccountActivity::class.java))
                finish()
            },
        2000
        )
★接下來我們要實例化一個 Handler的類別,裡面傳入,Looper,並且用postDelayed的funtion。
我們可以注意到,postDelayed裡面有兩個參數
-Runnable:可以把它想成要做的事情,我們這邊再透過startIntent來轉換Activity。
-delayMillis:這邊則填入要延遲的毫秒數(千分之一秒)
★Intent: 我們可以透過Intent來轉換Activity或是傳送資料到其他Activity,而這次示範的是轉換Activity,參數如下
-packageContext:要從哪個Activity出發,也就是傳入當前的 activity
-第二個參數:填入要轉換的目的地Activity
五、最後別忘了要在Layout加入可愛的畫面囉!
好的,接下來我們要找可愛的照片,但是無奈我不會製圖。所以我推薦大家我一個常去下載免費PNG素材的網站 https://zh.pngtree.com/pay/pay-event-page?b=62
你可以選擇成為尊榮不凡的VIP,但我沒有,因為我是免費仔,所以有下載限制跟要註明著作者。
而因為我們要創造關於寵物的App,於是我找到下面的圖片。
小狗 PNG由588ku设计 Pngtree.com
之後把檔案加入到values→res→drawable,並且新增一個叫做 dimen的xml。
dimen顧名思義就是尺寸,可以透過在dimen設定尺寸,並且透過呼叫的方式達到統一/重用的好處。
我就直接貼code囉
<resources>

    <dimen name="splash_title_textSize">40sp</dimen>
    <dimen name="splash_title_marginBottom">10dp</dimen>
    <dimen name="splash_logo_weight">200dp</dimen>
    <dimen name="splash_logo_height">180dp</dimen>

</resources>
然後在values→res → string 一樣新增 title
<string name="app_name_chinese">寵物約散</string>
然後再color 新增
<color name="grey_light">#E1E1E1</color>
layout Code 直接附上
<?xml version="1.0" encoding="utf-8"?>
<androidx.constraintlayout.widget.ConstraintLayout xmlns:android="http://schemas.android.com/apk/res/android"
    xmlns:app="http://schemas.android.com/apk/res-auto"
    xmlns:tools="http://schemas.android.com/tools"
    android:layout_width="match_parent"
    android:layout_height="match_parent"
    android:background="@color/white"
    tools:context=".ui.activity.SplashActivity">


    <TextView
        android:id="@+id/tv_app_name"
        android:layout_width="wrap_content"
        android:layout_height="wrap_content"
        android:text="@string/app_name_chinese"
        android:textSize="@dimen/splash_title_textSize"
        android:textStyle="bold"
        android:textColor="@color/grey_light"
        app:layout_constraintBottom_toTopOf="@id/iv_app_logo"
        app:layout_constraintStart_toStartOf="parent"
        app:layout_constraintEnd_toEndOf="parent"
        android:layout_marginBottom="@dimen/splash_title_marginBottom">

    </TextView>


    <ImageView
        android:id="@+id/iv_app_logo"
        android:layout_width="@dimen/splash_logo_weight"
        android:layout_height="@dimen/splash_logo_height"
        android:src="@drawable/icon_dog"
        app:layout_constraintBottom_toBottomOf="parent"
        app:layout_constraintEnd_toEndOf="parent"
        app:layout_constraintStart_toStartOf="parent"
        app:layout_constraintTop_toTopOf="parent"/>


</androidx.constraintlayout.widget.ConstraintLayout>
一、我們打開 File→New→Image Asset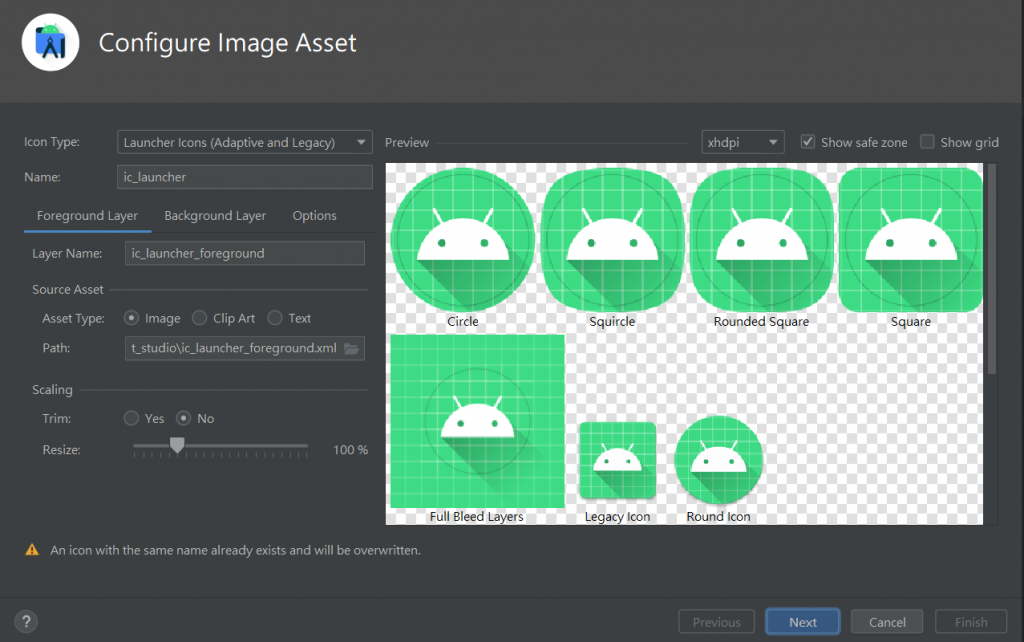
二、在 Foreground Layer,的地方 Source Asset Type的地方選擇 Image,並且把剛剛的點選,path,把剛剛的狗狗圖片位置指定進去。
★Asset Type的 Chip Art代表用 Android 內建的 icon,Text則代表用文字當作icon。
★下面的Scaling,可以調整size。
三、在 Background Layer,調整背景顏色,我們把背景顏色改成符合寵物的高雄暖南綠-63C7B3,按Next之後,就完成啦。
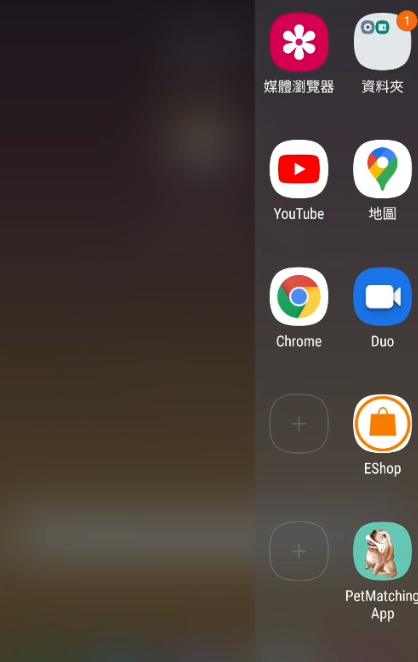
好的,如果不滿意字型的話,可以去網路上下載字型呦,但是切記要注意使用權限喔!!
這次筆者使用jf 字型是來自 open粉圓所下載的 https://justfont.com/huninn/
非常符合尊爵不凡的可愛氣質APP,那廢話就不多說了
一、把剛剛下載的字型加入到專案
New→Folder→Asset 再把剛剛的字型丟進去該資料夾
二、 創立一個 Custom TextView class
class JFTextView(context: Context,attrs: AttributeSet): AppCompatTextView(context, attrs) {

init{
applyFont()
    }


//這一行傳入剛剛放在asset的字型
private fun applyFont(){
val typeface: Typeface = Typeface.createFromAsset(context.assets,"jf-openhuninn-1.1.ttf")
setTypeface(typeface)
    }
}
★後面繼承的類,會因為要客製化的view不一樣,而繼承不同的類,例如EdText就會是繼承AppCompatEditText,Button就是繼承AppCompatButton。
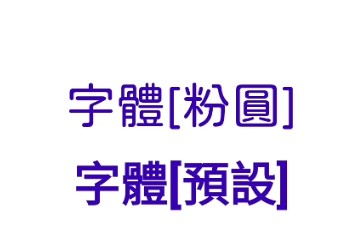
三、建立好類別後,就可以直接在layout引用啦
接下來到activity.splash.xml 把原本的TextView修改剛剛定義的class。
<com.example.petsmatchingapp.ui.JFTextView
    android:id="@+id/tv_app_name1"
    android:layout_width="wrap_content"
    android:layout_height="wrap_content"
    android:text="字體[粉圓]"
    android:textSize="@dimen/splash_title_textSize"
    android:textStyle="bold"
    android:textColor="@color/design_default_color_primary_dark"
    app:layout_constraintBottom_toTopOf="@id/tv_app_name"
    app:layout_constraintStart_toStartOf="parent"
    app:layout_constraintEnd_toEndOf="parent"
    android:layout_marginBottom="@dimen/splash_title_marginBottom"/>
大功告成!!
那就明天見啦~ へけ